
本文介绍使用 SpringBoot+Nginx 实现视频在线点播,本人所发内容及涉及源码,均为亲手所撸,如总结内容有误,欢迎指出。
视频点播方案如下:
1.播放器通过 http协议从http服务器上下载视频文件进行播放
问题:必须等到视频下载完才可以播放,不支持快进到某个时间点进行播放
2.播放器通过rtmp协议连接媒体服务器以实时流方式播放视频
使用rtmp协议需要架设媒体服务器,造价高,对于直播多采用此方案。
3.播放器使用HLS协议连接http服务器(Nginx、Apache等)实现近实时流方式播放视频
HLS协议规定:基于Http协议,视频封装格式为ts,视频的编码格式为H264,音频编码格式为MP3、AAC或者AC-3
什么是HLS?
HLS的工作方式是:将视频拆分成若干ts格式的小文件,通过m3u8格式的索引文件对这些ts小文件建立索引。一般10秒一个ts文件,播放器连接m3u8文件播放,当快进时通过m3u8即可找到对应的索引文件,并去下载对应的ts文件,从而实现快进、快退以近实时的方式播放视频。
IOS、Android设备、及各大浏览器都支持HLS协议。
今天我们使用SpringBoot+Nginx实现一下视频在线点播。
1、ffmpeg的使用
FFmpeg被许多开源项目采用,QQ影音、暴风影音、VLC等。
下载:FFmpeg https://www.ffmpeg.org/download.html#build-windows
将安装们目录配置于环境变量之中:
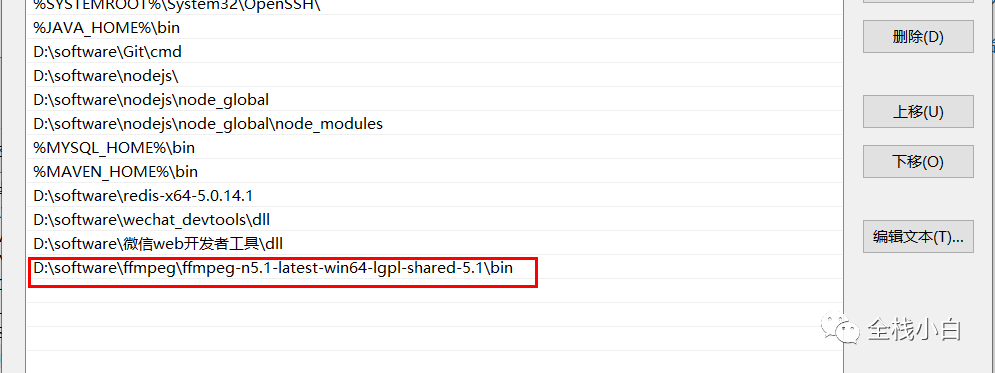

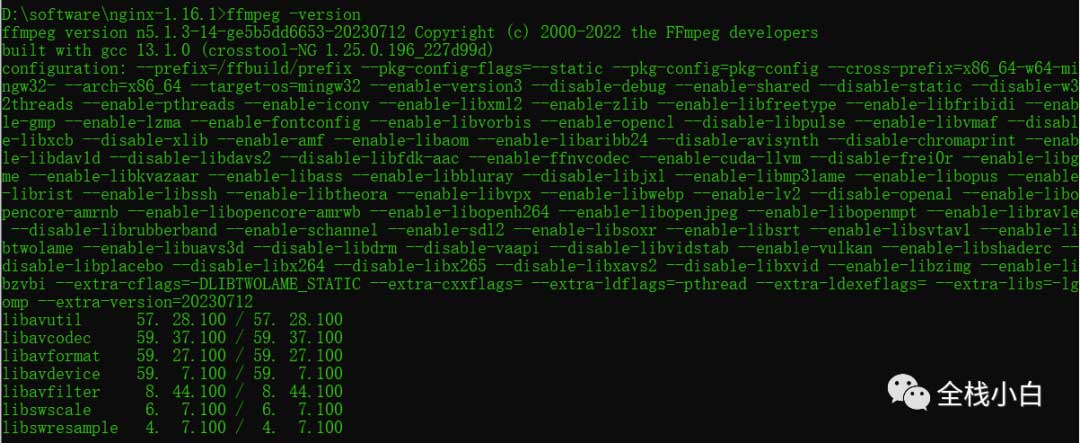
检测是否安装成功:
生成m3u8/ts文件
使用ffmpeg生成 m3u8的步骤如下:
第一步:先将avi视频转成mp4
ffmpeg.exe -i lucene.avi -c:v libx264 -s 1280x720 -pix_fmt yuv420p -b:a 63k -b:v 753k -r 18 .\lucene.mp4下面把各参数意思大概讲讲,大概了解意思即可,不再此展开流媒体专业知识的讲解。
-c:v 视频编码为x264,x264编码是H264的一种开源编码格式。
-s 设置分辨率
-pix_fmt yuv420p:设置像素采样方式,主流的采样方式有三种,YUV4:4:4,YUV4:2:2,YUV4:2:0,它的作用是根据采样方式来从码流中还原每个像素点的YUV(亮度信息与色彩信息)值。
-b 设置码率,-b:a和-b:v分别表示音频的码率和视频的码率,-b表示音频加视频的总码率。码率对一个视频质量有很大的作用。
-r:帧率,表示每秒更新图像画面的次数,通常大于24肉眼就没有连贯与停顿的感觉了。
第二步:将mp4生成m3u8
ffmpeg -i F:test\test.mp4 -c:v copy -c:a copy -f ssegment -segment_format mpegts -segment_list F:\m3u8\hls\test.m3u8 -segment_time 10 F:\m3u8\hls\test%05d.ts-hls_time 设置每片的长度,单位为秒
-hls_list_size n: 保存的分片的数量,设置为0表示保存所有分片
-hls_segment_filename :段文件的名称,%05d表示5位数字
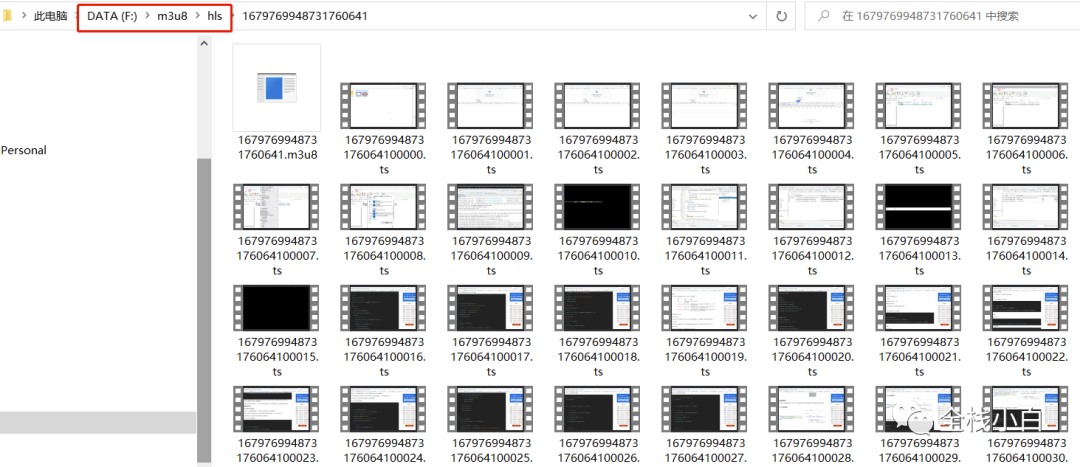
生成的效果是:将test.mp4视频文件每10秒生成一个ts文件,最后生成一个m3u8文件,m3u8文件是ts的索引文件。
使用VLC打开m3u8文件,测试播放效果,VLC 是一款自由、开源的跨平台多媒体播放器及框架,可播放大多数多媒体文件,以及 DVD、音频 CD、VCD 及各类流媒体协议。
m3u8转MP4文件
ffmpeg -i F:\m3u8\hls\1679771418348863490\1679771418348863490.m3u8 -c copy aaaa.mp42、Java使用ffmpeg生成m3u8
file:
  upload-path: "F:\\movie_online"
  ffmpeg-path: D:\\software\\ffmpeg\\ffmpeg-n5.1-latest-win64-lgpl-shared-5.1\\bin\\ffmpeg.exe
  target-path: "F:\\m3u8\\hls\\"
代码
FileHandleUtil.java
@Component
public class FileHandleUtil {

    @Value("${file.upload-path}")
    private String filePath;

    @Value("${file.target-path}")
    private String targetPath;

    @Value("${file.ffmpeg-path}")
    private String ffmpegPath;
    // originFile  文件全路径   fileName   文件名
    public void mp4TranM3u8Ts(String originFile, String fileName){
        File file = new File(originFile);
        if (!file.exists()) {
            throw new RuntimeException("源文件不存在");
        }
        File targetFile = new File(targetPath + fileName);
        if (!targetFile.exists()) {
            targetFile.mkdir();
        }
        String output = targetPath + fileName + File.separator + fileName + ".m3u8";
        List<String> command = new ArrayList<>();
        command.add(ffmpegPath);
        command.add("-i");
        command.add(originFile);
        command.add("-c:v");
        command.add("copy");
        command.add("-c:a");
        command.add("copy");
        command.add("-f");
        command.add("ssegment");
        command.add("-segment_format");
        command.add("mpegts");
        command.add("-segment_list");
        command.add(output);
        command.add("-segment_time");
        command.add("10");
        String ts = targetPath + fileName + File.separator + fileName + "%05d.ts";
        command.add(ts);
        ProcessUtil.execute(command);
    }
}
ProcessUtil.java
public class ProcessUtil {
    public static String execute(List<String> command) {
        StringBuffer inputStringBuffer = new StringBuffer();
        StringBuffer errorStringBuffer = new StringBuffer();
        try {
            ProcessBuilder builder = new ProcessBuilder(command);
            Process process = builder.start();
            System.out.println("============inputStream============");
            // 处理InputStream
            Thread t1 = new Thread(() -> {
                InputStream input = null;
                InputStreamReader reader = null;
                BufferedReader buffer = null;

                try {
                    input = process.getInputStream();
                    reader = new InputStreamReader(input);
                    buffer = new BufferedReader(reader);
                    String inputLine = "";
                    while ((inputLine = buffer.readLine()) != null) {
                        System.out.println(inputLine);
                        inputStringBuffer.append(inputLine);
                    }
                    //退出循环后表示结束流
                    System.out.println("===》》退出循环后表示结束流");
                } catch (IOException e) {
                    e.printStackTrace();
                } finally {
                    try {
                        if (buffer != null) {
                            buffer.close();
                        }
                        if (reader != null) {
                            reader.close();
                        }
                        if (input != null) {
                            input.close();
                        }
                    } catch (IOException e) {
                        e.printStackTrace();
                    }
                }
            });
            t1.setName("deviceName");
            t1.start();

            System.out.println("============errorStream============");
            // 处理ErrorStream
            new Thread(() -> {
                InputStream input = null;
                InputStreamReader reader = null;
                BufferedReader buffer = null;
                try {
                    input = process.getErrorStream();
                    reader = new InputStreamReader(input);
                    buffer = new BufferedReader(reader);
                    String errorLine = "";
                    while ((errorLine = buffer.readLine()) != null) {
                        System.out.println(errorLine);
                        errorStringBuffer.append(errorLine);
                    }
                } catch (IOException e) {
                    e.printStackTrace();
                } finally {
                    try {
                        if (buffer != null) {
                            buffer.close();
                        }
                        if (reader != null) {
                            reader.close();
                        }
                        if (input != null) {
                            input.close();
                        }
                    } catch (IOException e) {
                        e.printStackTrace();
                    }
                }
            }).start();

            /**
             * 只会存在一个输入流返回
             */
            if (inputStringBuffer != null) {
                return inputStringBuffer.toString();
            }
            if (errorStringBuffer != null) {
                return errorStringBuffer.toString();
            }

        } catch (Exception e) {
            e.printStackTrace();
            return null;
        }
        return null;
    }
}
文件上传部分省略了,在文件上传后,使用上述工具类将视频转为m3u8/ts文件,保存在配置好的F:\m3u8\hls\目录即可
3、Nginx文件服务器配置
server {
        listen       80;
        server_name  localhost;
	    charset utf-8;

        location ^~ /hls/ {
            add_header Access-Control-Allow-Origin *;
            add_header Access-Control-Allow-Headers X-Requested-With;
            add_header Access-Control-Allow-Methods GET,POST,PUT,DELETE,OPTIONS;

            types {
                application/vnd.apple.mpegurl m3u8;
                video/mp2t ts;
            }
            alias  F:/m3u8/hls/;
            expires -1;
            add_header Cache-Control no-cache;
        }
    }
文件夹目录
4、H5代码
需要使用两个库,可在cdn下载,相关资料也会上传群文件
<!DOCTYPE html>
<html lang="en">
<head>
<meta charset="UTF-8">
<title>测试视频播放</title>
<script type="text/javascript" src="video-6.7.3.js"></script>
<script type="text/javascript" src="videojs-contrib-hls-5.14.1.min.js"></script>
<link href="video.js_6.7.3.min.css" rel="stylesheet" type="text/css"/>
</head>
<body>
<video id="example-video" width="800" height="600" controls poster="http://127.0.0.1:8888/hls/add.png" class="video-js vjs-default-skin vjs-big-play-centered">
<source src="http://127.0.0.1/hls/1679771414267805698/1679771414267805698.m3u8" type="application/x-mpegURL">
</video>
<input type="button" onclick="switchvideo()" value="switch"/>
<script type="text/javascript">
var player = videojs('example-video');
function switchvideo() {
player.src({
src: 'http://127.0.0.1/hls/1679769948731760641/1679769948731760641.m3u8',
type: 'application/x-mpegURL',
withCredentials: true
})
player.play();
}
</script>
</body>
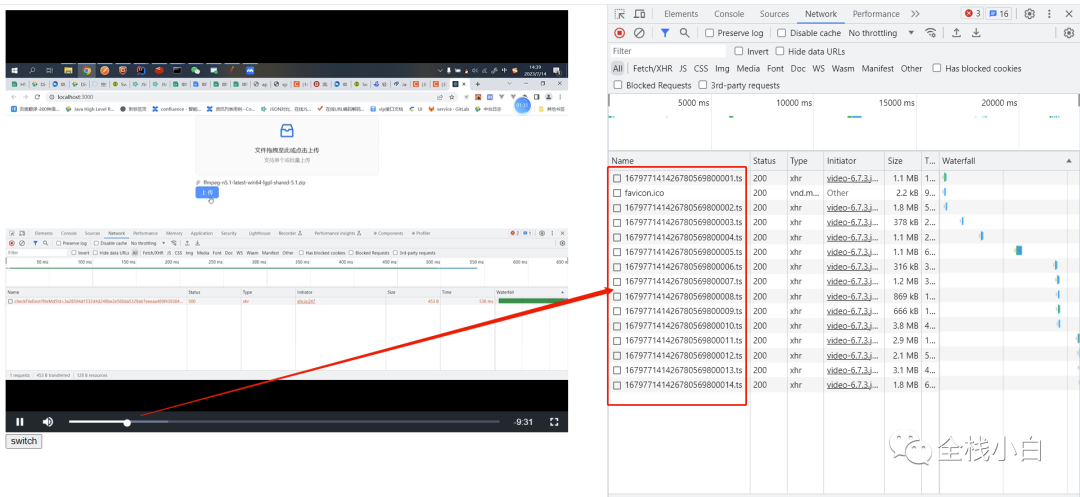
</html>5、测试
在nginx安装目录下启动nginx,打开页面:
作者:全栈小白
原文:https://mp.weixin.qq.com/s/3g_b-1-7D37g1Vyk22shng
版权声明:本文内容转自互联网,本文观点仅代表作者本人。本站仅提供信息存储空间服务,所有权归原作者所有。如发现本站有涉嫌抄袭侵权/违法违规的内容, 请发送邮件至1393616908@qq.com 举报,一经查实,本站将立刻删除。