
本文从开发者的角度深入解析了基于netty的通信模块, 并通过简易扩展实现微服务化通信工具雏形, 适合于想要了解netty通信框架的使用案例, 想了解中间件通信模块设计, 以及微服务通信底层架构的同学。希望此文能给大家带来通信模块架构灵感。
01 概述
网络通信是很常见的需求,对于传统web网页工具短连接场景,浏览器和服务器交互,常见为浏览器通过http协议请求Tomcat服务器;
对于长连接场景, 比如即时通讯,或中间件等实时性要求高的场景,一般采用tcp协议的长连接进行全双工实时通信;
对于java开发者来说,使用原生socket进行tcp开发,效率是比较低的,稳定性可靠性等也不好保障,一般选择网络通信框架netty加快开发效率。
对于上层应用来说,netty的标准使用方式依然比较繁琐,未能很好的适配一些业务使用场景,比如rocketMq根据netty包装了一层业务框架:通信模块remoting。
该模块可用性高,稳定性好,易扩展,经过了中间件产品长期高并发的质量验证, 值得信任,并广泛用于其他点对点(指定ip)通信场景,如dleger(raft的java实现)。
有相关通信需求的同学也都可以参考该通信模块,相信有很多的灵感,或直接使用该通信模块,带来开发效率的提升。
本文从一个普通java开发者的视角,去解析该通信模块
- 如何用 – 常见使用方式
- 实现原理 – 数据流转链路
- 设计关键点 – 为什么要如此设计
- 模块升级 – 实现简易的微服务化通信工具
本文代码版本:
<parent>
  <groupId>org.apache.rocketmq</groupId>
  <artifactId>rocketmq-remoting</artifactId>
  <version>5.0.1-PREVIEW-SNAPSHOT</version>
</parent>
02 如何用
编写简单易懂的测试demo,实现server client的交互流程。
简单示例 协议code 为写死 0 1 5 9,输入测试信息,输出使用sysout。
启动server 注册服务监听
import com.alibaba.fastjson.JSON;
import io.netty.channel.ChannelHandlerContext;
import org.apache.rocketmq.remoting.RemotingServer;
import org.apache.rocketmq.remoting.netty.NettyRemotingServer;
import org.apache.rocketmq.remoting.netty.NettyRequestProcessor;
import org.apache.rocketmq.remoting.netty.NettyServerConfig;
import org.apache.rocketmq.remoting.protocol.RemotingCommand;
import java.util.concurrent.ArrayBlockingQueue;
import java.util.concurrent.ExecutorService;
import java.util.concurrent.ThreadPoolExecutor;
import java.util.concurrent.TimeUnit;
public class Server {
    public static void main(String[] args) throws Exception {
        NettyServerConfig nettyServerConfig = new NettyServerConfig();
        // 配置端口
        nettyServerConfig.setListenPort(8888);
        // 配置线程数 netty workGroup 线程池 处理io等低耗时
        nettyServerConfig.setServerSelectorThreads(2);
        // 配置线程数 netty eventGroup 线程池 处理自定义hander/长耗时等
        nettyServerConfig.setServerWorkerThreads(8);
        NettyRemotingServer remotingServer = new NettyRemotingServer(nettyServerConfig, null);

        // 支持共用或独立的业务处理线程池
        ExecutorService poolA = new ThreadPoolExecutor(4, 4, 0, TimeUnit.SECONDS, new ArrayBlockingQueue<>(1024));
        ExecutorService poolB = new ThreadPoolExecutor(4, 4, 0, TimeUnit.SECONDS, new ArrayBlockingQueue<>(1024));

        // 业务处理器
        NettyRequestProcessor processA = new NettyRequestProcessor() {
            @Override
            public RemotingCommand processRequest(ChannelHandlerContext ctx, RemotingCommand request) throws Exception {
                System.out.println("received from client, remark:" + request.getRemark() + ", coe:" + request.getCode());
                RemotingCommand response = RemotingCommand.createResponseCommand(0, "server");
                switch (request.getCode()) {
                    case 0:
                        response.setBody(new String("hello sync 0").getBytes());
                    case 1:
                        response.setBody(new String("hello sync 1").getBytes());
                    default:
                        break;
                }
                return response;
            }
            @Override
            public boolean rejectRequest() {
                return false;
            }
        };
        // 业务处理器
        NettyRequestProcessor processB = new NettyRequestProcessor(){
            @Override
            public RemotingCommand processRequest(ChannelHandlerContext ctx, RemotingCommand request) throws Exception {
                System.out.println("received from client, remark:" + request.getRemark() + ", coe:" + request.getCode());
                RemotingCommand response = RemotingCommand.createResponseCommand(0, "server");
                switch (request.getCode()) {
                    case 9:
                        response.setBody(new String("hello sync 9").getBytes());
                    default:
                        break;
                }
                return response;
            }
            @Override
            public boolean rejectRequest() {
                return false;
            }
        };
        // 注册 协议 - 对应的处理器, 类似web url 路由到对应的class
        remotingServer.registerProcessor(0, processA, poolA);
        remotingServer.registerProcessor(1, processA, poolA);
        remotingServer.registerProcessor(9, processB, poolB);

        remotingServer.start();

        System.out.println("start ok " + JSON.toJSONString(nettyServerConfig));
        System.in.read();
    }
}
启动client 发起调用
import io.netty.channel.ChannelHandlerContext;
import org.apache.rocketmq.remoting.InvokeCallback;
import org.apache.rocketmq.remoting.netty.NettyClientConfig;
import org.apache.rocketmq.remoting.netty.NettyRemotingClient;
import org.apache.rocketmq.remoting.netty.NettyRequestProcessor;
import org.apache.rocketmq.remoting.netty.ResponseFuture;
import org.apache.rocketmq.remoting.protocol.RemotingCommand;
import java.util.concurrent.ArrayBlockingQueue;
import java.util.concurrent.ExecutorService;
import java.util.concurrent.ThreadPoolExecutor;
import java.util.concurrent.TimeUnit;
public class Client {
    public static void main(String[] args) throws Exception {
        NettyClientConfig nettyServerConfig = new NettyClientConfig();
        // 配置线程数 netty eventGroup 线程池 处理自定义hander/耗时长等
        nettyServerConfig.setClientWorkerThreads(8);
        NettyRemotingClient remotingClient = new NettyRemotingClient(nettyServerConfig, null);

        // 支持共用或独立的业务处理线程池
        ExecutorService poolA = new ThreadPoolExecutor(4, 4, 0, TimeUnit.SECONDS, new ArrayBlockingQueue<>(1024));

        // 监听服务端发过来的请求
        remotingClient.registerProcessor(5, new NettyRequestProcessor() {
            @Override
            public RemotingCommand processRequest(ChannelHandlerContext ctx, RemotingCommand request) throws Exception {
                System.out.println("receive from server : " + request.getCode());
                return null;
            }
            @Override
            public boolean rejectRequest() {
                return false;
            }
        }, poolA);

        remotingClient.start();

        // 主动发起远程调用
        {
            // 同步调用
            RemotingCommand request = RemotingCommand.createRequestCommand(0, null);
            request.setRemark("sync");
            RemotingCommand response = remotingClient.invokeSync("127.0.0.1:8888", request, 30 * 1000L);
            System.out.println("call sync ok remark:" + response.getRemark() + " body:" + new String(response.getBody()));
        }
        {
            // 异步调用
            RemotingCommand request = RemotingCommand.createRequestCommand(1, null);
            request.setRemark("async");
            remotingClient.invokeAsync("127.0.0.1:8888", request, 30 * 1000L, new InvokeCallback() {
                @Override
                public void operationComplete(ResponseFuture responseFuture) {
                    RemotingCommand response = responseFuture.getResponseCommand();
                    System.out.println("call async ok remark:" + response.getRemark() + " body:" + new String(response.getBody()));
                }
            });
        }
        {
            // 单向调用
            RemotingCommand request = RemotingCommand.createRequestCommand(9, null);
            request.setRemark("oneway");
            remotingClient.invokeOneway("127.0.0.1:8888", request, 30 * 1000L);
            System.out.println("call oneway ok ");
        }
        System.in.read();
    }
}
该点对点调用,是需要手动指定目标服务器的ip和端口的,不同于hsf拥有注册中心进行协调撮合提供目标ip。
日志输出
Connected to the target VM, address: '127.0.0.1:57381', transport: 'socket'
start ok {"listenPort":8888,"serverAsyncSemaphoreValue":64,"serverCallbackExecutorThreads":0,"serverChannelMaxIdleTimeSeconds":120,"serverOnewaySemaphoreValue":256,"serverPooledByteBufAllocatorEnable":true,"serverSelectorThreads":2,"serverSocketRcvBufSize":65535,"serverSocketSndBufSize":65535,"serverWorkerThreads":8,"useEpollNativeSelector":false}
received from client, remark:sync, coe:0
received from client, remark:async, coe:1
received from client, remark:oneway, coe:9
Connected to the target VM, address: '127.0.0.1:57385', transport: 'socket'
call sync ok remark:server body:hello sync 1
call oneway ok
call async ok remark:server body:hello sync 103 实现原理
关于netty如何封装java基础nio socket不做展开。这里分析通信模块是如何封装netty,扩展调用协议规范的部分,重点描述其中关键的设计要点。
server 启动监听请求
作为服务端,需绑定端口,监听请求,这里采用标准netty服务端模式。
remotingServer.start();
    @Override
    public void start() {
        ...
        ServerBootstrap childHandler =
            this.serverBootstrap.group(this.eventLoopGroupBoss, this.eventLoopGroupSelector)
                .channel(useEpoll() ? EpollServerSocketChannel.class : NioServerSocketChannel.class)
                .option(ChannelOption.SO_BACKLOG, 1024)
                .option(ChannelOption.SO_REUSEADDR, true)
                .option(ChannelOption.SO_KEEPALIVE, false)
                .childOption(ChannelOption.TCP_NODELAY, true)
                .childOption(ChannelOption.SO_SNDBUF, nettyServerConfig.getServerSocketSndBufSize())
                .childOption(ChannelOption.SO_RCVBUF, nettyServerConfig.getServerSocketRcvBufSize())
                .localAddress(new InetSocketAddress(this.nettyServerConfig.getListenPort()))
                .childHandler(new ChannelInitializer<SocketChannel>() {
                    @Override
                    public void initChannel(SocketChannel ch) throws Exception {
ch.pipeline()
.addLast(defaultEventExecutorGroup, HANDSHAKE_HANDLER_NAME, handshakeHandler)
.addLast(defaultEventExecutorGroup,
    encoder,
    new NettyDecoder(),
    new IdleStateHandler(0, 0, nettyServerConfig.getServerChannelMaxIdleTimeSeconds()),
    connectionManageHandler,
    serverHandler
);
                    }
                });
        ...
        ChannelFuture sync = this.serverBootstrap.bind().sync();
        InetSocketAddress addr = (InetSocketAddress) sync.channel().localAddress();
        ...
    }
关注涉及几个线程池的地方:
- bossGroup -> eventLoopGroupBoss 固定线程数1
- workerGroup -> eventLoopGroupSelector 若linux采用epoll实现 否则使用nio实现, 线程数可配置
- eventGroup -> defaultEventExecutorGroup 普通实现的 handler 工作线程池, 线程数可配置
另外就是传统艺能:心跳, 解码器 NettyEncoder,编码器 NettyDecoder,连接管理器 connectionManageHandler,和最终的业务处理器 serverHandler
server 注册业务处理器
业务线程池配置
请求协议code关联业务处理器
        // 支持共用或独立的业务处理线程池
        ExecutorService poolA = new ThreadPoolExecutor(4, 4, 0, TimeUnit.SECONDS, new ArrayBlockingQueue<>(1024));
        ExecutorService poolB = new ThreadPoolExecutor(4, 4, 0, TimeUnit.SECONDS, new ArrayBlockingQueue<>(1024));

        // 业务处理器
        NettyRequestProcessor processA = new NettyRequestProcessor() {
            @Override
            public RemotingCommand processRequest(ChannelHandlerContext ctx, RemotingCommand request) throws Exception {
                System.out.println("received from client, remark:" + request.getRemark() + ", coe:" + request.getCode());
                RemotingCommand response = RemotingCommand.createResponseCommand(0, "server");
                switch (request.getCode()) {
                    case 0:
                        response.setBody(new String("hello sync 0").getBytes());
                    case 1:
                        response.setBody(new String("hello sync 1").getBytes());
                    default:
                        break;
                }
                return response;
            }
            @Override
            public boolean rejectRequest() {
                return false;
            }
        };
        // 业务处理器
        NettyRequestProcessor processB = new NettyRequestProcessor(){
            @Override
            public RemotingCommand processRequest(ChannelHandlerContext ctx, RemotingCommand request) throws Exception {
                System.out.println("received from client, remark:" + request.getRemark() + ", coe:" + request.getCode());
                RemotingCommand response = RemotingCommand.createResponseCommand(0, "server");
                switch (request.getCode()) {
                    case 9:
                        response.setBody(new String("hello sync 9").getBytes());
                    default:
                        break;
                }
                return response;
            }
            @Override
            public boolean rejectRequest() {
                return false;
            }
        };
        // 注册 协议 - 对应的处理器, 类似web url 路由到对应的class
        remotingServer.registerProcessor(0, processA, poolA);
        remotingServer.registerProcessor(1, processA, poolA);
        remotingServer.registerProcessor(9, processB, poolB);
不同业务独立线程池的必要性
在复杂业务场景中,比如商品管理链路,订单交易链路,将所有的请求堆积在一个线程池中,快请求和慢请求公用一个赛道,无法避免资源分配不均问题通信模块设计为可手动配置每个业务的处理线程池
注册路由和线程池关系
    @Override
    public void registerProcessor(int requestCode, NettyRequestProcessor processor, ExecutorService executor) {
        ExecutorService executorThis = executor;
        if (null == executor) {
            executorThis = this.publicExecutor;
        }

        Pair<NettyRequestProcessor, ExecutorService> pair = new Pair<NettyRequestProcessor, ExecutorService>(processor, executorThis);
        this.processorTable.put(requestCode, pair);
    }
建立 code – processor – pool 的三者映射关系,在后续收到请求后,可查找注册关系进行路由唤起processor
client 启动 发起请求
        NettyRemotingClient remotingClient = new NettyRemotingClient(nettyServerConfig, null);

        remotingClient.start();

// 主动发起远程调用
        {
            // 同步调用
            RemotingCommand request = RemotingCommand.createRequestCommand(0, null);
            request.setRemark("sync");
            RemotingCommand response = remotingClient.invokeSync("127.0.0.1:8888", request, 30 * 1000L);
            System.out.println("call sync ok remark:" + response.getRemark() + " body:" + new String(response.getBody()));
        }
        {
            // 异步调用
            RemotingCommand request = RemotingCommand.createRequestCommand(1, null);
            request.setRemark("async");
            remotingClient.invokeAsync("127.0.0.1:8888", request, 30 * 1000L, new InvokeCallback() {
                @Override
                public void operationComplete(ResponseFuture responseFuture) {
                    RemotingCommand response = responseFuture.getResponseCommand();
                    System.out.println("call async ok remark:" + response.getRemark() + " body:" + new String(response.getBody()));
                }
            });
        }
        {
            // 单向调用
            RemotingCommand request = RemotingCommand.createRequestCommand(9, null);
            request.setRemark("oneway");
            remotingClient.invokeOneway("127.0.0.1:8888", request, 30 * 1000L);
            System.out.println("call oneway ok ");
        }
启动客户端client后,即处于长连接状态,双向通信及时性有保障。
三种调用模式
作为通信组件,需要适配多种调用场景,同步异步调用已是基本操作,oneway用于不关心是否返回的场景。
试想一下,在全双工双向异步通信的背景下,如何能像http一样实现同步调用,发出一个请求,收到一个请求后怎么跟前面发出的请求关联起来,又如何实现异步等待转为同步响应。
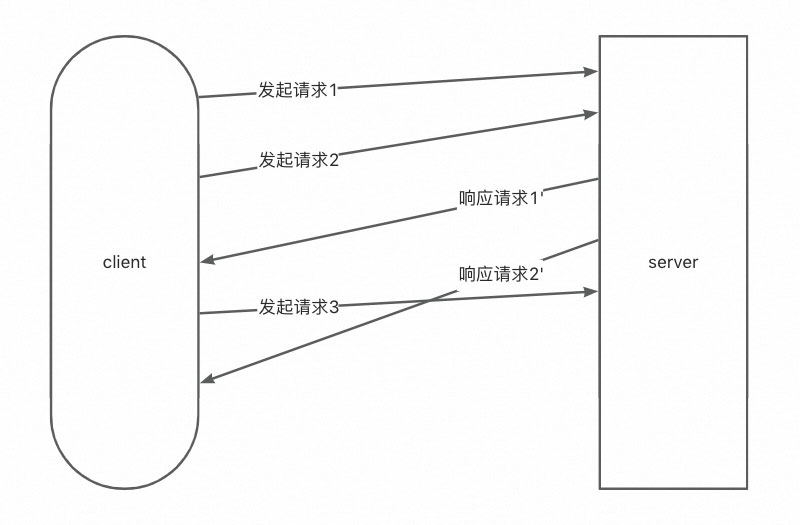

- 同步调用
发起请求
   public RemotingCommand invokeSyncImpl(final Channel channel, final RemotingCommand request, final long timeoutMillis)
        throws InterruptedException, RemotingSendRequestException, RemotingTimeoutException {
        // 唯一id
        final int opaque = request.getOpaque();
    ...
        final ResponseFuture responseFuture = new ResponseFuture(channel, opaque, timeoutMillis, null, null);
        // 把当前请求记录到待响应table中
        this.responseTable.put(opaque, responseFuture);
        final SocketAddress addr = channel.remoteAddress();
        channel.writeAndFlush(request).addListener(new ChannelFutureListener() {
            @Override
            public void operationComplete(ChannelFuture f) throws Exception {
                if (f.isSuccess()) {
                    //标记为写入成功
                    responseFuture.setSendRequestOK(true);
                    return;
                } else {
                    responseFuture.setSendRequestOK(false);
                }
                // 写入异常结果 并唤起wait的线程
                responseTable.remove(opaque);
                responseFuture.setCause(f.cause());
                responseFuture.putResponse(null);
                public void putResponse(final RemotingCommand responseCommand) {
                    this.responseCommand = responseCommand;
                    this.countDownLatch.countDown();
                }
                log.warn("send a request command to channel <" + addr + "> failed.");
            }
        });
        // 同步等待结果
        RemotingCommand responseCommand = responseFuture.waitResponse(timeoutMillis);
        public RemotingCommand waitResponse(final long timeoutMillis) throws InterruptedException {
            this.countDownLatch.await(timeoutMillis, TimeUnit.MILLISECONDS);
            return this.responseCommand;
        }
      ...
    }
关键设计点:每一个请求request,都分配了一个 client唯一自增的id (request.getOpaque(); requestId.getAndIncrement())。
把id和上下文存储到请求待响应table中:发送请求后(写入channel),线程等待结果响应 responseFuture.waitResponse,利用countDownLatch等待结果。
- 异步调用
发起请求
    public void invokeAsyncImpl(final Channel channel, final RemotingCommand request, final long timeoutMillis,final InvokeCallback invokeCallback)
        // 唯一id
    final int opaque = request.getOpaque();
    ...
        final ResponseFuture responseFuture = new ResponseFuture(channel, opaque, timeoutMillis - costTime, invokeCallback, once);
        // 把当前请求记录到待响应table中
        this.responseTable.put(opaque, responseFuture);
        ...
        channel.writeAndFlush(request).addListener(new ChannelFutureListener() {
            @Override
            public void operationComplete(ChannelFuture f) throws Exception {
                if (f.isSuccess()) {
                    //标记为写入成功
                    responseFuture.setSendRequestOK(true);
                    return;
                }
                requestFail(opaque);
                log.warn("send a request command to channel <{}> failed.", RemotingHelper.parseChannelRemoteAddr(channel));
            }
        });
        ...
    }
关键设计点:每一个请求request,都分配了一个 client唯一自增的id (request.getOpaque(); requestId.getAndIncrement())。
把id和上下文存储到请求待响应table中:发送请求后,将callback传递给responseFuture,等待callback被调用。
- 单向调用oneway
发起请求
    public void invokeOnewayImpl(final Channel channel, final RemotingCommand request, final long timeoutMillis)throws InterruptedException, RemotingTooMuchRequestException, RemotingTimeoutException, RemotingSendRequestException {
        request.markOnewayRPC();
        ...
        boolean acquired = this.semaphoreOneway.tryAcquire(timeoutMillis, TimeUnit.MILLISECONDS);
        final SemaphoreReleaseOnlyOnce once = new SemaphoreReleaseOnlyOnce(this.semaphoreOneway);
        channel.writeAndFlush(request).addListener(new ChannelFutureListener() {
            @Override
            public void operationComplete(ChannelFuture f) throws Exception {
                once.release();
                if (!f.isSuccess()) {
                    log.warn("send a request command to channel <" + channel.remoteAddress() + "> failed.");
                }
            }
        });
        ...
    }
无需监听结果
关键设计点:使用信号量Semaphore控制并发数
是通道瞬间并发度,不同于流控qps
oneway模式:不同于同步调用 异步调用 这里不关心返回值 所以无需记录id到待响应table
server受理请求路由
监听请求
    class NettyServerHandler extends SimpleChannelInboundHandler<RemotingCommand> {
        @Override
        protected void channelRead0(ChannelHandlerContext ctx, RemotingCommand msg) throws Exception {
            processMessageReceived(ctx, msg);
        }
    }
    public void processMessageReceived(ChannelHandlerContext ctx, RemotingCommand msg) throws Exception {
        final RemotingCommand cmd = msg;
        if (cmd != null) {
            switch (cmd.getType()) {
                // 来自client的请求
                case REQUEST_COMMAND:
                    processRequestCommand(ctx, cmd);
                    break;
                // 来自client的响应
                case RESPONSE_COMMAND:
                    processResponseCommand(ctx, cmd);
                    break;
                default:
                    break;
            }
        }
    }
     public void processRequestCommand(final ChannelHandlerContext ctx, final RemotingCommand cmd) {
        // 路由关系 线程池配置 查询
        final Pair<NettyRequestProcessor, ExecutorService> matched = this.processorTable.get(cmd.getCode());
        final Pair<NettyRequestProcessor, ExecutorService> pair = null == matched ? this.defaultRequestProcessor : matched;
        final int opaque = cmd.getOpaque();
    ...
        Runnable run = new Runnable() {
            @Override
            public void run() {
        ...
                final RemotingResponseCallback callback = new RemotingResponseCallback() {
                    @Override
                    public void callback(RemotingCommand response) {
                        ...
                        // 非oneway模式 才需要回写response
                        if (!cmd.isOnewayRPC()) {
                            ...
                            ctx.writeAndFlush(response);
                            ...
                        }
                    }
                };
                ...
                // 使用指定的业务处理器processor处理业务
                NettyRequestProcessor processor = pair.getObject1();
                RemotingCommand response = processor.processRequest(ctx, cmd);
                callback.callback(response);
                ...
            }
        };
        ...
        // 包装为线程任务 放到配置的线程池中执行
        final RequestTask requestTask = new RequestTask(run, ctx.channel(), cmd);
        pair.getObject2().submit(requestTask);
        ...
    }
关键设计点
抽象复用:
client 和 server的 网络通信读模块是高度一致的,所以抽象出来共有的部分,复用代码,继承结构:
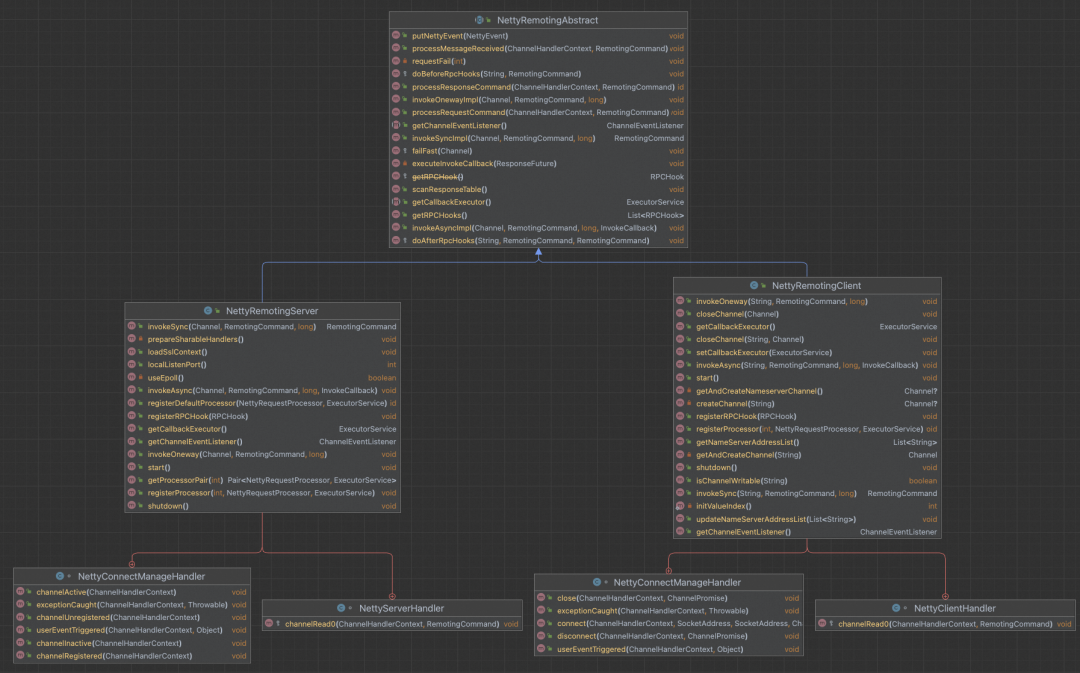
是一个很标准的抽象复用案例, 但需注意在两个角色(client server)中同一份代码是有不一样的解读链路
路由实现:
利用code – processor – pool 的三者映射关系方便的拿到对应业务的处理器及其独立的线程池,进行任务投递
设计理念类似观察者模式,添加观察者-业务处理器(这里仅单个观察者),当事件来了(socket消息读取)后,通知到所有观察者进行具体业务处理。
client 监听响应
- 监听 同步调用结果
    class NettyClientHandler extends SimpleChannelInboundHandler<RemotingCommand> {        @Override        protected void channelRead0(ChannelHandlerContext ctx, RemotingCommand msg) throws Exception {
            processMessageReceived(ctx, msg);
        }
    }
    public void processMessageReceived(ChannelHandlerContext ctx, RemotingCommand msg) throws Exception {
        final RemotingCommand cmd = msg;
        if (cmd != null) {
            switch (cmd.getType()) {
                // 来自server的请求
                case REQUEST_COMMAND:
                    processRequestCommand(ctx, cmd);
                    break;
                // 来自server的响应
                case RESPONSE_COMMAND:
                    processResponseCommand(ctx, cmd);
                    break;
                default:
                    break;
            }
        }
    }
     public void processResponseCommand(ChannelHandlerContext ctx, RemotingCommand cmd) {
        final int opaque = cmd.getOpaque();
         // 从待响应table中找到响应对应的请求
        final ResponseFuture responseFuture = responseTable.get(opaque);
        if (responseFuture != null) {
            responseFuture.setResponseCommand(cmd);

            responseTable.remove(opaque);
            if (responseFuture.getInvokeCallback() != null) {
                // 异步调用 回调callback
                executeInvokeCallback(responseFuture);
            } else {
                // 同步调用
                // 写入正常结果 并唤起wait的线程
                responseFuture.putResponse(cmd);
                public void putResponse(final RemotingCommand responseCommand) {
                    this.responseCommand = responseCommand;
                    this.countDownLatch.countDown();
                }
                responseFuture.release();
            }
        } else {
            log.warn("receive response, but not matched any request, " + RemotingHelper.parseChannelRemoteAddr(ctx.channel()));
            log.warn(cmd.toString());
        }
    }
关键设计点
异步协调 && 同步等待 && 唤起机制
读取到来自server响应数据的线程 -> 通过待响应table查找当前响应归属的请求 -> 操作其countDownLatch定向唤起等待结果的请求线程
同步结果唤起条件:写入异常 || 等待超时 || 读取到来自server的对应id的响应
// 同步等待结果
RemotingCommand responseCommand = responseFuture.waitResponse(timeoutMillis);
- 监听 异步调用结果
    class NettyClientHandler extends SimpleChannelInboundHandler<RemotingCommand> {
        @Override
        protected void channelRead0(ChannelHandlerContext ctx, RemotingCommand msg) throws Exception {
            processMessageReceived(ctx, msg);
        }
    }
    public void processMessageReceived(ChannelHandlerContext ctx, RemotingCommand msg) throws Exception {
        final RemotingCommand cmd = msg;
        if (cmd != null) {
            switch (cmd.getType()) {
                // 来自server的请求
                case REQUEST_COMMAND:
                    processRequestCommand(ctx, cmd);
                    break;
                // 来自server的响应
                case RESPONSE_COMMAND:
                    processResponseCommand(ctx, cmd);
                    break;
                default:
                    break;
            }
        }
    }
     public void processResponseCommand(ChannelHandlerContext ctx, RemotingCommand cmd) {
        final int opaque = cmd.getOpaque();
         // 从待响应table中找到响应对应的请求
        final ResponseFuture responseFuture = responseTable.get(opaque);
        if (responseFuture != null) {
            responseFuture.setResponseCommand(cmd);

            responseTable.remove(opaque);
            if (responseFuture.getInvokeCallback() != null) {
                // 异步调用
                executeInvokeCallback(responseFuture);
            } else {
                // 同步调用
                // 写入结果 并唤起wait的线程
                responseFuture.putResponse(cmd);
                   public void putResponse(final RemotingCommand responseCommand) {
                this.responseCommand = responseCommand;
                this.countDownLatch.countDown();
            }
                responseFuture.release();
            }
        } else {
            log.warn("receive response, but not matched any request, " + RemotingHelper.parseChannelRemoteAddr(ctx.channel()));
            log.warn(cmd.toString());
        }
    }

  private void executeInvokeCallback(final ResponseFuture responseFuture) {
        ExecutorService executor = this.getCallbackExecutor();
    ...
        executor.submit(new Runnable() {
            @Override
            public void run() {
                try {
                    responseFuture.executeInvokeCallback();
                } catch (Throwable e) {
                    log.warn("execute callback in executor exception, and callback throw", e);
                } finally {
                    responseFuture.release();
                }
            }
        });
        ...
    }
关键设计点
- 异步协调 && callback机制
读取到来自server响应数据的线程 -> 通过待响应table查找当前响应归属的请求 -> 回调callback
异步结果回调callback条件:写入异常 || 等待超时 || 读取到来自server的对应id的响应
另外callback执行采用了cas机制限制仅执行一次
04 模块升级-微服务化通信工具
why?
从业务视角开发来看,通信模块依然是比较基础的,对于普通开发者,希望能够像hsf一样,简单的定制协议service,契合java接口实现多态机制,不希望每次都去根据code或其他url之类的手动去分发路由,显得过于原始。
how?
参考hsf系列的远程调用方式,使用动态代理规范化协议传输,使用泛化反射机制便捷调用。
封装程度跟灵活程度往往是成反比的,注意不要过度设计,尽可能保留原始通信模块的灵活。
使用方式
- 定义接口 和 实现
public interface ServiceHello {
    String sayHello(String a, String b);
    Integer sayHelloInteger(Integer a, Integer b);
}
import com.uext.remote.rf.service.ServiceHello;
public class ServiceHelloImpl implements ServiceHello {
@Override
public String sayHello(String a, String b) {
return "hello " + a + " " + b;
}
@Override
public Integer sayHelloInteger(Integer a, Integer b) {
return 1000 + a + b;
}
}
同hsf,接口interface可打包后提供给消费者,实现类隐藏于提供者代码中
- 启动provider 注册服务监听
import com.alibaba.fastjson.JSON;
import com.uext.remote.rf.provider.ServiceHelloImpl;
import com.uext.remote.rf.provider.ServiceWorldImpl;
import com.uext.remote.rf.service.ServiceHello;
import com.uext.remote.rf.service.ServiceWorld;

public class TestServer {
    public static void main(String[] args) throws Exception {
        ApiProviderBean apiProviderBean = new ApiProviderBean();
        apiProviderBean.setPort(8888);
        apiProviderBean.init();
        apiProviderBean.register(ServiceHello.class, new ServiceHelloImpl());
        apiProviderBean.register(ServiceWorld.class, new ServiceWorldImpl());

        System.out.println("start ok " + JSON.toJSONString(apiProviderBean));
        System.in.read();
    }
}
启动服务端,注册一些需要暴露的服务,通过接口和接口的实现类的实例进行绑定
- 启动consumer 发起调用
import com.uext.remote.rf.service.ServiceHello;
import com.uext.remote.rf.service.ServiceWorld;
import org.apache.rocketmq.remoting.netty.NettyClientConfig;
import org.apache.rocketmq.remoting.netty.NettyRemotingClient;
public class TestClient {
    public static void main(String[] args) throws Exception {
        // 初始化一个连接客户端
        NettyClientConfig nettyServerConfig = new NettyClientConfig();
        NettyRemotingClient remotingClient = new NettyRemotingClient(nettyServerConfig, null);
        remotingClient.start();
        ApiConsumerBean apiConsumerBean = new ApiConsumerBean();
        apiConsumerBean.setRemotingClient(remotingClient);
        apiConsumerBean.setInterfac(ServiceHello.class);
        apiConsumerBean.setTimeOut(30000L);
        apiConsumerBean.setAddr("127.0.0.1:8888");

        ServiceHello serviceHello = apiConsumerBean.getProxy();
        ApiConsumerBean apiConsumerBean2 = new ApiConsumerBean();
        apiConsumerBean2.setRemotingClient(remotingClient);
        apiConsumerBean2.setInterfac(ServiceWorld.class);
        apiConsumerBean2.setTimeOut(30000L);
        apiConsumerBean2.setAddr("127.0.0.1:8888");
        ServiceWorld serviceWorld = apiConsumerBean2.getProxy();

        System.out.println(serviceHello.sayHello("a", "b"));
        System.out.println(serviceHello.sayHelloInteger(1, 2));
        serviceWorld.sayWorld("aa", "bb");

        System.in.read();
    }
}
初始化一个长连接客户端, 获取接口远程实现实例, 发起调用。
- 日志输出
Connected to the target VM, address: '127.0.0.1:49830', transport: 'socket'
start ok {"index":{"com.uext.remote.hsf.service.ServiceWorld":{"public abstract void com.uext.remote.hsf.service.ServiceWorld.sayWorld(java.lang.String,java.lang.String)":{}},"com.uext.remote.hsf.service.ServiceHello":{"public abstract java.lang.Integer com.uext.remote.hsf.service.ServiceHello.sayHelloInteger(java.lang.Integer,java.lang.Integer)":{},"public abstract java.lang.String com.uext.remote.hsf.service.ServiceHello.sayHello(java.lang.String,java.lang.String)":{}}},"port":8888,"remotingServer":{"callbackExecutor":{"activeCount":0,"completedTaskCount":0,"corePoolSize":4,"largestPoolSize":0,"maximumPoolSize":4,"poolSize":0,"queue":[],"rejectedExecutionHandler":{},"shutdown":false,"taskCount":0,"terminated":false,"terminating":false,"threadFactory":{}},"rPCHooks":[]}}
world aa bb
Connected to the target VM, address: '127.0.0.1:53211', transport: 'socket'
hello a b
1003实现方式
- 请求头 参数协议
import lombok.Data;
import org.apache.rocketmq.remoting.CommandCustomHeader;
import org.apache.rocketmq.remoting.exception.RemotingCommandException;
@Data
public class CommonHeader implements CommandCustomHeader{
    /**
     * com.uext.remote.hsf.service.ServiceHello
     */
    String interfaceName;
    /**
     * public abstract java.lang.String com.uext.remote.hsf.service.ServiceHello.sayHello(java.lang.String,java.lang.String)
     */
    String methodName;

    String argsJsonJson;

    @Override
    public void checkFields() throws RemotingCommandException {
    }
}
使用接口interface package url 和 方法 method的作为识别码,用以路由选择。其中动态参数问题,需要考虑如何解决解码为方法参数对应的不同类型,本文采用简易实现(json)。
- provider实现代码
import com.alibaba.fastjson.JSON;
import com.alibaba.fastjson.TypeReference;
import io.netty.channel.ChannelHandlerContext;
import lombok.Data;
import org.apache.rocketmq.remoting.netty.*;
import org.apache.rocketmq.remoting.protocol.RemotingCommand;
import java.lang.reflect.Method;
import java.lang.reflect.Parameter;
import java.util.*;
@Data
public class ApiProviderBean {
    private int port = 8888;
    // 长连接实例
    private NettyRemotingServer remotingServer;
    public void init() throws Exception {
        NettyServerConfig nettyServerConfig = new NettyServerConfig();
        nettyServerConfig.setListenPort(port);
        remotingServer = new NettyRemotingServer(nettyServerConfig, null);
        remotingServer.registerProcessor(0, new NettyRequestProcessor() {
            @Override
            public RemotingCommand processRequest(ChannelHandlerContext ctx, RemotingCommand request) throws Exception {
                // 请求数据解析
                CommonHeader commonHeader = (CommonHeader) request.decodeCommandCustomHeader(CommonHeader.class);

                // 路由查找
                Map<String/*method*/, Call> map = index.get(commonHeader.getInterfaceName());
                Call call = Objects.requireNonNull(map, "interface not exists " + commonHeader.getInterfaceName()).get(commonHeader.getMethodName());
                if(call == null){
                    throw new RuntimeException("method not exists " + commonHeader.getMethodName());
                }
                // 参数解码 todo 优化解码编码
                Parameter[] ts = call.method.getParameters();
                List<Object> args = new ArrayList<>();
                List<String> argsJson = JSON.parseObject(commonHeader.argsJsonJson, new TypeReference<List<String>>(){});
                for (int i = 0; i < argsJson.size(); i++) {
                    // 根据method规范 逐一反序列化
                    args.add(JSON.parseObject(argsJson.get(i), ts[i].getType()));
                }
                // 反射调用
                Object res = call.method.invoke(call.instance, args.toArray(new Object[0]));
                // 结果编码 回传 todo 优化解码编码
                RemotingCommand response = RemotingCommand.createResponseCommand(0, null);
                if(res != null) {
                    response.setBody(JSON.toJSONBytes(res));
                }
                return response;
            }
            @Override
            public boolean rejectRequest() {
                return false;
            }
        }, null);
        remotingServer.start();
    }
    private static class Call{
        Object instance;
        Method method;
    }
    private Map<String/*interface*/, Map<String/*method*/, Call>> index = new HashMap<>();
    /**
     * @param interfac 接口 协议
     * @param impl 实现类的实例
     */
    public synchronized <T> void register(Class<T> interfac, T impl){
        // 建立 接口-实现类-方法 路由关系
        String iname = interfac.getName();
        Map<String/*method*/, Call> map = index.get(iname);
        if(map == null){
            map = new LinkedHashMap<>();
            index.put(iname, map);
        }
        for (Method declaredMethod : interfac.getDeclaredMethods()) {
            Call call = new Call();
            call.instance = impl;
            call.method = declaredMethod;
            map.put(declaredMethod.toString(), call);
        }
    }
}
关键在于 注册协议(interface)和实现类, 维护映射路由关系。
收到channel请求的数据后,解码,根据映射路由关系进行反射调用拿到结果,编码结果,回写到channel
由于通道code 定义为int,但为了灵活配置接口及实现,不想硬编码,所以丢失了自定义不同业务线程池的特性,如果有需要可以重构通道code为string,然后把相关路由协议序列化到通道code中。
- consumer实现代码
import com.alibaba.fastjson.JSON;
import lombok.Data;
import org.apache.rocketmq.remoting.netty.NettyRemotingClient;
import org.apache.rocketmq.remoting.protocol.RemotingCommand;
import java.lang.reflect.InvocationHandler;
import java.lang.reflect.Method;
import java.lang.reflect.Proxy;
import java.nio.charset.StandardCharsets;
import java.util.ArrayList;
import java.util.List;
@Data
public class ApiConsumerBean implements InvocationHandler {
    /**
     * 超时时间
     */
    private Long timeOut = 3000L;
    /**
     * 目标 ip:port
     */
    private String addr = "127.0.0.1:8888";
    /**
     * 实现类
     */
    private Class<?> interfac;
    /**
     * 长连接实例
     */
    private NettyRemotingClient remotingClient;
    /**
     * 获取协议 代理实例
     */
    public <T> T getProxy() throws IllegalArgumentException {
        return (T) Proxy.newProxyInstance(Thread.currentThread().getContextClassLoader(), new Class[]{interfac}, this);
    }
    /**
     * 规范编码协议
     */
    @Override
    public Object invoke(Object target, Method method, Object[] args) throws Throwable {
        if (Object.class.equals(method.getDeclaringClass())) {
            return method.invoke(this, args);
        }
        // 协议编码入参
        CommonHeader header = new CommonHeader();
        header.setInterfaceName(interfac.getName());
        header.setMethodName(method.toString());
        // todo 优化解码编码
        List<String> argJson = new ArrayList<>();
        for (Object arg : args) {
            argJson.add(JSON.toJSONString(arg));
        }
        header.setArgsJsonJson(JSON.toJSONString(argJson));
        // 定义通道code 0 为 远程使用
        RemotingCommand request = RemotingCommand.createRequestCommand(0, header);
        Object res = null;
        if(method.getReturnType() != null) {
            RemotingCommand response = remotingClient.invokeSync(addr, request, timeOut);
            // 协议解码结果 todo 优化解码编码
            if(response.getBody() != null && response.getBody().length > 0) {
                res = JSON.parseObject(new String(response.getBody(), StandardCharsets.UTF_8), method.getReturnType());
            }
        }else{
            remotingClient.invokeOneway(addr, request, timeOut);
        }
        return res;
    }
}
关键在于 委托接口(interface)的调用实现, 动态代理为: 根据协议编码, 包装request之后写入channel
同步等待, 所以采用了同步调用模式
收到channel响应的结果后, 解码, 返回结果
其中无返回值的接口, 不关心响应结果, 可使用oneway方式调用
更进一步 注册中心 ip自动选择
引入注册中心 zk 或 namesrv,通过中心化协调,让某一些consumer自动选择某一台provider,并同时可以支持配置中心化下放,实现服务治理,越来越像微服务(dubbo)框架了哈。
当然,在跟多业务场景中,是无法引入其他中间件的,能少依赖就少依赖,降低复杂度。
在内网环境中,绝大部分项目采用Axxx一站式发布部署,配套Nxxxxxxx集群云资源管理,是支持按应用名动态获取当前集群ip清单的。
curl http://xxxxx.xxxx
{
  "num": 164,
  "result": [
    {
      "dns_ip": "13.23.xx.xxx",
      "state": "working_online"
    },
    ...
  ],
  "start": 0,
  "total": 164
}
那么我们是否可以依赖该 ip清单,用来做本地hash ip自动选择呢?
当然可以,配合可用性心跳探测,每台机器节点自己维护一份可用性提供者消费者清单缓存,通过一致性hash等算法选择机器匹配机器。
那么就得到了一个简易版的低依赖,去中心化,高可用的微服务通信框架。
作者:陈鹏辉(承飞)
来源:大淘宝技术
原文:https://mp.weixin.qq.com/s/hjXzPu5-_jNGYx7NwdSpXw
版权声明:本文内容转自互联网,本文观点仅代表作者本人。本站仅提供信息存储空间服务,所有权归原作者所有。如发现本站有涉嫌抄袭侵权/违法违规的内容, 请发送邮件至1393616908@qq.com 举报,一经查实,本站将立刻删除。