
本文将介绍使用 Spring Boot 和 Flutter 创建一个简单的聊天应用程序。这将帮助我们了解如何在 Flutter 和 Spring Boot 中使用 SockJS 配置 WebSocket。

我们将使用在上一篇文章《在 SpringBoot 和 React 中配置 WebSocket》中构建的服务器作为应用程序的服务器。
对于这个应用程序,我们需要一个非常重要的库,那就是 stomp_dart_client。
文件 pubspec.yaml 中的依赖关系部分如下所示:
# ...
dependencies:
flutter:
sdk: flutter
stomp_dart_client: 1.0.0
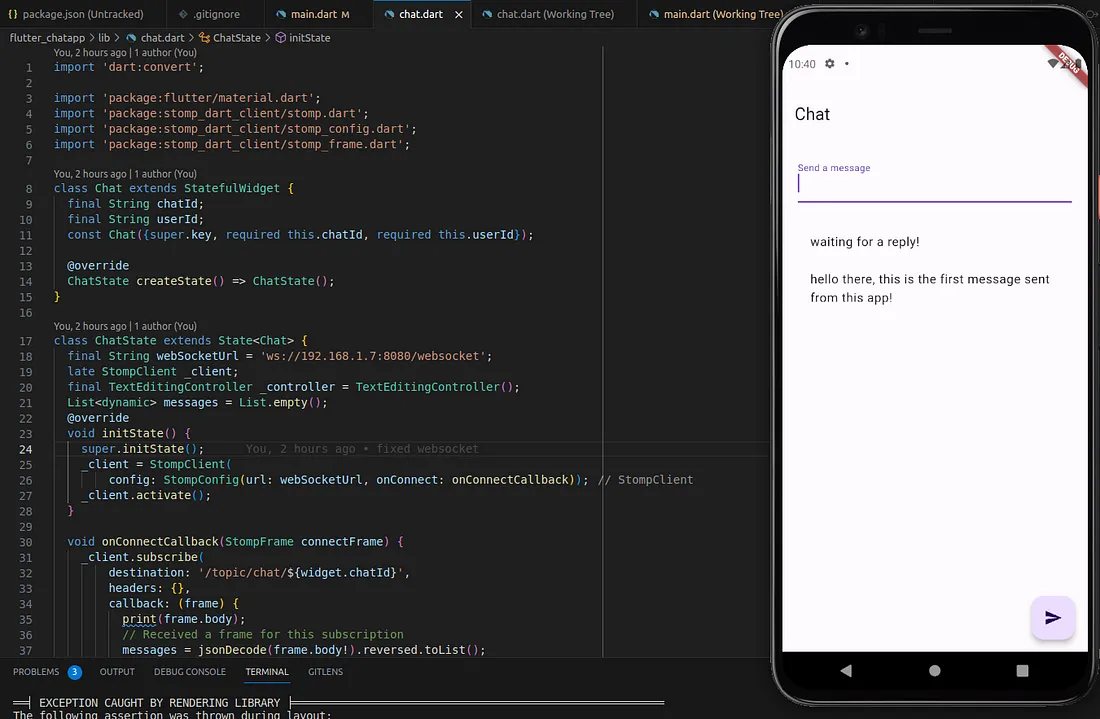
# ...接下来要创建的 chart.dart 文件将主要包含连接到我们在上一篇文章中安装的 SpringBoot 服务器所需的 WebSocket 配置,以及聊天视图,其中包括输入、发送消息的浮动操作和实际消息本身。
import 'dart:convert';

import 'package:flutter/material.dart';
import 'package:stomp_dart_client/stomp.dart';
import 'package:stomp_dart_client/stomp_config.dart';
import 'package:stomp_dart_client/stomp_frame.dart';

class Chat extends StatefulWidget {
  final String chatId;
  final String userId;
  const Chat({super.key, required this.chatId, required this.userId});

  @override
  ChatState createState() => ChatState();
}

class ChatState extends State<Chat> {
  final String webSocketUrl = 'ws://192.168.1.7:8080/websocket';
  late StompClient _client;
  final TextEditingController _controller = TextEditingController();
  List<dynamic> messages = List.empty();
  @override
  void initState() {
    super.initState();
    _client = StompClient(
        config: StompConfig(url: webSocketUrl, onConnect: onConnectCallback));
    _client.activate();
  }

  void onConnectCallback(StompFrame connectFrame) {
    _client.subscribe(
        destination: '/topic/chat/${widget.chatId}',
        headers: {},
        callback: (frame) {
          print(frame.body);
          // Received a frame for this subscription
          messages = jsonDecode(frame.body!).reversed.toList();
        });
  }

  void _sendMessage() {
    final message = _controller.text;
    if (message.isNotEmpty) {
      _client.send(
        destination: '/app/chat/${widget.chatId}', // Replace with your chat ID
        body: json.encode({
          'data': message,
          'userId': widget.userId
        }), // Format the message as needed
      );
      _controller.clear();
    }
  }

  @override
  Widget build(BuildContext context) {
    double screenHeight = MediaQuery.of(context).size.height - 250;
    return Scaffold(
      appBar: AppBar(
        title: Text('Chat'),
      ),
      body: Padding(
        padding: const EdgeInsets.all(20),
        child: Column(
          crossAxisAlignment: CrossAxisAlignment.start,
          children: [
            Form(
              child: TextFormField(
                controller: _controller,
                decoration: const InputDecoration(labelText: 'Send a message'),
              ),
            ),
            const SizedBox(height: 24),
            SingleChildScrollView(
              child: Container(
                height: screenHeight, // Set a fixed height here
                child: ListView.builder(
                  itemCount: messages.length,
                  itemBuilder: (context, index) {
                    // Extract the item from the list
                    Map<String, dynamic> item = messages[index];

                    // Create a Text widget for the item
                    return ListTile(
                      title: Text(item['data']),
                      // You can add more widgets here, e.g., icons, buttons, etc.
                    );
                  },
                ),
              ),
            )
          ],
        ),
      ),
      floatingActionButton: FloatingActionButton(
        onPressed: _sendMessage,
        tooltip: 'Send message',
        child: const Icon(Icons.send),
      ),
    );
  }

  @override
  void dispose() {
    _client.deactivate();
    _controller.dispose();
    super.dispose();
  }
}
让我们来分解一下。
代码从 import 开始,包括用于 JSON 编码和解码的 dart:convert 库,以及与 Flutter 和 Stomp WebSocket 客户端相关的几个包。
Chat 是一个表示聊天界面的有状态部件。它需要两个必要参数:chatId 和 userId。该部件定义了一个 WebSocket URL,初始化了一个 Stomp 客户端,并维护了一个消息列表。
创建窗口小部件时会调用 initState 方法。在该方法中,Stomp 客户端被配置为 WebSocket URL 和建立连接时要执行的回调函数。然后激活客户端。
当 Stomp 客户端成功连接到 WebSocket 服务器时,onConnectCallbackmethod 将被调用。它订阅了一个接收消息的目标主题,并定义了一个处理传入消息的回调函数。在该回调中,接收到的 JSON 消息会被解码、反转并存储在消息列表中。之所以要反转,是因为本文开发的服务器采用了消息存储方式。
当用户发送消息时,_sendMessagemethod 将被调用。它会将消息连同用户 ID 发送到服务器上的特定目标主题,消息采用 JSON 编码。
build 方法定义聊天界面的用户界面。它包括一个应用程序栏、一个用于发送消息的文本输入框、一个可滚动的消息列表和一个用于发送消息的浮动操作按钮。
在 ListView.builder 中,messages 列表会反复显示每条消息。列表是反向的,因此较新的信息会显示在顶部。每条消息都显示在一个 ListTile widget 中,其中包含一个用于显示消息内容的 Text widget。
当移除部件时,dispose 方法用于清理资源。它会停用 Stomp 客户端、处理文本控制器并调用父对象的 dispose 方法。
main.dart
在 main.dart 中,我们将使用以下实现来以硬编码方式显示聊天界面。
import 'package:flutter/material.dart';
import 'package:flutter_chatapp/chat.dart';

void main() {
  runApp(const MyApp());
}

class MyApp extends StatelessWidget {
  const MyApp({super.key});

  // This widget is the root of your application.
  @override
  Widget build(BuildContext context) {
    return MaterialApp(
        title: 'Chat Application',
        theme: ThemeData(
          colorScheme: ColorScheme.fromSeed(seedColor: Colors.deepPurple),
          useMaterial3: true,
        ),
        home: const Chat(chatId: '1', userId: 'lejdi'));
  }
}
了解该应用程序将如何开发,可关注:https://github.com/lejdiprifti/medium/tree/main/flutter_chatapp
作者:Lejdi Prifti
版权声明:本文内容转自互联网,本文观点仅代表作者本人。本站仅提供信息存储空间服务,所有权归原作者所有。如发现本站有涉嫌抄袭侵权/违法违规的内容, 请发送邮件至1393616908@qq.com 举报,一经查实,本站将立刻删除。