
由于兼容性问题和缺乏明确的指导,许多开发人员在将 WebRTC 集成到 Expo 应用程序时面临挑战。本文将探讨使用 Expo 和 WebRTC 构建视频通话应用程序的最简单方法。
前提条件
在开始之前,请确保您已具备以下条件:
- 已安装 Node.js
- 已安装 Expo(npm install -g expo-cli)
- React Native 的基础知识
- 信令服务器(为简单起见,我们将使用 socket.io)

在 Expo 中设置 WebRTC
1. 安装前检查兼容性
在安装之前,务必确保 Expo SDK 和 WebRTC 插件的版本兼容
示例版本:
"expo": "~52.0.11",
"@config-plugins/react-native-webrtc": "^10.0.0"
官方插件兼容性指南:https://www.npmjs.com/package/@config-plugins/react-native-webrtc
安装之前请仔细检查此链接以避免依赖项不匹配。
2. 安装 WebRTC 和插件
安装 WebRTC 库及其 Expo 配置插件:
- npx expo install react-native-webrtc @config-plugins/react-native-webrtc3. 在 app.json 中注册插件
将插件条目添加到您的 app.json 或 app.config.js 文件中,如下所示:
{
  "expo": {
    "plugins": ["@config-plugins/react-native-webrtc"]
  }
}
4. WebRTC 无法在 Expo Go 中运行
重要提示:react-native-webrtc 使用本地代码,不能在 Expo Go 中运行。
要测试和使用 WebRTC,您需要使用 Expo Dev Client 构建一个自定义开发客户端。
使用 WebRTC 和 Expo 编写 P2P 视频通话应用程序
步骤 1:导入所需模块
import React, { useState, useEffect, useCallback } from 'react';
import { View, Text, Button, StyleSheet } from 'react-native';
import { mediaDevices, RTCPeerConnection, RTCSessionDescription, RTCIceCandidate, RTCView } from 'react-native-webrtc';
import io from 'socket.io-client';
解释:
- mediaDevices(媒体设备): 用于访问摄像头和麦克风。
- RTCPeerConnection、RTCSessionDescription、RTCIceCandidate:用于处理对等连接和信令的 WebRTC API。
- RTCView:将视频流渲染到屏幕上。
- socket.io-client:用于使用信令服务器在两个 peer 之间进行信令传输。
步骤 2:连接到信令服务器
const socket = io( '' ); // 信令服务器 URL步骤 3:设置状态变量
const [localStream, setLocalStream] = useState(null);
const [remoteStream, setRemoteStream] = useState(null);
const [peerConnection, setPeerConnection] = useState(null);
const [status, setStatus] = useState('Waiting for call...');
const [isCalling, setIsCalling] = useState(false);
解释:
localStream:从用户的摄像头和麦克风流式传输。remoteStream:来自远程 peer 的流。peerConnection:WebRTC 连接对象。status:UI 中显示的呼叫状态消息。isCalling:布尔值,指示通话是否处于活动状态。
步骤 4:访问媒体设备
const openMediaDevices = useCallback(async () => {
  try {
    const mediaStream = await mediaDevices.getUserMedia({
      audio: true,
      video: true,
    });
    setLocalStream(mediaStream);
  } catch (error) {
    console.error('Error accessing media devices: ', error);
    setStatus('Error accessing media devices');
  }
}, []);
此函数请求访问摄像头和麦克风。如果获准,它将在 localStream 中存储视频流,以显示用户的视频并在通话中使用。
步骤 5:处理传入信令事件
useEffect(() => {
  socket.on('offer', async (offer) => {
    ...
  });

  socket.on('answer', async (answer) => {
    ...
  });

  socket.on('candidate', async (candidate) => {
    ...
  });

  return () => {
    socket.off('offer');
    socket.off('answer');
    socket.off('candidate');
  };
}, [localStream, peerConnection]);
解释:
- 监听传入的
offer、answer和candidate消息。 - 这些消息是WebRTC 信令过程的一部分。
- 当组件卸载时清理事件监听器。
步骤 6:处理收到的 Offer
socket.on('offer', async (offer) => {
  console.log('Received offer', offer);
  setStatus('Receiving offer...');
  const pc = new RTCPeerConnection();
  setPeerConnection(pc);
解释:
收到 offer 时:
- 已创建新的对等连接。
- 添加了本地媒体曲目。
- 远程 offer 已设置。
- 创建 answer 并通过信令服务器发回。
  pc.onicecandidate = (event) => {
    if (event.candidate) {
      socket.emit('candidate', event.candidate);
    }
  };

  pc.ontrack = (event) => {
    setRemoteStream(event.streams[0]);
  };

  localStream?.getTracks().forEach(track => {
    pc.addTrack(track, localStream);
  });

  try {
    await pc.setRemoteDescription(new RTCSessionDescription(offer));
    const answer = await pc.createAnswer();
    await pc.setLocalDescription(answer);
    socket.emit('answer', answer);
    setStatus('Answering call...');
  } catch (error) {
    console.error('Error handling offer: ', error);
    setStatus('Error handling offer');
  }
});
步骤 7:处理来自远程 Peer 的 Answer
socket.on('answer', async (answer) => {
  console.log('Received answer', answer);
  setStatus('Call established');
  await peerConnection.setRemoteDescription(new RTCSessionDescription(answer));
});
步骤 8:处理 ICE Candidates
socket.on('candidate', async (candidate) => {
  console.log('Received ICE candidate', candidate);
  await peerConnection.addIceCandidate(new RTCIceCandidate(candidate));
});
向连接中添加新的 ICE candidate,以找到最佳网络路由。
步骤 9:开始通话(创建并发送 Offer)
const startCall = async () => {
  if (!localStream) {
    setStatus('No local stream available');
    return;
  }

  const pc = new RTCPeerConnection();
  setPeerConnection(pc);
解释:
- 初始化一个新连接。
- 添加本地媒体曲目。
- 设置 ICE 和轨道处理程序。
- 创建一个 offer 并通过信令服务器发送。
  pc.onicecandidate = (event) => {
    if (event.candidate) {
      socket.emit('candidate', event.candidate);
    }
  };

  pc.ontrack = (event) => {
    setRemoteStream(event.streams[0]);
  };

  localStream.getTracks().forEach(track => {
    pc.addTrack(track, localStream);
  });

  try {
    const offer = await pc.createOffer();
    await pc.setLocalDescription(offer);
    socket.emit('offer', offer);
    setStatus('Calling...');
    setIsCalling(true);
  } catch (error) {
    console.error('Error creating offer: ', error);
    setStatus('Error starting call');
  }
};
步骤 10:挂断通话
const hangUp = () => {
  if (peerConnection) {
    peerConnection.close();
  }
  setPeerConnection(null);
  setRemoteStream(null);
  setIsCalling(false);
  setStatus('Call ended');
};
解释:
关闭当前通话并重置 UI 和状态。
步骤 11:在应用程序启动时启动媒体设备
useEffect ( () => {
  openMediaDevices ();
}, [openMediaDevices]);
当应用程序启动时,它会自动访问用户的媒体设备。
步骤 12:UI组件
<View style={styles.container}>
  <Text style={styles.status}>{status}</Text>
  <View style={styles.videoContainer}>
    {localStream && (
      <RTCView
        style={styles.localVideo}
        streamURL={localStream.toURL()}
        mirror={true}
      />
    )}
    {remoteStream && (
      <RTCView
        style={styles.remoteVideo}
        streamURL={remoteStream.toURL()}
      />
    )}
  </View>
  <View style={styles.buttons}>
    {isCalling ? (
      <Button title="Hang Up" onPress={hangUp} />
    ) : (
      <Button title="Start Call" onPress={startCall} />
    )}
  </View>
</View>
解释:
- 显示通话状态。
- 使用
RTCView渲染本地和远程视频流。 - 提供开始或结束通话的按钮。
步骤 13:样式
const styles = StyleSheet.create({
  container: {
    flex: 1,
    justifyContent: 'center',
    alignItems: 'center',
  },
  status: {
    fontSize: 20,
    marginBottom: 20,
    textAlign: 'center',
  },
  videoContainer: {
    flexDirection: 'row',
    marginBottom: 20,
  },
  localVideo: {
    width: 100,
    height: 150,
    marginRight: 10,
    backgroundColor: 'black',
  },
  remoteVideo: {
    width: 300,
    height: 450,
    backgroundColor: 'black',
  },
  buttons: {
    flexDirection: 'row',
    justifyContent: 'center',
    marginTop: 20,
  },
});
使用 Flexbox 的简单布局来组织视频预览和控制按钮。
服务器端信令代码(Node.js + Socket.IO)
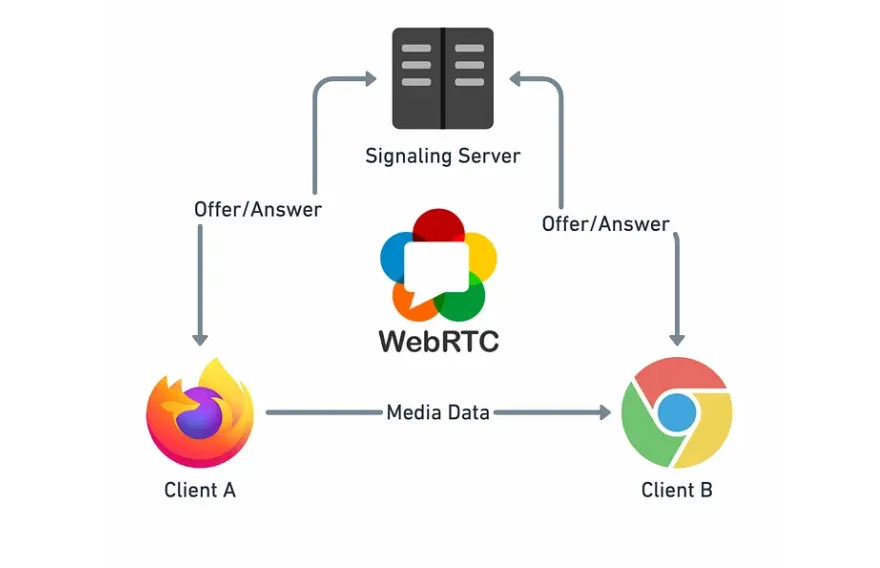
为了使用 WebRTC 实现点对点通信,需要一个信令服务器在客户端之间交换 offer, answer 和 ICE candidates。
我们将使用 Node.js 和 Socket.IO 来实现信令机制。
const express = require('express');
const http = require('http');
const socketIo = require('socket.io');

const app = express();
const server = http.createServer(app);
const io = socketIo(server);

io.on('connection', (socket) => {
    console.log('User connected');

    socket.on('offer', (offer) => {
        socket.broadcast.emit('offer', offer);
    });

    socket.on('answer', (answer) => {
        socket.broadcast.emit('answer', answer);
    });

    socket.on('candidate', (candidate) => {
        socket.broadcast.emit('candidate', candidate);
    });

    socket.on('disconnect', () => {
        console.log('User disconnected');
    });
});

server.listen(5000, () => {
    console.log('Signaling server running on http://localhost:5000');
});
这是一个最小的信令服务器,用于处理 WebRTC 环境中的对等连接。
现在大功告成了!完成 Expo 应用程序和信令服务器的设置后,WebRTC 的点对点视频通话应用程序就可以使用了。只需确保检查 Expo 和 npm 上 @config-plugins/react-native-webrtc 的版本兼容性,并记住 react-native-webrtc 不能与 Expo Go 一起使用,请使用 expo-dev-client 代替。可以在这里找到完整的源代码:https://github.com/tarikulislam36/TestRTC。
作者:Tarikul Islam
本文来自作者投稿,版权归原作者所有。如需转载,请注明出处:https://www.nxrte.com/jishu/webrtc/58002.html