
在许多 Web 应用中,我们可能需要为许多目的录制音频,如语音转文字、记录对话、实时音频/视频会议、语音消息、语言学习和发音练习,以及用户反馈和客户支持。
使用 MediaRecorder 在浏览器上录制音频很容易,但录制高质量的原始音频并保存实时流是非常困难的,它需要一个防故障的服务器,而且在发送到服务器上之前,还必须在浏览器上做大量的预处理。
在浏览器上录制MP3
一个简单的例子是我们如何录制一个MP3,下载文件并播放录制的音频。
const startButton = document.getElementById('startButton');
    const stopButton = document.getElementById('stopButton');
    const audioPlayer = document.getElementById('audioPlayer');
    const downloadLink = document.getElementById('downloadLink');
    startButton.addEventListener('click', startRecording);
    stopButton.addEventListener('click', stopRecording);

    function startRecording() {
      navigator.mediaDevices.getUserMedia({ audio: true })
        .then((stream) => {
          audioStream = stream;
          mediaRecorder = new MediaRecorder(stream);

          mediaRecorder.addEventListener('dataavailable', handleDataAvailable);
          mediaRecorder.start();

          startButton.disabled = true;
          stopButton.disabled = false;
        })
        .catch((error) => {
          console.error('Error accessing microphone:', error);
        });
    }

    function stopRecording() {
      mediaRecorder.stop();
      audioStream.getTracks().forEach((track) => track.stop());

      startButton.disabled = false;
      stopButton.disabled = true;
       downloadLink.href = createDownloadURL();
    }

    function handleDataAvailable(event) {
      if (event.data.size > 0) {
        recordedChunks.push(event.data);
      }
    }

    function playRecordedAudio() {
      const blob = new Blob(recordedChunks, { type: 'audio/mp3' });
      const audioURL = URL.createObjectURL(blob);

      audioPlayer.src = audioURL;// add src to your audio element
    }
   function createDownloadURL() {
        const blob = new Blob(recordedChunks, { type: 'audio/mp3' });
        const audioURL = URL.createObjectURL(blob);
        const downloadURL = audioURL.replace(/^data:audio\/[^;]+/, 'data:attachment/mp3');

        return downloadURL;
    }

function uploadAudio(){
  const file = new File(recordedChunks, 'recorded_audio.mp3', { type: 'audio/mp3' });
  const formData = new FormData();
  formData.append('audio', file);
  // send formData with ajax
}
上面的代码可以录制音频,我们可以在浏览器上即时播放,可以下载,也可以上传到我们的服务器。对于短录音(大约 1-2 分钟的小音频)来说,这是一种很好的方法。
但是如果我们必须录制直播和现场会议的音频,并且如果我们需要录制长达 2 小时,然后录制音频怎么办?在浏览器上创建文件然后上传文件可能会出现以下问题。
- 由于 MP3 不适用于高质量音频并使用有损压缩,因此为了获得高质量我们必须使用 WAV 格式在浏览器上创建 WAV 文件非常复杂,而且由于大文件大小上传大型录音也不是一件好事想法是因为如果互联网连接丢失或用户在上传未完成之前关闭浏览器怎么办。
- 在某些应用程序中,例如实时语音转文本,我们必须传递连续的音频流,因此发送文件是不可行的
- 我们无法从浏览器编写高质量的音频文件,也无法应用任何预处理步骤
- 如果用户在上传完成前关闭浏览器或在上传完成前互联网断开连接,我们可能会丢失数据
在浏览器上录制高质量音频并实时保存在服务器上
为了录制高质量的原始音频,我们将使用以下技术栈:
- React前端。
- extendable-media-recorder包用于扩展默认的 MediaRecorder 并且此包使用 AudioWorklet 代替 ScriptProcessorNode 进行音频处理,因为 ScriptProcessorNode 在主线程上运行,但 AudioWorklet 在主线程之外运行。
- 用于 WAV 编码的extendable-media-recorder-wav-encoder。
- 用于 websocket 的 Socket.io,因为我们将持续实时发送我们将从 MediaRecorder 接收的音频缓冲区。
- 后端的 NestJS。
- 用于创建 .wav 音频文件的wav npm 包。
- Docker,用于容器化应用程序
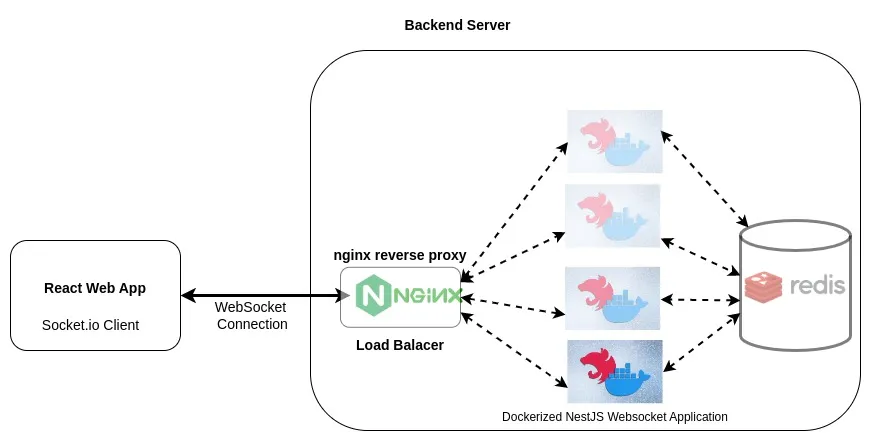
整体应用架构

现在我们将一步一步地从前端转到后端,看看如何设置我们的应用程序来录制音频。
前端
我们的前端是在 Reactjs 和 TypeScript 上,这里我们将不包括设计或组件,因为我们可以很容易地整合我将创建的音频录制类。
我们将需要两个类和一个自定义钩子来完成整个前端设置:
- 用于处理录音的录音机类
- Websocket 处理程序类,用于处理 websocket 连接并发送从我们的麦克风接收到的音频缓冲区
import { IBlobEvent, IMediaRecorder, MediaRecorder, register } from 'extendable-media-recorder';
import { connect } from 'extendable-media-recorder-wav-encoder';
/* to define custom encoders and
here we are using extendable-media-recorder-wav-encoder package
*/
(async () => {
    await register(await connect());
})();
export class RecordAudio {
    isPaused = false;
    private em: DocumentFragment;
    private recorder?: IMediaRecorder;
    constructor(private stream: MediaStream) {
        this.em = document.createDocumentFragment();
    }
    pause(): void {
        this.isPaused = true;
        this.recorder?.pause();
    }

    resume(): void {
        this.isPaused = false;
        this.recorder?.resume();
    }
    async start(timeslice = 1000) {
        try {

            this.recorder = new MediaRecorder(this.stream, {
                mimeType: 'audio/wav',
            });
            this.recorder.addEventListener('dataavailable', (e: IBlobEvent) => {
               /*
                In each timeslice we will get the data and the e.data is the AudioBuffer
                Send actual data if not paused, if paused send empty ArrayBuffer
              */
               const event: any = new Event('dataavailable');
                event.data = this.isPaused ? new ArrayBuffer(0) : e.data;
                this.em.dispatchEvent(event);
            });
            this.recorder.start(timeslice);
        } catch (e) {
              // we can send error event if something went wrong here
              const event: any = new Event('error');
              event.data = 'error message';
              this.em.dispatchEvent(event);
            console.log(e);
        }
    }

    stop() {
// on stop stop all audio tracks
        this.recorder?.stop();
        this.stream?.getAudioTracks().forEach((track) => {
            this.stream?.removeTrack(track);
        });
        this.stream?.getAudioTracks().forEach((track) => {
            this.stream?.removeTrack(track);
        });
    }

    addEventListener(event: string, data: any) {
        this.em.addEventListener(event, data);
    }

    removeEventListener(event: string, callback: any) {
        this.em.removeEventListener(event, callback);
    }
    // disptach events
    dispatchEvent(event: Event) {
        this.em.dispatchEvent(event);
    }
}
第二个类用于处理 Websocket 并将我们将从录音机接收到的 AudioBuffer 发送到服务器。
import { Manager, Socket } from 'socket.io-client';
import { RecordAudio } from './RecordAudio';

export class WebsocketManager{
    audioRecorder?: RecordAudio;
    mediaStream?: MediaStream;
    audioSocket?: Socket;
    paused = false;
    audioSocketNameSpace = 'audio';
    webSocketURL = 'ws://localhost:3000'
    saveAudioPath = 'save-audio'
    onAudioBlobReceived?: (data: any) => void;
    constructor() {}
    async start(deviceId: string) {
        const constraints = {
            audio: {
                deviceId: { exact: deviceId },
                echoCancellation: false,
                noiseSuppression: false,
            },
        };
        try {
            this.mediaStream = await navigator.mediaDevices.getUserMedia(constraints);
            this.mediaRecorder = new RecordAudio(this.mediaStream);
            const audioSocketManager = new Manager(this.webSocketURL, {
                query: {
                    audioFileName:'my-audio-file-name'
                   /* ......your query params
                   for example
                    userId: 'xxx-xxx-xxxx-xxxx'
                  */
                },
                transports: ['websocket'],
                path: this.saveAudioPath,
                timeout: 200000,
            });

            this.audioSocket = audioSocketManager.socket(this.audioSocketNameSpace, {
                auth: {
                    authorization: 'authorization key',
                },
            });
            this.audioSocket.on('connect', () => {

            });
           /*
            Handle on error and on disconnnecti websocket
            this.audioSocket.on('disconnect',(e)=>{console.log(e);})
             this.audioSocket.on('error',(e)=>{console.log(e);})
          */
           this.mediaRecorder.addEventListener('dataavailable', (data: any) => {
             this.audioSocket?.emit('recording', data);
          });
          this.mediaRecorder.start();
         // send start recording command
         this.audioSocket.emit('start-recording', 'start');
        } catch (e) {
            console.log(e);
            // handle error here
        }
    }

    stop() {
        this.closeResources();
    }

    cancel() {
          this.closeResources();
    }

    getState() {
        return ToUserStateMap[this.state];
    }

    pause() {
        this.paused = true;
    }


    onWebSocketError(event: any) {
        this.handleError();
        this.closeResources();
    }


    closeResources() {
        try {
            this.audioSocket?.disconnect();
            this.audioSocket?.emit('end-recording', 'end');
            this.stopAllMicrophoneInstances();
            this.audioSocket = undefined;
        } catch (e) {
            console.log(e);
        }
        if (this.mediaRecorder) {
            this.mediaRecorder.stop();
            this.mediaRecorder = undefined;
        }
    }

    stopAllMicrophoneInstances() {
        if (this.mediaRecorder) {
            this.mediaRecorder.removeEventListener('dataavailable', ()=>{this.onMediaRecorderData()});
            this.mediaRecorder.stop();
            this.mediaRecorder = undefined;
        }
        if (this.mediaStream !== null) {
            this.mediaStream?.getTracks().forEach(function (track) {
                track.stop();
            });
            this.mediaStream = undefined;
        }
    }

    handleError(status: any, message: string) {
        if (this.onError) {
            this.onError(status, message);
        }
    }

    handleFinished() {
        this.onFinished();
    }
}
现在我们已经为 Recording 和 Websocket Connection 创建了类。现在我们需要一个自定义钩子,我们将在我们的类中使用,以便从我们的反应组件与这些类进行交互。
export const recordAudio = () => {
    const [audioDeviceId,setAudioDeviceId = useState(''):
    const webSocketManager = useRef<WebsocketManager>();
    const onResult = (result: any) => {
        console.log(result);
    };
    const onError = (error: any) => {
        console.log(result);
    };
    const stopRecording = () => {
        if (webSocketManager.current) {
            webSocketManager.current?.stop();
            webSocketManager.current = undefined;

        }
    };
    useEffect(() => {
        return () => {
            stopVoiceRecording();
        };
    }, []);

    const startRecording = async () => {
        const websocketInstance = new WebsocketManager();
        websocketInstance.setOnResult(onResult);
        websocketInstance.setOnError(onError);
        websocketInstance.start(audioDeviceId);
        webSocketManager.current = websocketInstance;
    };
    const pauseAudio = () => {
        if (webSocketManager.current) {
            webSocketManager.current?.pause();
        }
    };
    const resumeAudio = () => {
        if (webSocketManager.current) {
            webSocketManager.current?.resume();
        }
    };
    return {
        startRecording,
        startRecording,
        pauseAudio,
        resumeAudio,
    };
};
用于创建音频文件的后端设置
我们将使用 NestJS 作为我们的服务器,因为 NestJS 提供了强大的功能并且高度模块化并支持 TypeScript。
现在让我们稍微讨论一下 NestJS 和 Socket.io,以及我们如何使用它来处理 websocket 连接。
有关 NestJS 的更多信息,您可以访问 NestJS 官方文档。https://docs.nestjs.com/
我使用 socket.io 并使用Redis Adapter处理 websocket 连接,并使用 wav npm 包从我们从 websocket 接收的 AudioBuffer 创建音频文件。
对于适配器的配置,我们必须创建一个适配器文件并将其添加到 main.ts 文件中。
import { NestFactory } from '@nestjs/core';
import { AppModule } from './app.module';
import { NestExpressApplication } from '@nestjs/platform-express';
import { RedisIoAdapter } from './common/adapters/redis-adapter';
global.__basedir =__dirname;

async function bootstrap() {
  const app = await NestFactory.create<NestExpressApplication>(AppModule);
  const redisIoAdapter = new RedisIoAdapter(app);
  await redisIoAdapter.connectToRedis();
  app.enableCors();
  app.useWebSocketAdapter(redisIoAdapter);
  const port = process.env.PORT_NUMBER;
  await app
    .listen(port)
    .then(() => console.log(`Listenings on http://localhost:${port}`));
}
bootstrap();
创建 Websocket 网关以接受 websocket 连接
在 Nest 中,网关只是一个带有 WebSocketGateway () 装饰器注释的类。它消除了回调的麻烦,如果我们将 socket.io 与 express 一起使用,我们将面临地狱级麻烦。我们可以通过使用GateWay类来使用简洁的代码。
import {
  SubscribeMessage,
  WebSocketGateway,
  WebSocketServer,
  OnGatewayConnection,
  OnGatewayDisconnect,
} from '@nestjs/websockets';
import { Server, Socket } from 'socket.io';
import fs from 'fs';
import path from 'path';
import { Readable } from 'stream';
import * as wav from 'wav';
@WebSocketGateway({
  transports: ['websocket'],
  cors: true,
  namespace: 'audio',
  path: '/save-audio',
})
export class AudioGateway implements OnGatewayConnection, OnGatewayDisconnect {
  @WebSocketServer()
  server: Server;
  uploadDir = '';
  private userWavFileWriters = {};
  constructor() {
    this.uploadDir = path.join(global.__basedir, 'uploads');
    if (!fs.existsSync(this.uploadDir)) {
      fs.mkdirSync(this.uploadDir);
    }
  }

  handleConnection(client: Socket) {
    console.log('Client connected:', client.id);
  }

  handleDisconnect(client: Socket) {
    console.log('Client disconnected:', client.id);
    // when user disconnects immediately wrap up the audio stream and delete the writer
    this.handleCloseSocket(client);
  }
  @SubscribeMessage('startRecording')
  handleStartRecording(client: Socket, data: ArrayBuffer) {
    const audioFileName = client.handshake.query.audioFileName as string;
    const audioSettings: { sampleRate: number; channelCount: number } =
      JSON.parse((client.handshake.query.settings as string) ?? 'false') ?? {
        sampleRate: 44100,
        channelCount: 2,
      };
    try {
      const existedWavFile = path.join(this.uploadDir, audioFileName + '.wav');
      // Audio File writer
      this.userWavFileWriters[audioFileName] = new wav.FileWriter(
        existedWavFile,
        {
          audioFormat: 1, // PCM
          channels: audioSettings.channelCount, // Stereo
          sampleRate: audioSettings.sampleRate,
        },
      );
    } catch (e) {
      // handle exception
    }
  }
  @SubscribeMessage('audioData')
  handleAudioData(client: Socket, payload: ArrayBuffer) {
    try {
      const audioFileName = client.handshake.query.audioFileName as string;
      const buffer = Buffer.from(payload);
      const singleReadable = new Readable();
      // eslint-disable-next-line @typescript-eslint/no-empty-function
      singleReadable._read = () => {}; // _read is required but you can noop it
      singleReadable.push(buffer);
      singleReadable.push(null);
      singleReadable.pipe(this.userWavFileWriters[audioFileName], {
        end: false,
      });
    } catch (e) {}
  }

  @SubscribeMessage('stopRecording')
  handleStopRecording(client: Socket) {
   this.handleCloseSocket(client);
  }

  private handleCloseSocket(client: Socket){
    const audioFileName = client.handshake.query.audioFileName as string;
    this.userWavFileWriters[audioFileName]?.end();
    delete this.userWavFileWriters[audioFileName];
  }
}
现在已经创建了一个用于现场录音的应用程序。我们可以对这个应用程序进行 docker 化,可以创建多个实例,并且可以使用负载均衡器,这样我们的应用程序就可以容错了。
作者:Tek Raj Pant
本文来自作者投稿,版权归原作者所有。如需转载,请注明出处:https://www.nxrte.com/jishu/27053.html