
对于客户端和服务器之间的交互,gRPC 是一个常见的概念。

什么是远程过程调用(RPC)?
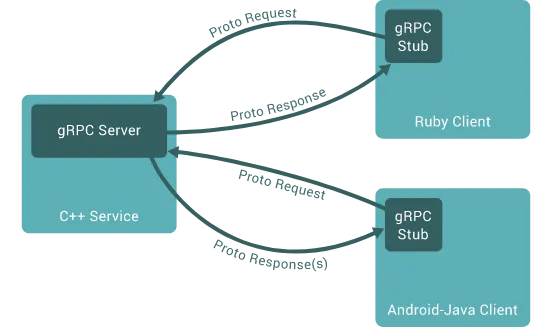
RPC 是一种软件通信协议。一个进程可以调用远程系统(如本地系统)上的一个过程(也称为函数或子程序),而无需事先了解远程系统的网络情况。RPC 使用传统的客户端-服务器模式。服务器定义程序,客户端请求远程服务器应用业务逻辑并返回结果。
Rest 与 gRPC:
表征状态转移(REST)是客户端与服务器之间的一种通信协议,通过 HTTP 1.1/HTTPS 1.1 与动词(PUT、POST、GET 等)进行交互。
gRPC 是谷歌推出的远程协议调用(Remote Protocol Call),是一种开源、基于合约、跨平台的通信协议,用于简化服务间通信。
gRPC 利用了 HTTP/2.0 和 TLS 的双向特性。它使用协议缓冲区作为有效载荷管理和序列化机制,类似于 Rest 的 JSON。
与 JSON 不同的是,protocol buffers 还包括三个主要部分:
- 一种合约定义语言,即proto3(最新的protocol buffer语言规范)。
- 生成的功能代码
- 特定语言的运行库
与HTTP/1.1顺序加载资源不同,HTTP/2.0使用TCP连接,单个连接承载许多数据流,因此不存在资源阻塞。在 HTTP/1.1 中,如果资源加载失败,序列将被阻止,我们可能会面临这样的问题。
什么是proto3?
syntax = 'proto3';

package bookStorePackage;

// Book service definition. defines all the rpc methods here
service Book {
    rpc createBook (BookItemReq) returns (BookItem);
    rpc readBook (BookRequest) returns (BookItem);
    rpc readBooks (Empty) returns (BooksList);
}

// inputs / request , e.g. BookItemReq
// outputs / response BookItem must be defined
// they are defined with a keyword of struct

message BookItemReq {
    string name = 1;
    string description = 2;
    string author = 3;
}

message BookItem {
    int32 id = 1;
    string name = 2;
    string description = 3;
    string author = 4;
}

message BookRequest {
    int32 id = 1;
}

message BooksList {
    repeated BookItem books = 1;
}

message Empty {}
`.proto` 包含 gRPC 的结构,并定义每个调用的过程和请求/响应。使用 protoc 插件将 .proto 文件转换为 proto 缓冲区文件。
protoc --proto_path=src --java_out=build/gen PROTO_PATH现在让我们进一步了解代码。你可以找到许多不带 TLS 的 gRPC 实现资源,在本文中我们将研究如何在Android 中使用 TLS 制作 gRPC 客户端。
在开始之前,我们需要有一个用任何语言编写的安全 gRPC 服务器。
如何使用 Android Studio?
首先,我们需要在 android 中建立一个新项目。在这个项目中,我们将使用一个空活动。接下来,设置依赖关系并在 build.gradle 中添加以下内容。
plugins {
id 'com.google.protobuf' version '0.8.18'
}
// this is used to generate proto buf file when you build the project
protobuf {
protoc {
artifact = "com.google.protobuf:protoc:3.21.7"
}
plugins {
grpc {
artifact = 'io.grpc:protoc-gen-grpc-java:1.51.0'
}
}
generateProtoTasks {
all().each { task ->
task.builtins {
java { option 'lite' }
}
task.plugins {
grpc { option 'lite' }
}
}
}
}
dependencies {
// for TLS based connection we need okhttp
implementation 'io.grpc:grpc-okhttp:1.51.1'
implementation 'io.grpc:grpc-protobuf-lite:1.51.1'
implementation 'io.grpc:grpc-stub:1.51.1'
// these are used to set up a secure client
implementation 'com.squareup.okhttp3:okhttp-tls:4.10.0'
implementation 'com.squareup.okhttp3:okhttp:4.10.0'
// for implementation of auto generated code
implementation 'javax.annotation:javax.annotation-api:1.3.2'
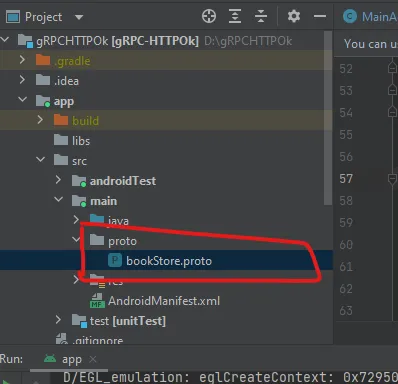
}将 proto 文件添加到我们的项目中:
我们需要将结构从android更改为project。现在可以在 app/src/main/proto 中添加 proto 文件。我们需要创建一个名为 proto 的目录,并将 .proto 文件放入其中。
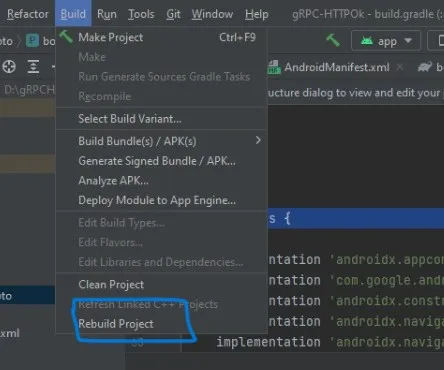
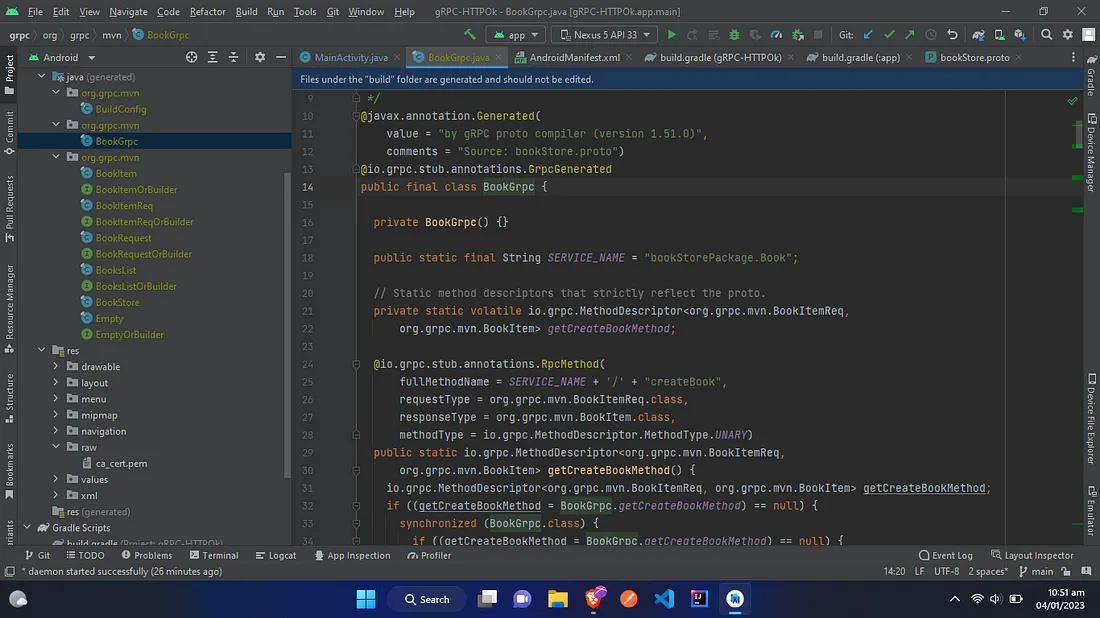
现在,我们需要通过 toolbar > build > rebuild project 来构建的项目,如下图:
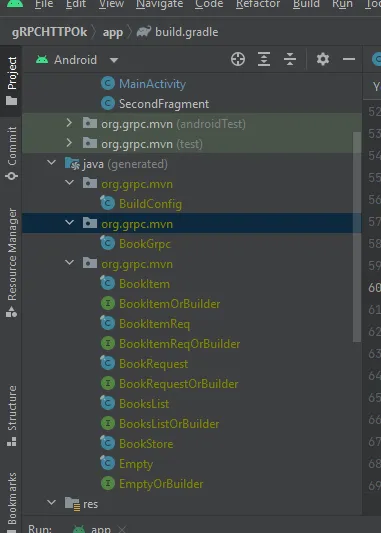
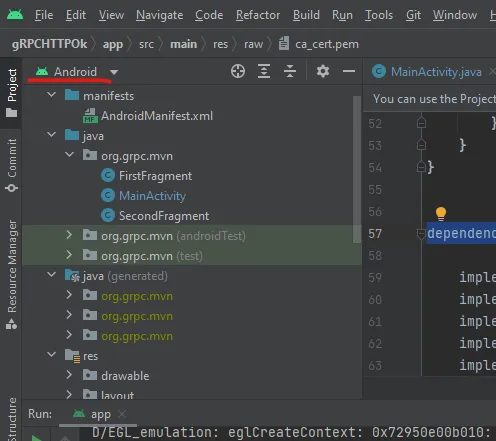
有一点很重要,在 Java 中,我们的项目中有一个特定的包名。如何在 proto 文件中指定该名称呢?很简单。我们需要为 java 添加一个选项,以指导编译器(protoc)生成 proto 缓冲文件。
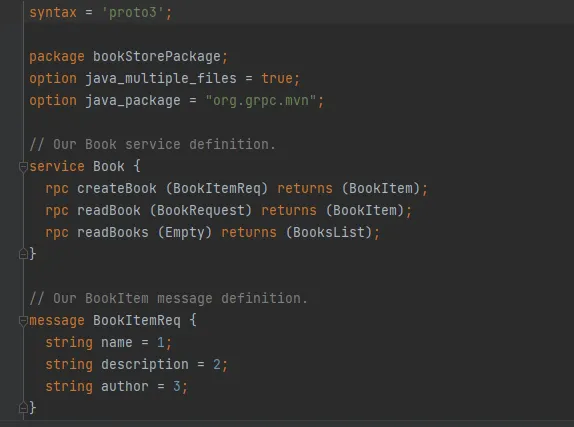
在 proto 文件中添加该选项后,编译器就会明白,它需要指定我们强制执行的软件包名称。默认情况下,编译器会使用 package 关键字作为包名。
现在,让我们深入研究如何设置客户端,以便通过安全连接与 gRPC 服务器通信。我们需要将签名证书放在应用程序 res 文件夹中的 raw 类别中:
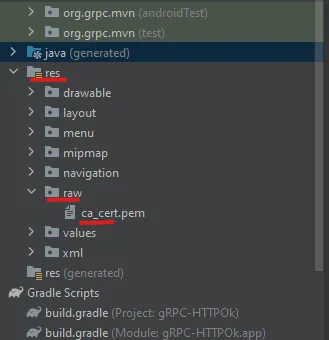
放置证书后,只需使用以下代码和 viola 即可轻松与我们的安全服务器进行通信。
        try{
            Resources res = getResources();
            InputStream instream = res.openRawResource(R.raw.ca_cert);
            CertificateFactory cf = CertificateFactory.getInstance("X.509");
            Certificate ca = cf.generateCertificate(instream);
            KeyStore kStore = KeyStore.getInstance(KeyStore.getDefaultType());
            kStore.load(null, null);
            kStore.setCertificateEntry("ca", ca);
            TrustManagerFactory tmf = TrustManagerFactory
                    .getInstance(TrustManagerFactory.getDefaultAlgorithm());
            tmf.init(kStore);
            TrustManager[]  trustManagers = tmf.getTrustManagers();
            if (trustManagers.length != 1 || !(trustManagers[0] instanceof X509TrustManager)) {
                throw new IllegalStateException("Unexpected default trust managers:" + Arrays.toString(trustManagers));
            }
            SSLContext context = SSLContext.getInstance("TLS");
            context.init(null, tmf.getTrustManagers(), null);
            SSLSocketFactory sslSocketFactory = context.getSocketFactory();

            final ManagedChannel channel = OkHttpChannelBuilder
                    .forAddress("IP Address",PORT)
                    .useTransportSecurity()
                    .overrideAuthority("add same DNS / IP:PORT entry here")
                    .sslSocketFactory(sslSocketFactory)
                    .build();
            // BookGrpc is an auto generated class from the proto we defined.
            BookGrpc.BookBlockingStub stub = BookGrpc.newBlockingStub(channel);
            // create a request object
            BookItemReq requestData = BookItemReq
                    .newBuilder()
                    .setName("AnyName")
                    .setAuthor("AnyAuthor")
                    .setDescription("Any Description")
                    .build();
            BookItem response = stub.createBook(requestData);
            // handle the response
            System.out.println(response);
            channel.shutdown();
        } catch (Exception e){
            e.printStackTrace();
        }
使用所提供的示例代码,您可以与安全的 gRPC 服务器进行通信。
代码的作用是什么?
我们知道,要建立安全连接,我们需要一套证书来确保通信是加密的。我们需要在 Android 应用程序中添加签名证书。
接下来,我们使用以下几行代码读取证书。
Resources res = getResources();
InputStream instream = res.openRawResource(R.raw.ca_cert);
首先,我们获取资源实例,然后使用函数 openRawResource 读取证书。接下来,我们从文件中生成证书,并将其添加为受信任证书。使用受信任证书,我们初始化 SSL 上下文实例,以初始化 SSL 套接字因子。SSL 套接字工厂是安全套接字的一个因素。
加密通道处理来自服务器的请求和响应。我们使用了 OkHttpChannelBuilder,它支持使用 SSLSocketFactor 在客户端和服务器之间提供安全通信介质。
如何自行获取证书?
您可以使用以下脚本生成证书:
rm *.pem
rm *.srl
rm *.cnf

# 1. Generate CA's private key and self-signed certificate
openssl req -x509 -newkey rsa:4096 -days 365 -nodes -keyout ca-key.pem -out ca-cert.pem -subj "/C=FR/ST=Occitanie/L=Toulouse/O=Test Org/OU=Test/CN=*.test/emailAddress=test@gmail.com"

echo "CA's self-signed certificate"
openssl x509 -in ca-cert.pem -noout -text

# 2. Generate web server's private key and certificate signing request (CSR)
openssl req -newkey rsa:4096 -nodes -keyout server-key.pem -out server-req.pem -subj "/C=FR/ST=Ile de France/L=Paris/O=Server TLS/OU=Server/CN=*.tls/emailAddress=tls@gmail.com"

# Remember that when we develop on localhost, It’s important to add the IP:0.0.0.0 as an Subject Alternative Name (SAN) extension to the certificate.
echo "subjectAltName=DNS:*.tls,DNS:example.com,IP:0.0.0.0" > server-ext.cnf
# Or you can use localhost DNS and grpc.ssl_target_name_override variable
# echo "subjectAltName=DNS:localhost" > server-ext.cnf

# 3. Use CA's private key to sign web server's CSR and get back the signed certificate
openssl x509 -req -in server-req.pem -days 60 -CA ca-cert.pem -CAkey ca-key.pem -CAcreateserial -out server-cert.pem -extfile server-ext.cnf

echo "Server's signed certificate"
openssl x509 -in server-cert.pem -noout -text

# 4. Generate client's private key and certificate signing request (CSR)
openssl req -newkey rsa:4096 -nodes -keyout client-key.pem -out client-req.pem -subj "/C=FR/ST=Alsace/L=Strasbourg/O=PC Client/OU=Computer/CN=*.client.com/emailAddress=client@gmail.com"

# Remember that when we develop on localhost, It’s important to add the IP:0.0.0.0 as an Subject Alternative Name (SAN) extension to the certificate.
echo "subjectAltName=DNS:eaple.com,IP:0.0.0.0" > client-ext.cnf

# 5. Use CA's private key to sign client's CSR and get back the signed certificate
openssl x509 -req -in client-req.pem -days 60 -CA ca-cert.pem -CAkey ca-key.pem -CAcreateserial -out client-cert.pem -extfile client-ext.cnf

echo "Client's signed certificate"
openssl x509 -in client-cert.pem -noout -text
以上完整代码地址:https://github.com/AbdullahJanKhan/android-grpc-tls
作者:Abdullah Jan Khan
版权声明:本文内容转自互联网,本文观点仅代表作者本人。本站仅提供信息存储空间服务,所有权归原作者所有。如发现本站有涉嫌抄袭侵权/违法违规的内容, 请发送邮件至1393616908@qq.com 举报,一经查实,本站将立刻删除。