
背景:客户要求 “根据网速添加自适应视频质量”,或者视频播放器可能在加载时加载了完整视频,这让网速较慢的用户等待了很长时间。也许您正在试图打造下一个具有最佳流媒体体验的大型视频平台。
我写这篇教程也是出于类似的原因,客户要求我添加自适应比特率,然后我就出去寻找资源,但却无法获得完整的解决方案,因此感到很沮丧。我将尽力为您提供一个简单的 HLS 实现,在后端使用 FFmpeg 将视频转换为多种质量,然后在前端使用 Video.js 流式传输 HLS 视频。
什么是 HLS(HTTP Live Streaming)?
HLS 是苹果公司开发的一种自适应比特率流协议,用于在互联网上传输媒体内容。它将视频分割成小块,并通过标准 HTTP 协议提供。HLS 可根据用户的可用带宽和设备能力动态调整视频流的质量,确保流畅播放而不会出现缓冲。
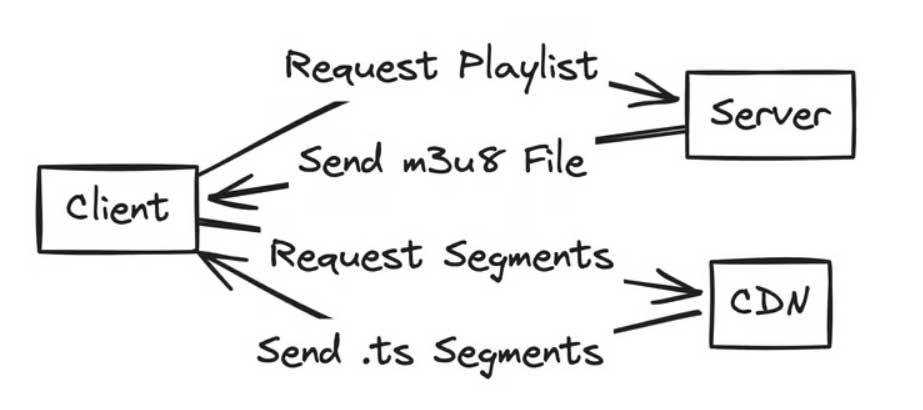
但是,等等!实际会发生什么?
当我们将 .mp4 或 .mov(或任何其他视频格式)转换为 HLS 时,它会将视频文件分割成更小的片段,并创建一个扩展名为 .m3u8 的播放列表文件。然后服务器将 .m3u8 文件提供给视频播放器,播放器请求 .ts 片段并自动调整视频比特率。

前提条件
在我们开始之前,请确保您已安装:
- Node.js 和 npm
- React.js
- Express.js
- Postman
将视频转换为 HLS 格式
首先必须先安装 FFmpeg,然后使用 ffmpeg 转换视频。
后台
1、初始化新的 NodeJs 应用程序并安装 express、cors、multer 和 uuid
npm i express cors multer uuid2、创建 index.js 文件
const express = require('express')
const cors = require('cors')
const PORT = 3000;

const app = express();

const corsOptions = {
    origin: "*",
};
app.use(cors(corsOptions));
app.use(express.json());


app.listen(PORT, () => {
    console.log(`Server is running on port ${PORT}`)
})
3、创建一个 middlewares 文件夹,添加一个 multer.js 文件并导出上传中间件。
确保在根目录中创建一个“uploads”文件夹
const multer = require('multer');

// Set up storage for uploaded files
const storage = multer.diskStorage({
    destination: (req, file, cb) => {
        cb(null, 'uploads/');
    },
    filename: (req, file, cb) => {
        cb(null, Date.now() + '-' + file.originalname);
    }
});

// Create the multer instance
const upload = multer({ storage: storage });

module.exports = upload;
4、在 index.js 文件中创建一个 /upload POST 路由,并添加以下代码:
const upload = require('./middlewares/multer')
const { exec } = require('child_process');
const fs = require('fs');
const uuid = require('uuid');
const path = require('path')

const chapter = {} // We will create an in-memory DB for now

app.use("/public", express.static(path.join(__dirname, "public")));

app.post('/upload', upload.single('video'), (req, res) => {
    const chapterId = uuid.v4(); // Generate a unique chapter ID
    const videoPath = req.file.path;
    const outputDir = `public/videos/${chapterId}`;
    const outputFileName = 'output.m3u8';
    const outputPath = path.join(outputDir, outputFileName);

    // Check if output directory exists, create if not
    if (!fs.existsSync(outputDir)) {
        fs.mkdirSync(outputDir, { recursive: true });
    }

    // Command to convert video to HLS format using ffmpeg
    const command = `ffmpeg -i ${videoPath} \
    -map 0:v -crf 23 -preset medium \
    -map 0:v -crf 28 -preset medium \
    -map 0:v -crf 32 -preset medium \
    -map 0:a? -c:a aac -b:a 128k \
    -hls_time 10 -hls_list_size 6 -f hls ${outputPath}`;

    // Execute ffmpeg command
    exec(command, (error, stdout, stderr) => {
        if (error) {
            console.error(`ffmpeg exec error: ${error}`);
            return res.status(500).json({ error: 'Failed to convert video to HLS format' });
        }
        console.log(`stdout: ${stdout}`);
        console.error(`stderr: ${stderr}`);
        const videoUrl = `public/videos/${chapterId}/${outputFileName}`;
        chapters[chapterId] = { videoUrl, title: req.body.title, description: req.body.description }; // Store chapter information
        res.json({ success: true, message: 'Video uploaded and converted to HLS.', chapterId });
    });
});
在上述代码中,我们基本上是将 video 作为输入文件,并将视频标题存储在上传文件夹中。
然后使用 ffmpeg 命令将文件转换为 HLS 格式。
让我用一分钟时间向你解释一下该命令:
const command = `ffmpeg -i ${videoPath} \
    -map 0:v -crf 23 -preset medium \
    -map 0:v -crf 28 -preset medium \
    -map 0:v -crf 32 -preset medium \
    -map 0:a? -c:a aac -b:a 128k \
-hls_time 10 -hls_list_size 6 -f hls ${outputPath}`;- ffmpeg: 这是处理多媒体文件的命令行工具。
- -i ${videoPath}: 此选项指定输入文件。${videoPath} 是输入视频文件路径的占位符。
- -map 0:v:该选项从输入文件中选择第一条数据流纳入输出,然后对其进行编码。
这里有三个映射 0:v,表示我们将创建包含多个视频流的输出,每个视频流都以不同的质量设置进行编码,但它们都将成为同一 HLS 输出的一部分。
- -crf 23、-crf 28、-crf 32:这些选项指定了视频编码的恒定速率系数(CRF)。CRF 是一种基于质量的编码方法,其中设定了目标质量水平,编码器会调整比特率以达到该质量水平。CRF 值越低,质量越高,但文件尺寸越大。
- -preset medium: 该选项指定编码预置,它决定了编码速度和压缩效率之间的权衡。中等预设是速度和压缩之间的平衡。其他预设包括 Veryslow、slow、fast、veryfast。
- -map 0:a? -c:a aac -b:a 128k: 该选项从输入文件中选择第一个音频流(? 表示如果有的话),并指定用于编码的音频编解码器(aac)和比特率(128k)。
- -hls_time 10:该选项设置 HLS 播放列表中每个片段的持续时间。在这种情况下,每个片段的长度为 10 秒。
- -hls_list_size 6:该选项设置 HLS 播放列表中条目数量的上限。达到此上限后,播放列表中的旧片段将被删除。
- -f hls: 此选项指定输出文件的格式,本例中为 HLS(HTTP 实时流)。
- ${outputPath}: 这是保存 HLS 文件的输出目录路径。
以下代码用于在 public 路由中静态提供 HLS 文件:
app.use("/public", express.static(path.join(__dirname, "public")));5、现在,我们将创建一个 /getVideo 路由,在该路由中,用户将提供 chapterId 作为查询,视频 URL 和标题将被发送回来
app.get('/getVideo', (req, res) => {
const { chapterId } = req.query;
if (!chapterId || !chapters[chapterId]) {
return res.status(404).json({ error: 'Chapter not found' });
}
const { title, videoUrl } = chapters[chapterId];
console.log(title, " ", videoUrl)
res.json({ title: title, url: videoUrl });
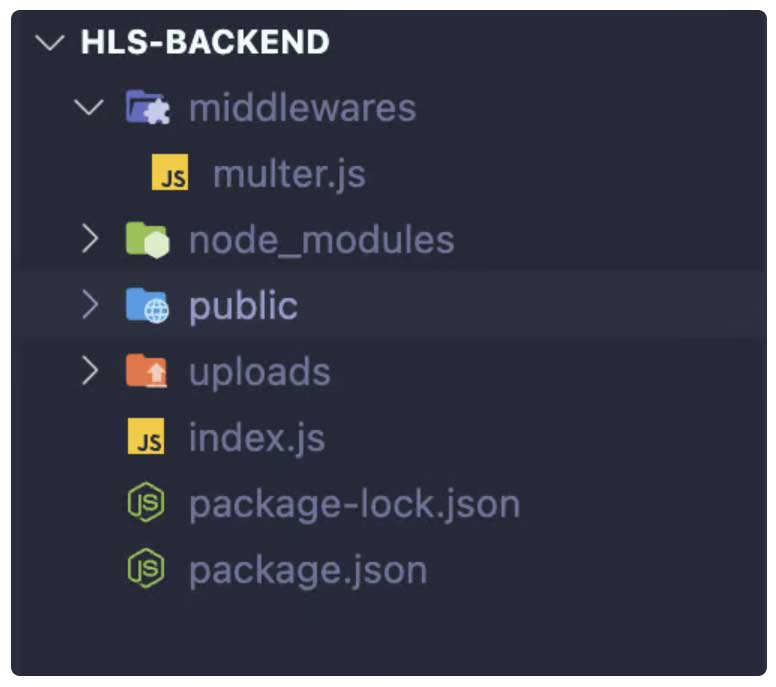
});最后,后台文件结构如下所示
最终 index.js 文件:
const express = require('express')
const upload = require('./middlewares/multer')
const { exec } = require('child_process');
const fs = require('fs');
const uuid = require('uuid');
const path = require('path')
const cors = require('cors')

const PORT = 3000;

const app = express();

const corsOptions = {
    origin: "*",
};
app.use(cors(corsOptions));
app.use(express.json());
app.use("/public", express.static(path.join(__dirname, "public")));
const chapters = {}

app.post('/upload', upload.single('video'), (req, res) => {
    const chapterId = uuid.v4(); // Generate a unique chapter ID
    const videoPath = req.file.path;
    const outputDir = `public/videos/${chapterId}`;
    const outputFileName = 'output.m3u8';
    const outputPath = path.join(outputDir, outputFileName);

    // Check if output directory exists, create if not
    if (!fs.existsSync(outputDir)) {
        fs.mkdirSync(outputDir, { recursive: true });
    }

    // Command to convert video to HLS format using ffmpeg
    const command = `ffmpeg -i ${videoPath} \
    -map 0:v -crf 23 -preset medium \
    -map 0:v -crf 28 -preset medium \
    -map 0:v -crf 32 -preset medium \
    -map 0:a? -c:a aac -b:a 128k \
    -hls_time 10 -hls_list_size 6 -f hls ${outputPath}`;

    // Execute ffmpeg command
    exec(command, (error, stdout, stderr) => {
        if (error) {
            console.error(`ffmpeg exec error: ${error}`);
            return res.status(500).json({ error: 'Failed to convert video to HLS format' });
        }
        console.log(`stdout: ${stdout}`);
        console.error(`stderr: ${stderr}`);
        const videoUrl = `public/videos/${chapterId}/${outputFileName}`;
        chapters[chapterId] = { videoUrl, title: req.body.title }; // Store chapter information
        res.json({ success: true, message: 'Video uploaded and converted to HLS.', chapterId });
    });
});

app.get('/getVideo', (req, res) => {
    const { chapterId } = req.query;
    if (!chapterId || !chapters[chapterId]) {
        return res.status(404).json({ error: 'Chapter not found' });
    }
    const { title, videoUrl } = chapters[chapterId];
    console.log(title, " ", videoUrl)
    res.json({ title: title, url: videoUrl });
});


app.listen(PORT, () => {
    console.log(`Server is running on port ${PORT}`)
})
使用 Postman 上传视频
- 启动后端服务器
node index.js- 打开 Postman
- 向 localhost:3000/upload 路由发出 POST 请求,并输入以下表单数据字段:
video: videoPath: file
title: videoTitle: string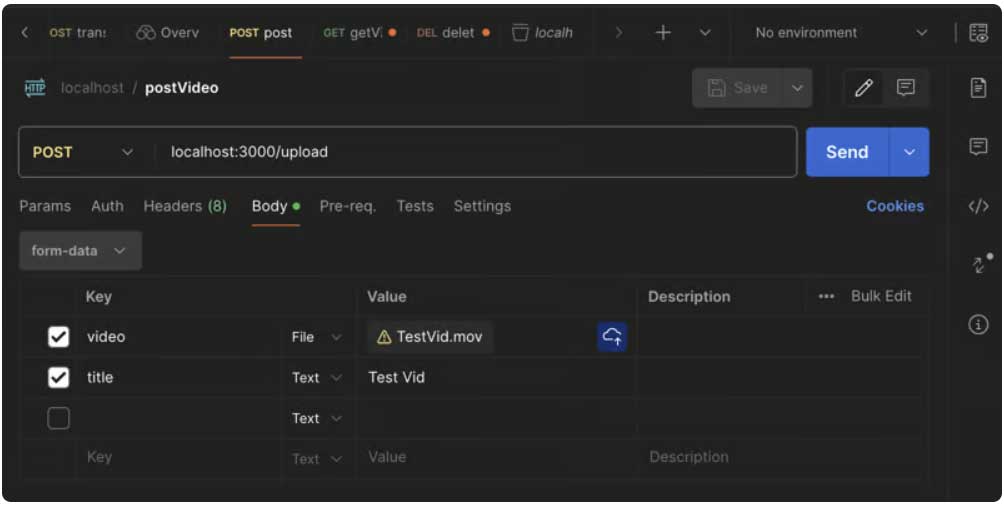
如果视频有效并转换成功,则响应如下:
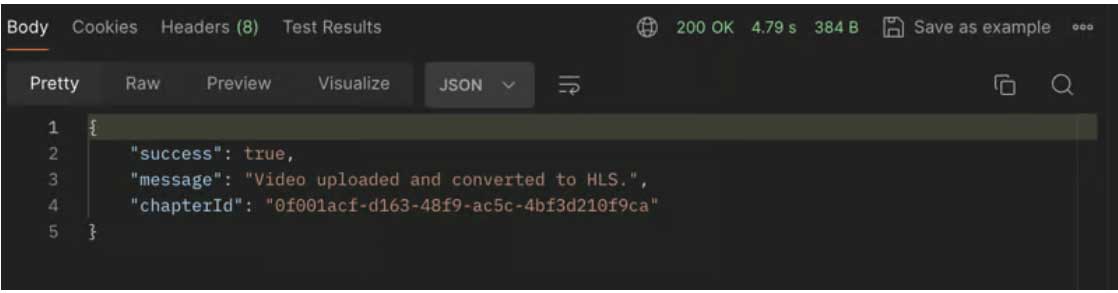
- 从响应中复制 chapterId。
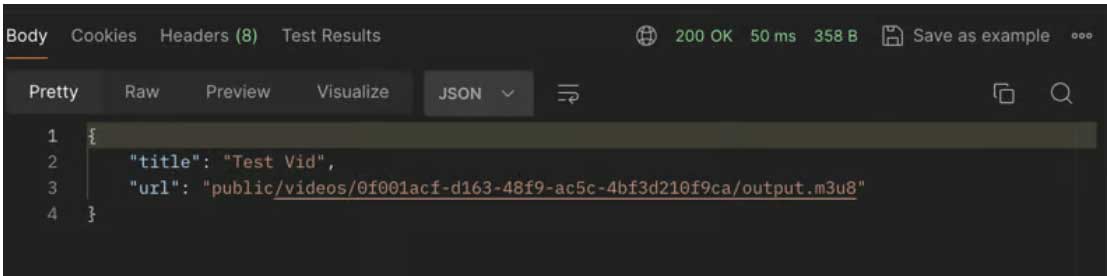
- 现在,以 chapterId 为参数,向 localhost:3000/getVideo 路由发出新的 GET 请求。
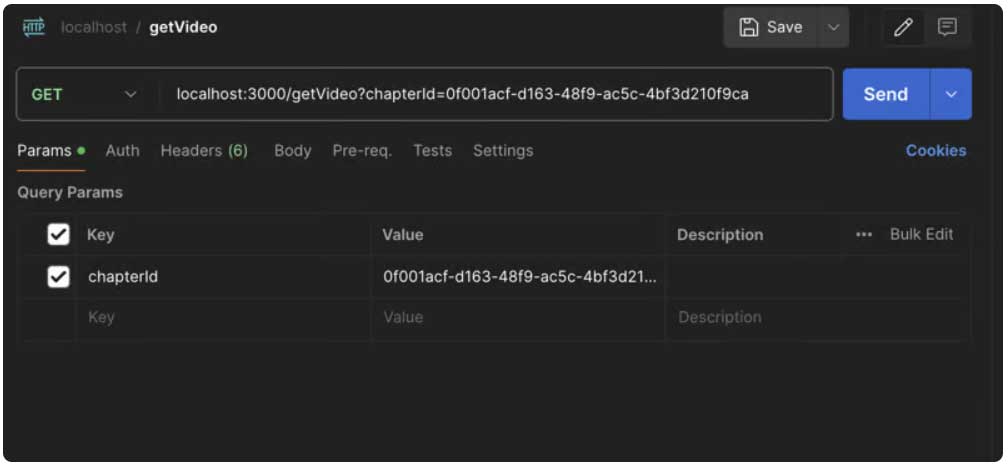
如果 chapterId 有效,您将收到视频标题和 URL 的回复。
视频已成功上传并转换。
检查后台 public和 uploads 文件夹。将生成一个或多个 output.ts 文件,并出现一个 output.m3u8 文件,即播放列表文件。

现在,我们需要创建前端。
前端
- 使用 Vite 初始化一个新的 React 应用程序:
npm create vite@latest hls-frontend- 安装
video.js
npm i video.js- 创建一个 VideoPlayer.jsx 组件:
import React, { useRef, useEffect } from 'react';
import videojs from 'video.js';
import 'video.js/dist/video-js.css';

export const VideoPlayer = (props) => {
    const videoRef = useRef(null);
    const playerRef = useRef(null);
    const { options, onReady } = props;

    useEffect(() => {

        // Make sure Video.js player is only initialized once
        if (!playerRef.current) {
            // The Video.js player needs to be _inside_ the component el for React 18 Strict Mode.
            const videoElement = document.createElement("video-js");

            videoElement.classList.add('vjs-big-play-centered');
            videoRef.current.appendChild(videoElement);

            const player = playerRef.current = videojs(videoElement, options, () => {
                videojs.log('player is ready');
                onReady && onReady(player);
            });


            // You could update an existing player in the `else` block here
            // on prop change, for example:
        } else {
            const player = playerRef.current;

            player.autoplay(options.autoplay);
            player.src(options.sources);
        }
    }, [options, videoRef]);

    // Dispose the Video.js player when the functional component unmounts
    useEffect(() => {
        const player = playerRef.current;

        return () => {
            if (player && !player.isDisposed()) {
                player.dispose();
                playerRef.current = null;
            }
        };
    }, [playerRef]);

    return (
        <div data-vjs-player style={{ width: "600px" }}>
            <div ref={videoRef} />
        </div>
    );
}

export default VideoPlayer;- 在 App.jsx 中编写以下代码:
import { useRef } from 'react'
import './App.css'
import VideoPlayer from './VideoPlayer';


function App() {
  var videoSrc = 'http://localhost:3000/public/videos/2d7b06b6-4913-4f75-907f-9c8c738a3395/output.m3u8';

  const playerRef = useRef(null);

  const videoJsOptions = {
    autoplay: true,
    controls: true,
    responsive: true,
    fluid: true,
    sources: [{
      src: videoSrc,
      type: 'application/x-mpegURL'
    }],
  };

  const handlePlayerReady = (player) => {
    playerRef.current = player;

    // You can handle player events here, for example:
    player.on('waiting', () => {
      videojs.log('player is waiting');
    });

    player.on('dispose', () => {
      videojs.log('player will dispose');
    });
  };


  return (
    <>
      <div>
        <VideoPlayer options={videoJsOptions} onReady={handlePlayerReady} />
      </div>
    </>
  )
}


export default App
目前,我们使用的是在 Postman 上发出 getVideo 请求后获得的视频网址。将 videoSrc 变量中的视频网址替换为hostname:port/url。稍后,您可以向后台发出 axios 请求,然后动态获取 url。
- 启动vite应用
npm run dev
现在 HLS 应用程序已准备就绪!您可以在此基础上进行其他改进,使其成为更好的应用程序。这里的目标是提供一个基本骨架,您可以在此基础上构建下一个大型应用程序!
作者:Indranil Chutia
译自:https://dev.to/indranilchutia/how-to-implement-hls-video-streaming-in-a-react-app-2cki
本文来自作者投稿,版权归原作者所有。如需转载,请注明出处:https://www.nxrte.com/jishu/47198.html