
在本文中,将解释用 AI 创建虚拟女友的过程。别担心,如果你不想要虚拟女朋友,也可以用来创建虚拟男友。
如果你有兴趣使用 Colab 生成你的女朋友/男朋友,你可以查看此处:https://colab.research.google.com/drive/1Nl5ioIkJdrsE-IoMUNPMsDt-wMi18JLN?usp=sharing
你还可以使用以下 repo 或此 colab notebook 跟随代码。
repo:https://github.com/gmongaras/AI_Girlfriend_Medium
colab notebook :https://colab.research.google.com/drive/1p7Z2_OCXt_FIQsYyvfsKADNDHgwRtZUS?usp=sharing
设置
首先,我们需要定义我真正想要实现的目标。我想要一个具有以下特征的虚拟女友:
- 她不应该花我几千美元。
- 她在一个合理的 GPU 上拟合。
- 我想和她说话。
- 她应该做出一些合理的回应。如果我问她关于学校的事情,她不应该回答关于汽车的问题。
- 她需要能记忆。
- 我应该能听到她的声音。
- 她应该能听到我说话。
- 我希望能够看到她(她不需要看到我)
- 我希望能够改变她的风格。
- 她应该能稍微动一下。静态图片显得乏味、没有生气。
要求很多,但幸运的是,所有这些任务在本文中都可以完成。
生成文本
让我们从生成文本开始,因为这是整个项目的基础。为此,我将使用 OpenAI API 并使用 davinci-3 模型。设置这部分非常简单。
注意:可以按照此教程获得 OpenAI 密钥:https://elephas.app/blog/how-to-create-openai-api-keys-cl5c4f21d281431po7k8fgyol0
# Open AI Key
openai.api_key = "your key here"
# Get the model
models = openai.Model
# Initial prompt with few-shot learning
initial_prompt = "The following is a conversation with me and my waifu girlfriendnn"
        "Me: HellonGirlfriend: Hellon"
        "Me: How are you?nGirlfriend: I am goodn"
        "Me: I love you.n"
# API request to GPT using the largest model - davinci-003
# https://beta.openai.com/docs/api-reference/introduction?lang=python
output = openai.Completion.create(
  model="text-davinci-003",
  prompt=initial_prompt,
  max_tokens=200,
  temperature=0.7
)["choices"][0]["text"]
print(output)
"Girlfriend: I appreciate the sentiment, but I don't think we know each other well enough for that."她不喜欢我,但这可以通过多学习几次来解决。我正在使用少样本学习来教 GPT 我希望它如何响应。注意它如何回应“女朋友:”,这表明它知道如何遵循我希望它回应的风格。
少样本方法有两个部分。第一行“The following …”告诉 GPT 它是谁以及它应该如何表现。接下来的几行“Me: … Girlfriend: …”是“few-show”部分,告诉GPT它应该如何行动,应该如何回应。
如果你想了解更多关于提示 GPT的信息,OpenAI发布了 GPT 的几个应用程序的示例提示列表:https://platform.openai.com/examples
GPT 现已设置。我们可以继续进行下一部分。
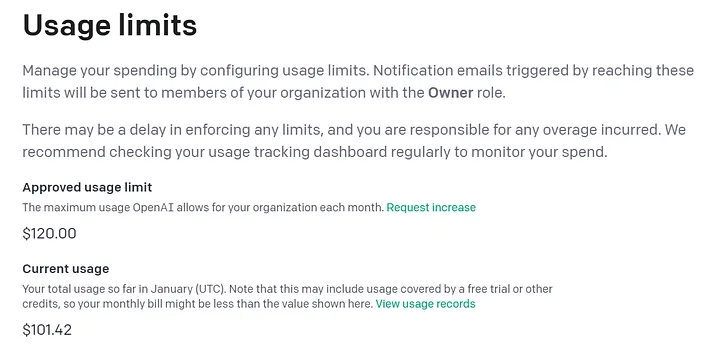

我忘了它不是免费的,随着内存的增长,我为每一次迭代花费的钱会越来越多。也许我应该找一个替代方案。
GPT替代方案
让我们尝试寻找替代方案。尽管它可能甚至不如 GPT-3 好,但总比花费 100 美元要好。
HuggingFace 。稍微找了一下,发现了一个LLM(Large Language Model),看起来很有前途。
可以在此处找到原始模型:https://huggingface.co/EleutherAI/gpt-neo-1.3B
但它是在书籍数据上训练的。在测试模型时,它并不知道如何进行对话。所以,我决定对其进行微调,使其更适合对话。
可以在此处找到经过微调的模型:https://huggingface.co/gmongaras/gpt-anime-sub-1.3B/
以这种方式微调产生了一个主要跟随对话的模型,但它是免费的。
微调模型是指你采用预训练模型并以某种方式对其进行训练,使其在特定任务中表现更好。这个想法背后的直觉是,从一个已经知道如何完成类似任务的模型开始,这将加快训练速度,而不是使用一个随机模型从头开始训练。
此外,如果只重新训练模型的一部分而不是整个模型,则可以节省计算资源。在我们的案例中,我们有一个通用的模型,它知道如何生成和完成文本,我对它进行了微调,使其在提示对话时表现更好。
下面是用于加载新模型并获得示例输出的代码:
# Load in the model
test_model = pipeline('text-generation',model="gmongaras/gpt-anime-sub-1.3B",
                      tokenizer="EleutherAI/gpt-neo-1.3B",
                      max_new_tokens=50,
                      torch_dtype=torch.float16,framework="pt",
                      device=torch.device("cuda:0"),
                      pad_token_id=50256)
# Used to get a response from the model
def get_response(input_text):
    return test_model(input_text)[0]["generated_text"][
        len(input_text):].split("n")[0].replace("Girlfriend: ", "")
print(get_response(initial_prompt))
'I do too.'不错,女朋友看起来很爱我。到目前为止,通过这个替代方案,我已经完成了功能 1-4。继续下一个功能。
她需要能记忆
这些 LLM 的一个大问题是,它们是内存消耗大户。原始的 Transformer 模型使用了注意力,并且该模型的内存使用量与用作输入的序列的大小成二次方增长。新模型可能使用线性注意力或某种性能更好的机制,但仍然存在内存限制。此约束限制了可以输入到模型中的序列长度。
我使用的当前模型的最大令牌长度为 2048 个标记。请注意,令牌不是单词,因为该模型可能使用了一种WordPiece 分词器。所以每个单词都是多个标记,而不仅仅是一个标记,它对我们可以给模型的单词数量给出了更多的限制。
为了解决这个问题,我们需要一些方法来限制输入模型的标记数量。第一个想法可能只是根据标记的数量来切割序列,但随后我们遇到了没有内存的问题,因为所有被切断的标记都将永远丢失。为了解决这个问题,我需要添加一个内存系统。
我经历了多次记忆迭代。一开始,我想我可以用自动编码器 (AE) 总结模型,并随着时间的推移组合生成的潜在模型,但无论我怎么努力,这根本不起作用。最后,我用了最不复杂的技巧,根据需要总结文本。
我使用一个三步系统来帮助组织总结过程和提示过程:
- 提示的第一部分是所有过去 prompts 的总结/摘要,限制在 512 个字符以内。
- 提示的下一部分是总结之后的对话历史(摘要)。可以有一个或多个部分创建将很快汇总的信息队列。接下来将总结最旧的文本块。我使用了 256 个字的块大小。这部分很重要,原因有二。首先是为模型提供更详细的近期历史记录。第二个是提供我们希望模型响应的样式示例。
- 最后一部分是当前输入的提示,以及提示的一些历史记录和 256 个单词的最大序列长度。
该系统通过保持每个部分的大小不变来工作。当文本量超过定义的限制时,我将当前提示块 (3) 移至历史队列 (2)。然后,我将历史的最旧部分 (2) 附加到当前摘要 (1),并总结替换旧摘要 (1) 的串联文本。
为了提示模型,我只是将这三个部分连接起来,以使用过去提示的历史记录和整个对话的摘要来进行大量提示。
为了总结文本,我使用了另一个 Hugging Face 模型,可以在此处找到:https://huggingface.co/pszemraj/led-large-book-summary
我发现与其他几个 Hugging Face 模型相比,这个模型最能总结对话的历史。
除了这种“记忆”帮助我的女朋友记住我们所说的话,我还用它来重新加载我过去的谈话。记忆系统的三个部分可以保存并重新加载,因此对话不会从头开始。
这部分满足了要求 5!
我们需要互相倾听
这部分很简单。我只需使用 TTS(文本到语音)模型和 STT(语音到文本)模型,就可以非常轻松地在我和我的计算机之间创建来回音频。
我训练的模型的一个问题是,它倾向于理解我给它的例子,但大多数时候,它并不完美并产生如下输出:
Me: Who are you?                   <- My input
Girlfriend: Me: I don't know you    <- Its output
为了弥补这个问题,我可以在询问任何事情之前给它更多的例子来说明我希望它如何响应,或者清理输出的序列。我选择后者,只是删除“Me:”或“Girlfriend:”的所有实例。get_reponse 函数变为如下。
# Used to get a response from the model
def get_response(input_text):
    return test_model(input_text)[0]["generated_text"][
        len(input_text):].split("n")[0].replace("Girlfriend: ", "").replace("Me: ", "").split(":")[0]
有了更新的响应函数,让我们创建一个循环来不断更新提示,并在用户和我的女朋友之间创建一个小的来回。
我正在为 STT 使用语音识别库,为 TTS 使用 gTTS。gTTS 只是一个基本的 TTS,没有任何语音定制。
# Used for STT
r = sr.Recognizer()
# Transcribes audio to text
def audio_to_text(audio):
    try:
        text = r.recognize_google(audio)
    except sr.UnknownValueError:
        text = "" # Default to nothing

    return text
# Prompt that will be continuously updated
global prompt
prompt = "The following is a conversation with me and my waifu girlfriendnn"
        "Me: HellonGirlfriend: Hellon"
        "Me: How are you?nGirlfriend: I am goodn"
# Latest reponse variable
global cur_resp
# Initialize audio device
try:
mixer.init()
except pygame.error:
pass
# Handles audio input and returns a response
def handle_audio(audio_pth):
global prompt
global cur_resp
# Get the audio if there is any
if audio_pth:
# Open the wav file and read in the data
# Get the audio data
audio = sr.AudioFile(audio_pth)
with audio as source:
audio = r.record(source)
# Get the text from the audio
text = audio_to_text(audio)
# Add the text to the prompt so far
prompt += f"Me: {text}n"
# Get a response
resp = get_response(prompt)
# Add the response to the prompt
prompt += f"Girlfriend: {resp}n"
# Ensure audio is unloaded
try:
mixer.stop()
mixer.music.unload()
except pygame.error:
pass
# When the response is generated create a new audio file
myobj = gTTS(text=resp, lang='en', slow=False)
myobj.save("tmp.mp3")
# Play the audio file
try:
mixer.music.load('tmp.mp3')
mixer.music.play()
except pygame.error:
display(Audio("tmp.mp3", autoplay=True))
cur_resp = resp
return resp
return cur_resp
audio_interface = gr.Blocks()
with audio_interface:
audio_blk = gr.Audio(source="microphone", type="filepath", label="Response", live=True)
text_blk = gr.Textbox(label="Reponse")
audio_blk.change(handle_audio, inputs=[audio_blk], outputs=[text_blk])
audio_interface.launch(debug=True)在本文的其余部分,我将使用 Gradio 作为界面库,因为它很简单,我在完整的应用程序中使用了它。
另外,为了让这个笔记本 Colab 兼容,我必须使用“display(Audio)”,它要求界面以调试模式启动,并使运行时与界面同步。要停止运行时循环,请单击页面顶部的停止按钮。
旁注:我想添加自定义音频,但我发现一次性方法花费的时间比我希望生成音频剪辑的时间长。所以我决定让模型保持基本的声音。
如果有兴趣,我发现有两个回复看起来很有希望,但速度不够快,无法进行流畅的对话。
- First repo:https://github.com/neonbjb/tortoise-tts
- Second repo:https://github.com/pkhungurn/talking-head-anime-2-demo
这部分涵盖功能 6 和 7!
我应该能见到她
能够与我的计算机交谈非常有趣,我想看看我在和谁交谈。人们可能认为我在电脑上对着文字说话很疯狂,但如果我对着图像说话,我就不会再看起来很疯狂了~
为了生成我女朋友的图像,我将使用某种 diffusion 模型。由于stable diffusion 是免费和开源的,因此很容易找到我想要使用的diffusion 模型。我打算使用的是: https://huggingface.co/hakurei/waifu-diffusion,因为我认为输出看起来不错。
设置很容易,只需使用 Hugging Face API,我们就得到了一张我女朋友的照片:
# Get the model
pipe = StableDiffusionPipeline.from_pretrained(
    'hakurei/waifu-diffusion',
    torch_dtype=torch.float16,
).to('cuda')
# Remove filter
# pipe.safety_checker = lambda images, clip_input: (images, False)
# Create the image
settings = "1girl,solo focus,very wide shot,feamle focus,ratio:16:9,detailed,looking at viewer,facing viewer,facing forward,vtuber"
characteristics = "waifu,female,brown hair,blue eyes,sidelocks,slight blush,happy"
prompt = f"{settings} {characteristics}"
with autocast("cuda"):
    image = pipe(prompt, guidance_scale=10)["images"][0]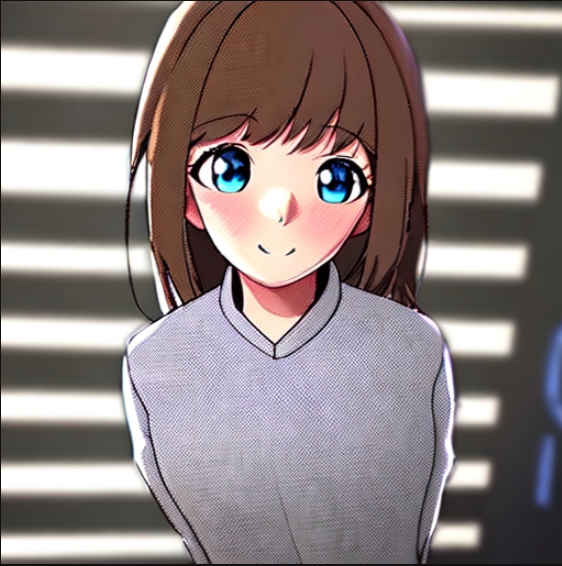
我试图让她的脸在图像的中间,并直接看着我,这样我就可以为她制作动画。到目前为止,这些提示看起来足以达到该目标。
我添加了一条注释行来删除过滤器,如果你想从模型中删除过滤器,可以使用该语句。该过滤器非常保守,几乎可以阻挡生成的所有图像。
根据上面的提示,我还没有生成 NSFW 图片,但是如果打开过滤器,一半的图像会被阻止,并显示“NSFW content was detected in one or more images. A black image will be returned instead. Try again with a different prompt and/or seed.” 所以,我添加了一个选项来关闭它,因为它真的很烦人。
这涵盖了第 8 部分和第 9 部分!只剩下一项功能了。
我想让她稍微动一下
现在,她一动不动,有点无聊。我有点想让她眨眼,看起来像是在说话。我想到的第一个想法是使用 VTuber 软件为静止图像添加动画。唯一的问题是大多数 VTuber 软件都不是开源的。即使它是开源的,该软件也可能需要使用相机来模拟人体运动。
幸运的是,我找到了以下repo:
https://github.com/pkhungurn/talking-head-anime-demo
当然,可能需要进行一些编辑才能准确获得所需内容,但这没关系。
该 repo 允许在给定原始图像和矢量的情况下使用要移动的单个图像。向量对于图像可以呈现的每种风格都有一个元素。向量的这些部分通常表示应应用该样式的百分比。例如,下面是更改索引 12 和 13 的结果:
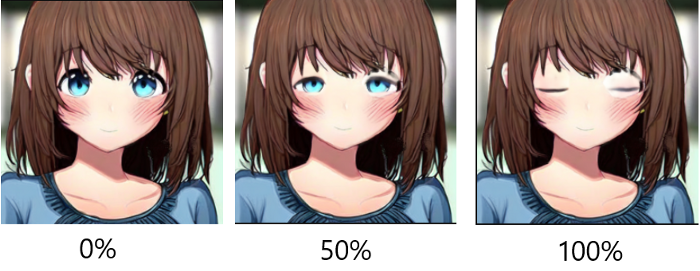
循环可以使用 Gradio 实时生成。

我还添加了瞳孔放大,因为我认为这样效果看起来更好。

使用样式向量,我们可以更改我在 repo 中记录的图像的所有类型的组件:https://github.com/gmongaras/AI_Girlfriend/blob/master/Img_Mover/Img_Mover.py
如果你一次随机更改所有元素会发生什么?

# Let's initialize the object to allow the image to move
device = torch.device("cuda:0")
blink_time = 0.66
mover = Img_Mover(device, blink_time, "test3.png", automatic_EMA=True)

global cur_vec_update_cycle
cur_vec_update_cycle = [0, 0.25, 0.5, 0.75, 1, 0.75, 0.5, 0.25, 0]
global cur_vec_update_cycle_2
cur_vec_update_cycle_2 = [0, 0, 0.25, 0.5, 0.75, 0.5, 0.25, 0, 0]
global cur_vec_num_its
cur_vec_num_its = 100

# Show random movements?
global cur_vec_random_movements
cur_vec_random_movements = True

def update_loop():
    global cur_vec_update_cycle
    global cur_vec_update_cycle_2
    global cur_vec_num_its
    global cur_vec_random_movements

    # Initial pose
    mover.pose *= 0
    yield mover.change_pose()


    for i in range(0, cur_vec_num_its):
        # Looping
        i %= len(cur_vec_update_cycle)

        # Update vector
        mover.pose[12] = mover.pose[13] =
            cur_vec_update_cycle[i]
        mover.pose[24] = mover.pose[25] =
            cur_vec_update_cycle_2[i]
        if cur_vec_random_movements:
            mover.pose[:37] = torch.rand(37,
                device=mover.pose.device, dtype=torch.float16)/2
            mover.pose[37:] = torch.rand(5,
                device=mover.pose.device, dtype=torch.float16)*2-1

        # Show image
        yield mover.change_pose()

    mover.pose *= 0
    yield mover.change_pose()

# Gradio interface
interface = gr.Blocks()
with interface:
    # Note gallery expects a 3-D array: (L, W, 3)
    gallery = gr.Image(label="Generated images", show_label=False)
        .style(height=300)
    start_btn = gr.Button(label="Start Animation")
    start_btn.click(update_loop, inputs=[], outputs=[gallery], queue=True)

# Start interface with queuing for live image updating
interface.queue().launch()
使用这个模型来使静止图像动起来非常容易,但我希望它是实时的和一致的。如果我想让她对上音频的口型,那么我需要找到一种方法,以可靠且一致的速率生成帧。
目前,在 A100 和 RTX 1000 上运行此代码的生成速度将完全不同,但如果我播放音频剪辑,该剪辑会以恒定速率生成音频。
生成实时动画
在生成实时动画时,我想到了两个选项:
- 在显示动画之前,我需要预先生成几帧、创建动画并将动画与我希望它运行的时间长度对齐。
- 根据需要实时生成帧。
如果我选择第一个选项,那么生成动画将需要一段时间。这种延迟对于长音频剪辑来说尤其麻烦。我决定采用第二种方法,因为动画是动态生成的,减少了响应的等待时间。
使用 EWMA 进行生成时序
对于实时生成,我需要知道生成单帧需要多长时间。为了获得此统计数据,我将在生成单个帧所需的时间内使用指数加权移动平均线 (EWMA)。

时刻 t 的 EWMA考虑了上一时刻和这一时刻 t 。对于 α,我将使用 0.5 的值,对先前的加权平均值和当前值赋予相同的权重。
生成速度会根据当时计算机上运行的内容而变化。因此,为了确保 EWMA 保持最新,我们可以在每次生成帧后更新该值。然后,使用 EWMA,因为我们知道我们想要眨眼多长时间(大约 0.7 秒),所以我们可以估计所需要生成的帧数,假设 EWMA 是准确的:

让我们更改代码以更新和使用 EWMA
mover.automatic_EMA = False


# How many blinks?
global number_of_blinks
number_of_blinks = 20

def update_loop():
    global number_of_blinks
    time_to_blink = "N/A"
    error = "N/A"

    # Reset EMA and cycle
    mover.EMA = 0.2
    mover.eye_cycle_end = False

    # Initial pose
    mover.pose *= 0
    yield mover.change_pose(), time_to_blink, error

    for i in range(0, number_of_blinks):
         # Begin blink timer
        frame_start = timer_start = time.time()

        # Iterate until the blink is complete
        while not mover.eye_cycle_end:

            # Update the internal vector with the
            # next iteration of the blink cycle
            pose = mover.Move_eyes()

            # Update the EMA
            mover.update_EMA(time.time()-frame_start)

            # Start timer for a single generation
            frame_start = time.time()

            # Show image
            yield mover.change_pose(), time_to_blink, error

        # Reset flag for another blink
        mover.eye_cycle_end = False

        # End blink timer
        time_to_blink = time.time()-timer_start
        error = abs(mover.total_blink_time_i-time_to_blink)

        # Blink anywhere between 2 and 7 secods with
        # a mean around 5 seconds (avg blink wait time)
        time.sleep(np.clip(np.random.normal(5, 1, size=1)[0], 2, 7))

    mover.pose *= 0
    yield mover.change_pose(), time_to_blink, error

# Gradio interface
interface = gr.Blocks()
with interface:
    # Note gallery expects a 3-D array: (L, W, 3)
    gallery = gr.Image(label="Generated images", show_label=False)
        .style(height=300)
    time_text = gr.Textbox(label="Time to blink")
    error_text = gr.Textbox(label=f"Error between desired ({mover.total_blink_time_i} seconds) and actual time")
    start_btn = gr.Button(label="Start Animation")
    start_btn.click(update_loop, inputs=[], outputs=[gallery, time_text, error_text], queue=True)

# Start interface with queuing for live image updating
interface.queue(concurrency_count=3).launch(debug=True, share=True, inline=False, inbrowser=True)
# Note if you lose the link, press Ctrl+Shift+T to get the tab back
查看视频效果:https://youtu.be/RQTAWsozx3w
EWMA 表现非常好,眨眼时间看起来正好在我想要的时间范围内。现在有一个内部状态允许实时动画。
定时开口
我的女朋友看起来不再像静止图像了!我对此很满意,但为什么不继续呢?
让我们再添加一些效果,让她看起来像是在和我说话,而不是只是对我诡异地微笑。
我们使用了一个 for 循环来生成眨眼,但是如果要让她说话,使用基本的“for”循环是行不通的,因为眨眼和说话是独立发生的,但是动画依赖于口型同步和眨眼。“for”循环本身需要同步更新嘴巴和眼睛。
在深入实施之前,我正式定义了以下要求,以实现添加运动的目标:
- 我希望眨眼时常发生,但频率不一致。
- 我希望口型大部分与播放的音频同步。
- 我希望眨眼有可能在嘴动时发生。
- 我希望图像看起来像在实时移动,延迟尽可能少。
到目前为止,我已经实现了目标 1 和 4。为了实现其他两个目标,我创建了三个将并行运行的独立函数。
- main 函数将无限期运行,直到它发现由于矢量更改需要更新图像。当它发现需要更新图像时,它会更新它并显示新图像。
- 下一个功能是眨眼功能。此函数也无限期地运行。每隔一段时间,这个函数就会触发眨眼循环。每个循环都由一次眨眼组成,并通过更改样式向量来实现。为了确保更新看起来顺利,它会等到显示下一个闪烁帧时再次更改矢量。
- 最后一个函数是嘴巴运动函数,它只在需要生成新音频时运行。与眨眼功能一样,它会根据需要更改样式向量。
三个功能同时运行。当线程 3 检查样式向量的更新时,线程 1 和 2 更新样式向量并等待它显示,然后再更新它。
就像眼球运动一样,嘴巴运动在向量中表示为百分比。此外,与眼球运动一样,我们需要嘴巴循环打开和关闭一次的持续时间。这些信息更难获得,但我们可以将生成的音频序列通过模型传递给每个单词的时间步长,并根据这些时间步长张开和闭上嘴巴。
具体来说,我按照以下步骤来同步嘴巴和音频:
- 获取音频中每个单词的时间步长。
- 开始播放音频并等到第一个单词的口型同步。
- 计算同步第一个单词的嘴部运动所需的帧数和嘴部运动百分比。
- 遍历所有帧。假设 EWMA 是正确的,词尾应该与闭嘴对齐。
- 等到下一个字。
- 重复步骤 3、4 和 5,直到音频播放完毕。
下面的代码在笔记本中实现了这些要求。
# We need the entire girlfriend object for this part
try:
    del mover
except NameError:
    pass
obj = Girlfriend_Obj()

def event_loop():
    # Initial update to make everything visible
    yield obj.last_image

    # Quick calibration. Blink 10 times
    # and calibrate the time it takes
    # to show the image for the EWMA
    for i in range(0, 10):
        s = time.time()
        obj.img_anim.eye_cycle_end = False
        while obj.img_anim.eye_cycle_end == False:
            obj.img_anim.Move_eyes()
            img = obj.img_anim.change_pose()
            obj.img_anim.update_EMA(time.time()-s)
            s = time.time()
            yield img
    obj.img_anim.eye_cycle_end = False

    # Start the blink loop
    if obj.b_thread == None:
        obj.b_thread = threading.Thread(target=obj.run_blink_loop, args=())
        obj.b_thread.start()

    # Make sure the mouth isn't already moving
    if obj.generating_mouth_movement == True:
        return
    # Make sure the thread is not running
    if obj.m_thread is not None:
        obj.m_thread.join()
    # Start the mouth movement loop
    obj.m_thread = threading.Thread(target=obj.run_talk_loop, args=("test_audio.mp3",))
    obj.m_thread.start()

    obj.generating_mouth_movement == True
    while True:
        # Wait until a new frame needs to be generated
        if obj.generating_mouth_movement == True:
            if obj.img_anim.mouth_frame_disp == False:
                # Change the pose and show the image
                img = obj.img_anim.change_pose()

                yield img
        else:
            # Start the mouth movement loop
            if obj.img_anim.eye_frame_disp == False:
                # Change the pose and show the image
                img = obj.img_anim.change_pose()

                yield img

        time.sleep(0.0001)

# Gradio interface
interface = gr.Blocks()
with interface:
    # Note gallery expects a 3-D array: (L, W, 3)
    gallery = gr.Image(label="Generated images", show_label=False)
        .style(height=300)
    start_btn = gr.Button(label="Start Animation")
    start_btn.click(event_loop, inputs=[], outputs=[gallery], queue=True)

# Start interface with queuing for live image updating
interface.queue().launch(inline=False, inbrowser=True)
# IF colab:
# interface.queue().launch(debug=True, share=True, inline=False, inbrowser=True)
查看视频效果:https://youtu.be/PFwoKE6R2VU
请注意,EWMA 用于嘴部运动和眨眼循环,以便为每个眨眼/嘴部运动周期生成预定义的运动速率。通过这种方式,可以即时估计帧数,并且,图像生成似乎是实时发生的。
我认为输出看起来足够好。这符合我定义的第 10 个要求!
注意:如果在 Colab 笔记本中运行,输出动画可能看起来不太好,因为 Colab 免费提供的 GPU 不是很好。
完成输出
如果你想知道最终的程序长什么样,下面有一个例子,是我和我虚拟女朋友的对话。
查看视频效果:https://youtu.be/PxsyIjzlcCM
- repo:https://github.com/gmongaras/AI_Girlfriend
- colab:https://colab.research.google.com/drive/1Nl5ioIkJdrsE-IoMUNPMsDt-wMi18JLN?usp=sharing
以上文章来源于深度学习与计算机视觉 ,作者磐怼怼
版权声明:本文内容转自互联网,本文观点仅代表作者本人。本站仅提供信息存储空间服务,所有权归原作者所有。如发现本站有涉嫌抄袭侵权/违法违规的内容, 请发送邮件至1393616908@qq.com 举报,一经查实,本站将立刻删除。