
在前面的博文中我们介绍了关于使用NDK编译FFMpeg6.0的一些坑以及相关的解决方法。
详情请参考:NDK编译ffmpeg6.0与x264的坑
在写《NDK编译ffmpeg6.0与x264的坑》一文的时候就说过了,我们编译FFmpeg6.0的目的就是为了体验一下它NDK式的MediaCodec硬解码以及硬编码。
今天我们就在android上使用FFmpeg6.0来体验一下它的硬解码,通过FFmpeg调用MediaCodec将视频数据解码为yuv数据并保存。
关于FFmpeg在android上硬解码的相关博文之前已经写过一篇博文:ffmpeg之硬解码
只是之前的需要通过注册JNI的方式调用MediaCodec,但这在FFmpeg6.0之后不需要了。
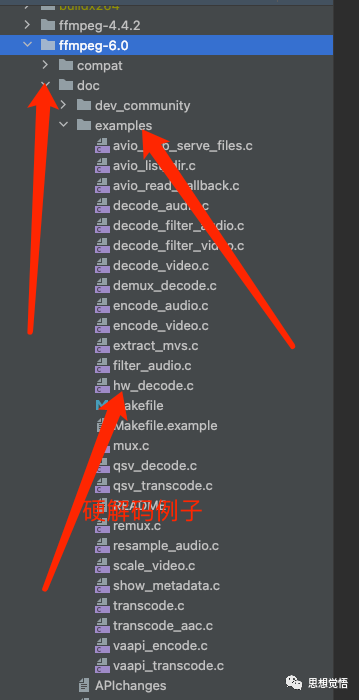
在这里顺便提一下一个关于学习ffmpeg的方法,众所周知,其实最好的学习资料就是官方的资料,没有比官方更权威的资料了。 一般在ffmpeg的源码目录doc/examples下就有很多例子,例如我们想学习下ffmpeg硬解码的例子,就可以研究该目录下的hw_decode.c这个例子。

FFmpeg6.0使用MediaCodec硬解码
下面说说使用FFmpeg调用MediaCodec进行硬解码的介个步骤:
- 打开编译选项
首先,要让FFmpeg支持MediaCodec硬解码,在交叉编译时就要打开相关配置,主要是enable一些与MediaCodec相关的属性:
--enable-hwaccels \
--enable-jni \
--enable-mediacodec \
--enable-decoder=h264_mediacodec \
--enable-decoder=hevc_mediacodec \
--enable-decoder=mpeg4_mediacodec \
--enable-hwaccel=h264_mediacodec \- 找到对应的解码器
一般情况下如果我们不关注软解码还是硬解码的话通过解码器ID使用avcodec_find_decoder函数获取到对应的解码器即可。 但是如果我们想要使用硬解码,一般会使用函数avcodec_find_decoder_by_name获取到对应的解码。
那么问题来了,在FFmepg中MediaCodec对应的硬解码器是啥呢?我怎么知道avcodec_find_decoder_by_name应该传递的参数是什么呢?
我们做NDK开发一定要学会妙用源码中configure这个文件,通过这个文件可以获取到很多我们想要的配置信息,最简单的,如果我们不知道有哪些可配置的编译信息, 则可以使用./configure --help进行查看。
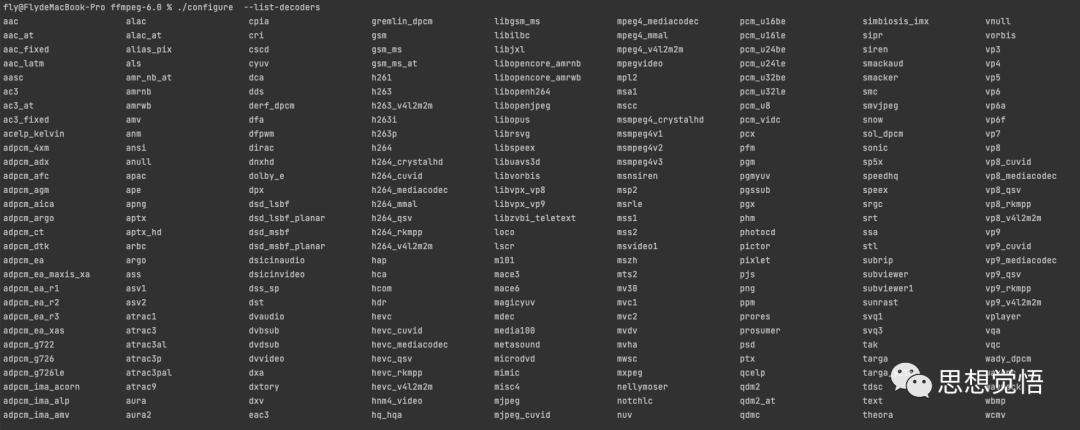
同理,在FFmpeg的源码中,我们可以通过命令行./configure --list-decoders查看它所支持的解码器,如图还是很多的,但是也并不是说都能直接使用的,因为大多数都是第三方的库, 一般需要在编译时打开进行链接编译后才能正常使用。
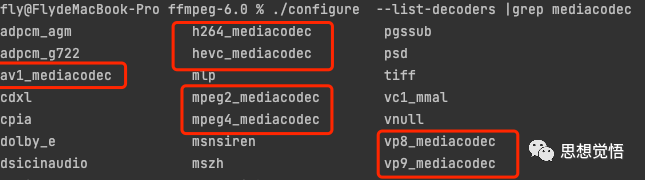
./configure --list-decoders输出太多了,我们只关心MediaCodec相关的,我们可以使用grep过滤一下:
./configure --list-decoders |grep mediacodec输出如图,框起来的哪些就是可以作为函数avcodec_find_decoder_by_name参数的值,进行MediaCodec硬解码。
- 配置硬解码器
要使用硬解码,你还得告诉解码器,你想要输出什么样的格式数据,这个就是配置硬解码器所要干的事情, 也就是说为了告诉解码器你想要获得的最终的YUV数据格式是什么?是NV12还是NV21还是其他?
在MediaCodec中硬解码的主要配置如下:
 // 配置硬解码器
                int i;
                for (i = 0;; i++) {
                    const AVCodecHWConfig *config = avcodec_get_hw_config(avCodec, i);
                    if (nullptr == config) {
                        LOGCATE("获取硬解码是配置失败");
                        return;
                    }
                    if (config->methods & AV_CODEC_HW_CONFIG_METHOD_HW_DEVICE_CTX &&
                        config->device_type == AV_HWDEVICE_TYPE_MEDIACODEC) {
                        hw_pix_fmt = config->pix_fmt;
                        LOGCATE("硬件解码器配置成功");
                        break;
                    }
}- 初始化初始化mediacodec的buffer
我们知道MediaCodec是基于队列的方式进行工作的,因此我们还需要
// 硬件解码器初始化
    AVBufferRef *hw_device_ctx = nullptr;
    ret = av_hwdevice_ctx_create(&hw_device_ctx, AV_HWDEVICE_TYPE_MEDIACODEC,
                           nullptr, nullptr, 0);
    if (ret < 0) {
        LOGCATE("Failed to create specified HW device");
        return;
    }
    avCodecContext->hw_device_ctx = av_buffer_ref(hw_device_ctx);
后续的其他步骤就和软解码一样了,无非就是打开解码器、读取视频包、将视频包送入解码器进行解码、从解码器中循环读取解码后的数据包等。 这些在之前的FFmpeg系列文章中已经介绍过很多了,这里就不再累赘了。
通过这么一个demo可以看出,万变不离其宗,FFMpeg6.0的硬解码对比以前的貌似只是省了一个av_jni_set_java_vm步骤而已,但是其内部是绕过了JNI调用MediaCodec的, 至于性能有了多少提升呢?感兴趣的同学们可以自行测试下。
下面是完整的代码:
extern "C" {
#include <libavformat/avformat.h>
#include <libavcodec/avcodec.h>
#include <libavcodec/codec.h>
#include <libavutil/avutil.h>
#include <libavutil/pixdesc.h>
}


AVPixelFormat hw_pix_fmt;
static enum AVPixelFormat get_hw_format(AVCodecContext *ctx,
                                        const enum AVPixelFormat *pix_fmts)
{
    const enum AVPixelFormat *p;

    for (p = pix_fmts; *p != -1; p++) {
        if (*p == hw_pix_fmt)
            return *p;
    }
    LOGD_E("FFDecoder","Failed to get HW surface format.\n");
    return AV_PIX_FMT_NONE;
}

void FFDecoder::decodeVideo(const char *videoPath, const char *yuvPath) {
    AVFormatContext *avFormatContext = avformat_alloc_context();
    int ret = avformat_open_input(&avFormatContext, videoPath, nullptr, nullptr);
    if (ret < 0) {
        LOGD_E("FFDecoder","打开媒体文件失败");
        return;
    }
    avformat_find_stream_info(avFormatContext, nullptr);
    int video_index = av_find_best_stream(avFormatContext, AVMEDIA_TYPE_VIDEO, -1, -1, nullptr, 0);
    if (video_index < 0) {
        LOGD_E("FFDecoder","找不到视频索引");
        return;
    }
    LOGD_E("FFDecoder","找到视频索引:%d", video_index);

    const AVCodec *avCodec = nullptr;
    AVCodecContext *avCodecContext = nullptr;
    AVPacket *avPacket = nullptr;
    AVFrame *avFrame = nullptr;
    FILE *yuv_file = nullptr;
    switch (avFormatContext->streams[video_index]->codecpar->codec_id) {
        // 这里以h264为例
        case AV_CODEC_ID_H264:
            avCodec = avcodec_find_decoder_by_name("h264_mediacodec");
            if (nullptr == avCodec) {
                LOGD_E("FFDecoder","没有找到硬解码器h264_mediacodec");
                return;
            } else {
                // 配置硬解码器
                int i;
                for (i = 0;; i++) {
                    const AVCodecHWConfig *config = avcodec_get_hw_config(avCodec, i);
                    if (nullptr == config) {
                        LOGD_E("FFDecoder","获取硬解码是配置失败");
                        return;
                    }
                    if (config->methods & AV_CODEC_HW_CONFIG_METHOD_HW_DEVICE_CTX &&
                        config->device_type == AV_HWDEVICE_TYPE_MEDIACODEC) {
                        hw_pix_fmt = config->pix_fmt;
                        LOGD_E("FFDecoder","硬件解码器配置成功");
                        break;
                    }
                }
                break;
            }
    }
    avCodecContext = avcodec_alloc_context3(avCodec);
    avcodec_parameters_to_context(avCodecContext,avFormatContext->streams[video_index]->codecpar);
    avCodecContext->get_format = get_hw_format;
    // 硬件解码器初始化
    AVBufferRef *hw_device_ctx = nullptr;
    ret = av_hwdevice_ctx_create(&hw_device_ctx, AV_HWDEVICE_TYPE_MEDIACODEC,
                                 nullptr, nullptr, 0);
    if (ret < 0) {
        LOGD_E("FFDecoder","Failed to create specified HW device");
        return;
    }
    avCodecContext->hw_device_ctx = av_buffer_ref(hw_device_ctx);
    // 打开解码器
    ret = avcodec_open2(avCodecContext, avCodec, nullptr);
    if (ret != 0) {
        LOGD_E("FFDecoder","解码器打开失败:%s",av_err2str(ret));
        return;
    } else {
        LOGD_E("FFDecoder","解码器打开成功");
    }

    avPacket = av_packet_alloc();
    avFrame = av_frame_alloc();
    yuv_file = fopen(yuvPath,"wb");
    while (true) {
        ret = av_read_frame(avFormatContext, avPacket);
        if (ret != 0) {
            LOGD_D("FFDecoder","av_read_frame end");
            // todo可能解码器内还有缓存的数据,需要avcodec_send_packet空包进行冲刷
            break;
        }
        if(avPacket->stream_index != video_index){
            av_packet_unref(avPacket);
            continue;
        }
        ret = avcodec_send_packet(avCodecContext,avPacket);
        if(ret == AVERROR(EAGAIN)){
            LOGD_E("FFDecoder","avcodec_send_packet EAGAIN");
        } else if(ret < 0){
            LOGD_E("FFDecoder","avcodec_send_packet fail:%s",av_err2str(ret));
            return;
        }
        av_packet_unref(avPacket);
        ret = avcodec_receive_frame(avCodecContext,avFrame);
        LOGD_E("FFDecoder","avcodec_receive_frame:%d",ret);
        while (ret == 0){
            LOGD_D("FFDecoder","获取解码数据成功:%s",av_get_pix_fmt_name(static_cast<AVPixelFormat>(avFrame->format)));
            LOGD_D("FFDecoder","linesize0:%d,linesize1:%d,linesize2:%d",avFrame->linesize[0],avFrame->linesize[1],avFrame->linesize[2]);
            LOGD_D("FFDecoder","width:%d,height:%d",avFrame->width,avFrame->height);
            ret = avcodec_receive_frame(avCodecContext,avFrame);
            // 如果解码出来的数据是nv12
            // 播放 ffplay -i d:/cap.yuv -pixel_format nv12 -framerate 25 -video_size 640x480
            // 写入y
            for(int j=0; j<avFrame->height; j++)
                fwrite(avFrame->data[0] + j * avFrame->linesize[0], 1, avFrame->width, yuv_file);
            // 写入uv
            for(int j=0; j<avFrame->height/2; j++)
                fwrite(avFrame->data[1] + j * avFrame->linesize[1], 1, avFrame->width, yuv_file);
        }
    }
    // 资源释放
    if (nullptr != avFormatContext) {
        avformat_free_context(avFormatContext);
        avFormatContext = nullptr;
    }
    if (nullptr != avCodecContext) {
        avcodec_free_context(&avCodecContext);
        avCodecContext = nullptr;
    }
    if (nullptr != avPacket) {
        av_packet_free(&avPacket);
        avPacket = nullptr;
    }
    if (nullptr != avFrame) {
        av_frame_free(&avFrame);
        avFrame = nullptr;
    }
    if(nullptr != yuv_file){
        fclose(yuv_file);
        yuv_file = nullptr;
    }
}
对于解码出来的YUV数据释放正常,我们可以用adb将yuv文件数据从手机中拉出来到电脑端,使用ffplay命令播放一下验证即可。 正如代码所注释的,假设我们解码得到的数据是NV12的,那么ffplay的播放命令就是:
ffplay -i yuv文件路径 -pixel_format nv12 -framerate 25 -video_size yuv宽x高
//如果解码出来的数据是nv12
//ffplay -i d:/cap.yuv -pixel_format nv12 -framerate 25 -video_size 640x480
关注我,一起进步,人生不止coding!!!

本文来自作者投稿,版权归原作者所有。如需转载,请注明出处:https://www.nxrte.com/jishu/31688.html