
很长时间以来,我一直想了解点对点浏览器网络和 WebRTC,但一直在寻找合适的项目。最近,我在重看 Twitch Plays Pokemon 的一些旧视频时突然有了灵感,心想如果能在更小的范围内实现实时游戏,让朋友们一起玩Gameboy,共享控制权,会怎么样呢?
我决定尝试在主机上运行一个现有的模拟器,并使用 WebRTC 在浏览器之间传输视频/音频和输入,将访客连接到模拟器上。
在本文中,我将介绍如何为该应用程序构建后台。您可以对其进行修改,并将其用于任何您喜欢的前端应用程序中。后续我还会介绍如何连接我自己的前端应用程序。
工具
我将使用 Nitric 来构建此应用程序的后台。这将使使用 AWS 快速启动和运行变得非常简单,而无需直接管理任何基础设施。
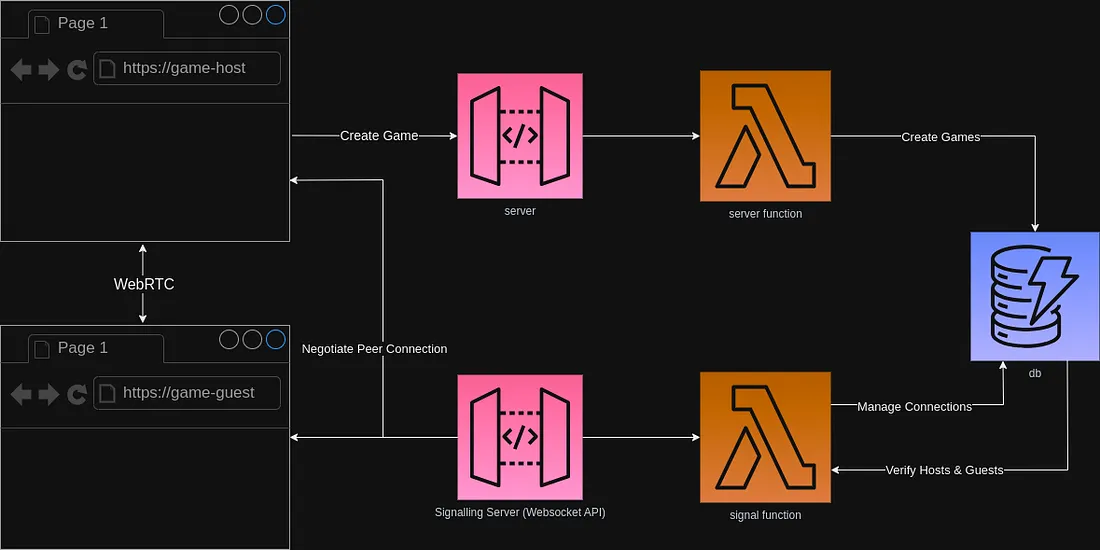
架构

启动项目
开始时,我们将运行 nitric new 命令并选择 typescript 模板。
你应该会得到一个结构如下的项目。
├── functions
│   ├── hello.ts
├── .gitignore
├── index.ts
├── nitric.yaml
├── package.json
├── README.md
└── yarn.lock
由此,实际上将删除默认的函数目录并创建一个名为 src/backend 的新目录。这是我们构建所有后端代码的地方。新目录结构如下所示:
├── src
│   ├── backend
├── .gitignore
├── index.ts
├── nitric.yaml
├── package.json
├── README.md
└── yarn.lock
定义资源
从上图中我们可以看到两个 API 网关、两个 lambda 函数和一个 dynamoDB 表。这些都可以非常容易地直接在我们的应用程序中使用 Nitric 资源用代码来表达。
首先,我们将创建一个新的resources目录,用于声明我们的函数所共享的资源。
然后,我们将定义 Websocket API 网关。
// src/backend/resources/signal.ts
import { websocket } from '@nitric/sdk';

export default websocket('signal');
在这里,我们从 nitric 中导入 websocket 资源,并声明一个名为 signal 的新 Websocket。
然后,我们将创建数据库并为其定义一些基本类型:
// src/backend/resources/db.ts
import { collection } from '@nitric/sdk';

export interface Game {
    // The connection ID of the host
    hostConnectionId?: string,
    // The hosts connection token (that they will use to authenticate with the game)
    hostToken: string,
    // The token guests use to connect
    guestToken: string,
}

export interface GuestConnection {
    // The name of the game the guest has joined
    game: string;
}

export const db = collection<Game | GuestConnection>('db');
在这里,我们将创建一个名为 DB 的新 Nitric collection,并为单表模式定义一些基本类型,以存储我们创建和托管游戏所需的所有数据。
为函数做好准备
我们将直接在新的后台目录中定义函数,因此需要更新项目中的 nitric.yaml 文件,以便 Nitric 可以找到我们在此创建的函数。
name: nitric-gameboy
handlers:
  - src/backend/*.ts
preview-features:
  - websockets
  - http
我们还将为即将使用的一些 Nitric 新功能添加一些preview-features标志。
构建服务器功能
首先,我们将从服务器函数开始,因为它将创建我们的新游戏,客户端将使用它来连接我们的 websocket 网关。
对于服务器,我们将使用 express.js 和其他一些组件来简化一些事情。因此,让我们先使用 yarn add express short-uuid unique-username-generator 和 yarn add -D @types/express(如果你喜欢,也可以使用 NPM)来添加。
然后,我们将在 src/backend/server.ts 下创建一个新文件,定义我们的导入和部分资源,并定义一些 express 中间件以方便使用。
// src/backend/server.ts
import { http } from "@nitric/sdk";
import express from "express"
import { generateUsername } from "unique-username-generator";
import { db } from './resources/db';
import short from 'short-uuid';
import signal from "./resources/signal";

const app = express();

// Store connections for transmitting data
// We only need to create new entries so we'll only request write permission
const gamesdb = db.for('writing');

// use express json middleware
app.use(express.json());
然后添加一个新端点以在数据库中创建新游戏:
// Create a new game
app.post("/game", async (req, res) => {
    // generate a unique random name for the game
    const gameName = generateUsername('-')

    // generate host and guest tokens for authentication
    const hostToken = short.generate();
    const guestToken = short.generate();

    // create the new game and redirect to the host portal
    await gamesdb.doc(`game|${gameName}`).set({
        guestToken,
        hostToken,
    });

    // Return newly created game details to our client
    res.status(201).json({
        name: gameName,
        guestToken,
        hostToken,
    }).send();
});
最后,我们再添加一个端点,以帮助客户发现我们的 websocket 网关:
// Get the websocket address
app.get("/address", async (req, res) => {
    const url =  await signal.url();
    res.status(200).contentType('text/plain').send(url);
});
在服务器文件的最底部,我们要让 Nitric 知道我们要使用自己的 HTTP 服务器:
http(app);构建信号函数
接下来,我们将构建信号函数,该函数将充当 WebRTC 客户端连接的信号服务器。在此应用程序中,服务器本身并不需要知道信息传递的具体细节,它只需要确保信令信息到达预定目标即可。
首先,我们将在 src/backend/signal.ts 中创建新函数,并导入之前创建的一些资源。
import signal from './resources/signal';
import { Game, GuestConnection, db } from './resources/db';

// Store connections for transmitting data
const gamesdb = db.for('reading', 'writing', 'deleting');
// We'll use this for re-encoding messages we edit before we send to the game host
const encoder = new TextEncoder();
然后,我们将定义服务器在收到新的 websocket 连接时会做什么:
signal.on('connect', async (ctx) => {
    // get the guest or host query params
    const [ gameName ] = ctx.req.query['game'] || [];
    const [ token ] = ctx.req.query['token'] || [];

    try {
        // check that the game exists
        const game = await gamesdb.doc(`game|${gameName}`).get() as Game;

        if (game && token === game.hostToken) {
            if (!game.hostConnectionId) {
                game.hostConnectionId = ctx.req.connectionId;
            } else {
                throw new Error('this game is already being hosted!!!')
            }

        } else if (game && token === game.guestToken) {
            await gamesdb.doc(`connection|${ctx.req.connectionId}`).set({
                game: gameName,
            });
        } else {
            throw new Error("Failed Authentication");
        }

        await gamesdb.doc(`game|${gameName}`).set(game);

    } catch (e) {
        ctx.res.success = false;
    }

    return ctx;
});
当有新的连接进来时,我们会检查一些由查询参数提供的详细信息,例如 ws://my-websocket?game=my-game&token=my-token 。
所提供的游戏名称将告诉我们该游戏的目标,所提供的令牌将让我们知道用户已通过某种方式获得访问该游戏的授权(要么是游戏的创建者,要么是已将此信息共享给他们),我们将使用此令牌来确定他们是作为主机还是作为访客加入的。
其次,我们需要定义客户端断开 websocket 连接时的行为,以便清理数据库。
signal.on('disconnect', async (ctx) => {
    const resp = await gamesdb.query().where('hostConnectionId', '==', ctx.req.connectionId).limit(1).fetch();
    if(resp.documents.length > 0) {
        const document = resp.documents[0];
        const gameName = document.id.split('|')[1];
        // we know they're a game host
        // delete the game and connected clients
        const connections = gamesdb.query().where('game', '==', gameName).stream();

        // close the client connection
        const streamPromise = new Promise<any>(res => {
            connections.on('end', res);
        });

        connections.on('data', async (data) => {
            const connectionId = data.id.split('|')[1];
            // tell the clients the stream is over
            await signal.close(connectionId);
        });

        await streamPromise;
        await gamesdb.doc(document.id).delete();

        return ctx;
    }

    // remove the client from the client connection pool
    await gamesdb.doc(`connection|${ctx.req.connectionId}`).delete();
});
在这个函数中,我们只是获取即将离开的连接的 ID,判断它是访客还是主机,然后将其从数据库中删除。
如果是主机,我们还会通知访客,并断开仍连接到 websocket 网关的连接。
最后,我们希望在主机和访客连接后,在它们之间路由信息:
const sendHost = async (gameName: string, data: Record<string, any>) => {
    const game = await gamesdb.doc(`game|${gameName}`).get() as Game;

    const streamData = encoder.encode(JSON.stringify(data));

    await signal.send(game.hostConnectionId!, streamData);
}

signal.on('message', async (ctx) => {
    // if they are a game host
    // we want to relay their messages to the intended guest
    const resp = await gamesdb.query().where('hostConnectionId', '==', ctx.req.connectionId).limit(1).fetch();
    if(resp.documents.length > 0) {
        // responses are for handshakes with guests so should contain the guests original connection ID
        // we'll use this to respond directly to them
        const msg = ctx.req.json();
        if (!msg.connectionId) {
            ctx.res.success = false;
            return ctx
        }

        await signal.send(msg.connectionId, ctx.req.data);

        return ctx;
    }

    // otherwise they are a guest
    // we want to relay their message to the host
    const connection = await gamesdb.doc(`connection|${ctx.req.connectionId}`).get() as GuestConnection;
    const data = ctx.req.json();

    await sendHost(connection.game, {
        connectionId: ctx.req.connectionId,
        ...data,
    });
});
如果我们检测到发件人是主机,我们就会向连接到该主机游戏的所有游客发送信息。
否则,我们将向客人连接的游戏主机发送信息。
本地测试
现在我们已经定义了后端,可以在本地进行测试,以验证一切正常。
我们可以运行 yarn dev(或 npm),让后端在本地运行。

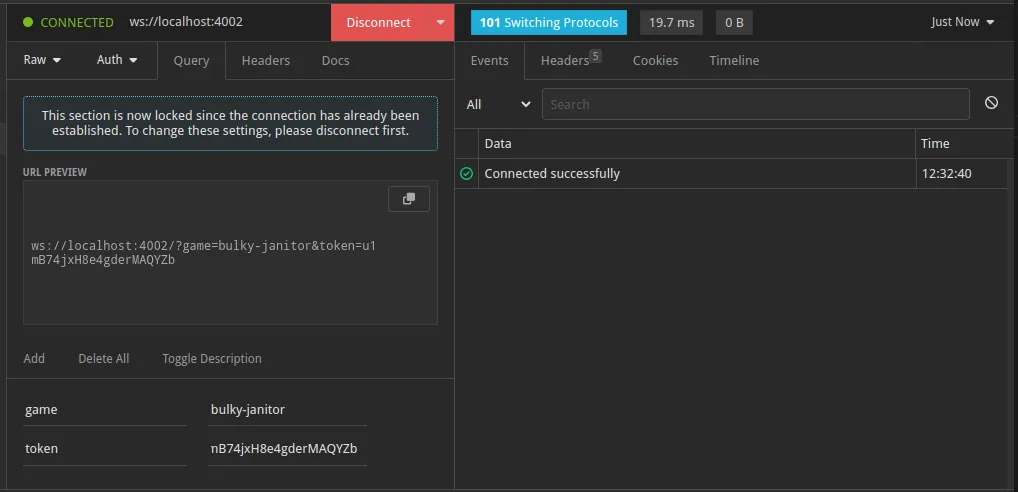
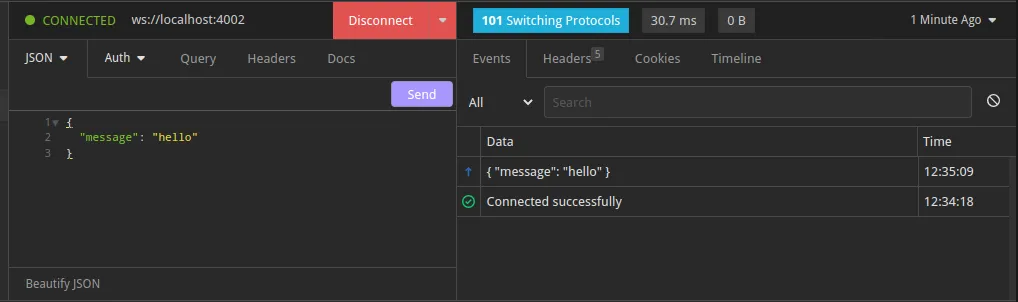
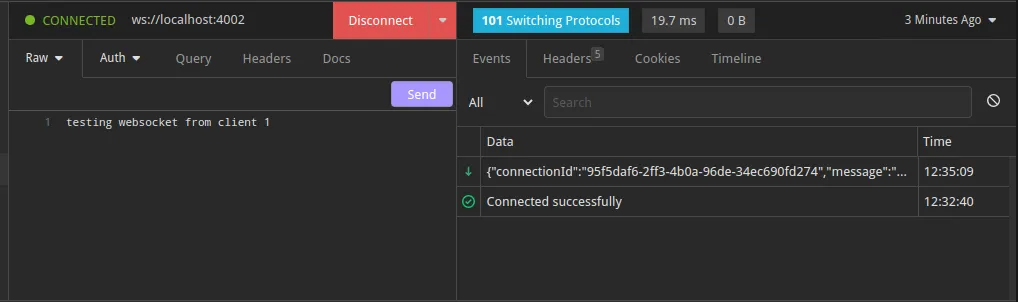
在左侧,我们可以看到 websocket 和 HTTP 服务器的地址。我们可以使用 Postman 或 Insomnia 等客户端对其进行测试(屏幕截图中我将使用 Insomnia)。

创建新游戏后,我们可以使用以下详细信息连接到我们的 websocket 服务器:

下一部分
我计划在下一部分继续讨论这个问题,届时我将用 WebRTC 和 Gameboy 部件构建一个基本的前端,敬请期待。
GitHub地址:https://github.com/tjholm/multi-boy
作者:Tim Holm
本文来自作者投稿,版权归原作者所有。如需转载,请注明出处:https://www.nxrte.com/jishu/webrtc/31570.html