
1. 简介
本文主要针对 WebRTC 在苹果设备(IOS 和 MACOS)上如何实现相机采集进行深入分析。特别是,我们会详细查看所用的 API,以及这些 API 所扮演的角色。
1.1 阅读本文后,你将掌握:
-
相机采集基础概念及 API 介绍 -
如何自定义视频大小和图像格式? -
如何设置帧率? -
在前后摄像头之间如何切换? -
WebRTC 如何与苹果的 API 进行交互实现相机采集 -
IOS 和 MACOS 代码的通用性
通过掌握上述知识点,您不仅能了解 WebRTC 在相机采集方面的功能和限制,还能更加灵活地在自己的项目中实施相关功能。
2. 相机采集基础概念及 API 介绍
苹果通过 AVFoundation 框架提供了一系列与相机采集相关的 API,主要包括 AVCaptureSession, AVCaptureDevice, AVCaptureDeviceInput, 和 AVCaptureVideoDataOutput。
它们的关系可以以这张架构图说明:


2.1 AVCaptureSession
配置采集行为并协调从输入设备到采集输出的数据流的对象。
实例化 AVCaptureSession
#import <AVFoundation/AVFoundation.h>

// 初始化 AVCaptureSession
AVCaptureSession *captureSession = [[AVCaptureSession alloc] init];
以下是核心 API 介绍:
2.1.1 配置会话
| API | 说明 |
|---|---|
beginConfiguration() |
标记对正在运行的采集会话的配置进行更改的开始,以在单个原子更新中执行 |
commitConfiguration() |
在单个原子更新中提交对正在运行的采集会话的配置的一项或多项更改。 |
// 开始配置会话
[captureSession beginConfiguration];

// ...(添加输入和输出等)

// 提交配置更改
[captureSession commitConfiguration];
2.1.2 设置会话 preset
| API | 说明 |
|---|---|
canSetSessionPreset |
确定是否可以使用指定的预设配置采集会话。 |
sessionPreset |
指示输出的质量级别或比特率的预设值 |
if ([captureSession canSetSessionPreset:AVCaptureSessionPreset1280x720]) {
    [captureSession setSessionPreset:AVCaptureSessionPreset1280x720];
}
2.1.3 配置输入
| API | 说明 |
|---|---|
inputs: [AVCaptureInput] |
向采集会话提供媒体数据的输入 |
canAddInput(AVCaptureInput) -> Bool |
确定是否可以向会话添加输入。 |
addInput(AVCaptureInput) |
向会话添加采集输入。 |
removeInput(AVCaptureInput) |
从会话中删除输入。 |
// 获取默认摄像头
AVCaptureDevice *camera = [AVCaptureDevice defaultDeviceWithMediaType:AVMediaTypeVideo];

// 创建摄像头输入
NSError *error;
AVCaptureDeviceInput *cameraInput = [AVCaptureDeviceInput deviceInputWithDevice:camera error:&error];

// 添加摄像头输入到会话
if ([captureSession canAddInput:cameraInput]) {
    [captureSession addInput:cameraInput];
}
2.1.4 配置输出
| API | 说明 |
|---|---|
outputs: [AVCaptureOutput] |
采集会话将其数据发送到的输出目标。 |
canAddOutput(AVCaptureOutput) -> Bool |
确定是否可以将输出添加到会话。 |
addOutput(AVCaptureOutput) |
将输出添加到采集会话。 |
removeOutput(AVCaptureOutput) |
从采集会话中删除输出。 |
// 创建输出对象
AVCaptureVideoDataOutput *output = [[AVCaptureVideoDataOutput alloc] init];

// 配置输出对象的参数(省略)

// 添加输出到会话
if ([captureSession canAddOutput:output]) {
    [captureSession addOutput:output];
}
2.1.5 连接输入和输出
| API | 说明 |
|---|---|
connections: [AVCaptureConnection] |
采集会话包含的输入和输出之间的连接。 |
addConnection(AVCaptureConnection) |
添加到采集会话的连接。 |
addInputWithNoConnections(AVCaptureInput) |
将采集输入添加到会话而不形成任何连接。 |
addOutputWithNoConnections(AVCaptureOutput) |
将采集输出添加到会话而不形成任何连接。 |
removeConnection(AVCaptureConnection) |
从会话中删除采集连接。 |
AVCaptureAudioChannel |
监视采集连接中音频通道的平均和峰值功率级别的对象。 |
// 获取会话的连接
AVCaptureConnection *connection = [output connectionWithMediaType:AVMediaTypeVideo];

// 配置连接的参数(例如视频方向,稳定性设置等)(省略)
2.1.6 管理会话生命周期
| API | 说明 |
|---|---|
startRunning() |
开始通过采集管道的数据流。 |
stopRunning() |
停止通过采集管道的数据流。 |
// 开始会话
[captureSession startRunning];

// 停止会话
[captureSession stopRunning];
2.2 AVCaptureDevice
用于访问和控制物理设备,如摄像头。
相关 API:
| API | 说明 |
|---|---|
AVCaptureDeviceDiscoverySession |
查找与特定搜索条件匹配的采集设备的对象。 |
defaultDeviceWithDeviceType:mediaType:position: |
返回指定设备类型、媒体类型和位置的默认设备。 |
defaultDeviceWithMediaType: |
返回采集指定媒体类型的默认设备。 |
deviceWithUniqueID: |
创建一个表示具有指定标识符的设备的对象。 |
AVCaptureDeviceWasConnectedNotification |
当新的采集设备可用时系统发布的通知。 |
AVCaptureDeviceWasDisconnectedNotification |
当现有设备不可用时系统发布的通知。 |
2.2.1 授权设备访问
| API | 说明 |
|---|---|
requestAccessForMediaType:completionHandler: |
请求用户允许应用程序采集特定类型的媒体。 |
authorizationStatusForMediaType: |
返回授权状态,指示用户是否授予应用程序采集特定类型媒体的权限。 |
AVAuthorizationStatus |
指示应用程序采集媒体授权状态的常量。 |
2.2.2 识别设备
| API | 说明 |
|---|---|
uniqueID |
唯一标识设备的标识符。 |
modelID |
设备的型号标识符。 |
localizedName |
显示在用户界面中的本地化设备名称。 |
manufacturer |
设备制造商的人类可读字符串。 |
deviceType |
设备的类型,例如内置麦克风或广角摄像头。 |
AVCaptureDeviceType |
定义框架支持的设备类型的结构。 |
position |
采集设备硬件的物理位置。 |
AVCaptureDevicePosition |
指示采集设备的物理位置的常量。 |
2.2.3 配置相机硬件
| API | 说明 |
|---|---|
- lockForConfiguration: |
请求独占访问权限以配置设备硬件属性。 |
- unlockForConfiguration |
释放对设备硬件属性的独占控制。 |
AVCaptureDevice *camera = [AVCaptureDevice defaultDeviceWithMediaType:AVMediaTypeVideo];
NSError *error = nil;

// 锁定配置
if ([camera lockForConfiguration:&error]) {
    // 执行硬件配置代码

    // 解锁配置
    [camera unlockForConfiguration];
} else {
    NSLog(@"Error locking for configuration: %@", error);
}
| API | 说明 |
|---|---|
subjectAreaChangeMonitoringEnabled |
一个布尔值,指示设备是否监视主题区域的更改。 |
AVCaptureDeviceSubjectAreaDidChangeNotification |
当采集设备检测到视频主题区域发生重大变化时系统发布的通知。 |
camera.subjectAreaChangeMonitoringEnabled = YES;

// 添加观察者
[[NSNotificationCenter defaultCenter] addObserver:self
                                         selector:@selector(subjectAreaDidChange:)
                                              name:AVCaptureDeviceSubjectAreaDidChangeNotification
                                           object:camera];
| API | 说明 |
|---|---|
| Formats | 配置采集格式和相机帧速率。 |
// 获取支持的媒体格式
NSArray *formats = [camera formats];
AVCaptureDeviceFormat *selectedFormat = nil;
for (AVCaptureDeviceFormat *format in formats) {
    // 在这里,你可以根据需要来选择一个合适的媒体格式
    // 例如,根据分辨率或帧率来选择
    CMFormatDescriptionRef formatDesc = format.formatDescription;
    NSLog(@"Format: %@", CFBridgingRelease(CMFormatDescriptionCopyDescription(formatDesc)));
    if (CMFormatDescriptionGetMediaSubType(formatDesc) == kCVPixelFormatType_420YpCbCr8BiPlanarFullRange) {
        selectedFormat = format;
        break;
    }
}

if (selectedFormat) {
    if ([camera lockForConfiguration:nil]) {
        camera.activeFormat = selectedFormat;
        [camera unlockForConfiguration];
    }
}
| API | 说明 |
|---|---|
| Focus | 配置相机的自动对焦行为,或手动设置其镜头位置。 |
if ([camera isFocusModeSupported:AVCaptureFocusModeAutoFocus]) {
    camera.focusMode = AVCaptureFocusModeAutoFocus;
}
| API | 说明 |
|---|---|
| Exposure | 配置相机的自动曝光行为,或手动控制其曝光设置。 |
if ([camera isExposureModeSupported:AVCaptureExposureModeAutoExpose]) {
    camera.exposureMode = AVCaptureExposureModeAutoExpose;
}
| API | 说明 |
|---|---|
| White Balance | 配置摄像机的自动白平衡行为,或手动控制白平衡设置。 |
if ([camera isWhiteBalanceModeSupported:AVCaptureWhiteBalanceModeAutoWhiteBalance]) {
    camera.whiteBalanceMode = AVCaptureWhiteBalanceModeAutoWhiteBalance;
}
| API | 说明 |
|---|---|
| Lighting | 配置设备闪光灯、手电筒和弱光设置。 |
if ([camera hasFlash]) {
    camera.flashMode = AVCaptureFlashModeAuto;
}
if ([camera hasTorch]) {
    camera.torchMode = AVCaptureTorchModeAuto;
}
| API | 说明 |
|---|---|
| Color | 管理设备的 HDR 和色彩空间设置。 |
// 检查HDR是否可用,并设置
if ([camera isHDREnabled]) {
    if ([camera lockForConfiguration:nil]) {
        [camera setAutomaticallyAdjustsVideoHDREnabled:YES]; // 自动调整HDR
        [camera unlockForConfiguration];
    }
}

// 检查和设置色彩空间
if ([camera.activeFormat isVideoColorSpaceSupported:AVCaptureColorSpace_P3_D65]) {
    if ([camera lockForConfiguration:nil]) {
        camera.activeColorSpace = AVCaptureColorSpace_P3_D65; // 设置P3色彩空间
        [camera unlockForConfiguration];
    }
}
| API | 说明 |
|---|---|
| Zoom | 配置设备缩放行为并检查硬件功能。 |
if ([camera respondsToSelector:@selector(setVideoZoomFactor:)]) {
    camera.videoZoomFactor = 2.0; // 示例缩放因子
}
2.3 AVCaptureDeviceInput
用于从采集设备(如摄像头或麦克风)提供媒体输入到采集会话(AVCaptureSession)的对象。这个类是 AVCaptureInput 的一个具体子类,主要用于将采集设备连接到采集会话。
2.3.1 创建输入
| API | 说明 |
|---|---|
deviceInputWithDevice:error: |
返回指定采集设备的新输入。 |
initWithDevice:error: |
为指定的采集设备创建输入。 |
// 获取默认的摄像头设备
AVCaptureDevice *camera = [AVCaptureDevice defaultDeviceWithMediaType:AVMediaTypeVideo];
NSError *error = nil;

// 使用deviceInputWithDevice:error:创建输入
AVCaptureDeviceInput *input = [AVCaptureDeviceInput deviceInputWithDevice:camera error:&error];

// 或者使用initWithDevice:error:方法
AVCaptureDeviceInput *input = [[AVCaptureDeviceInput alloc] initWithDevice:camera error:&error];
2.3.2 配置输入属性
| API | 说明 |
|---|---|
unifiedAutoExposureDefaultsEnabled |
一个布尔值,指示输入是否启用统一自动曝光默认值。 |
videoMinFrameDurationOverride |
充当采集设备的活动视频最小帧持续时间修改器的时间值。 |
// 启用或禁用统一的自动曝光默认值
input.unifiedAutoExposureDefaultsEnabled = YES;

// 设置视频最小帧持续时间修饰符
input.videoMinFrameDurationOverride = CMTimeMake(1, 30);  // 例如,设置为30fps
2.3.3 访问设备
| API | 说明 |
|---|---|
device |
与此输入关联的采集设备。 |
portsWithMediaType:sourceDeviceType:sourceDevicePosition: |
检索虚拟设备的组成设备端口以在多摄像机会话中使用。 |
// 访问与此输入关联的采集设备
AVCaptureDevice *associatedDevice = input.device;

// 在多摄像机会话中,检索虚拟设备的组成设备端口
NSArray *ports = [input portsWithMediaType:AVMediaTypeVideo sourceDeviceType:AVCaptureDeviceTypeBuiltInWideAngleCamera sourceDevicePosition:AVCaptureDevicePositionBack];
2.4 AVCaptureVideoDataOutput
采集输出,用于记录视频并提供对视频帧的访问以进行处理。继承至 AVCaptureOutput
2.4.1 配置视频捕捉
| API | 说明 |
|---|---|
videoSettings |
包含输出压缩设置的字典。 |
alwaysDiscardsLateVideoFrames |
指示是否在视频帧迟到时丢弃它们。 |
automaticallyConfiguresOutputBufferDimensions |
一个布尔值,指示输出是否自动配置输出缓冲区的大小。 |
deliversPreviewSizedOutputBuffers |
一个布尔值,指示输出是否配置为提供预览大小的缓冲区。 |
recommendedVideoSettingsForVideoCodecType:assetWriterOutputFileType: |
返回适合采集要录制到具有指定编解码器和类型的文件的视频的视频设置字典。 |
recommendedVideoSettingsForAssetWriterWithOutputFileType: |
指定与 AVAssetWriterInput 一起使用的推荐设置。 |
// 创建实例
AVCaptureVideoDataOutput *videoOutput = [[AVCaptureVideoDataOutput alloc] init];

// 配置输出设置
videoOutput.videoSettings = @{(id)kCVPixelBufferPixelFormatTypeKey : @(kCVPixelFormatType_32BGRA)};

// 是否丢弃迟到的帧
videoOutput.alwaysDiscardsLateVideoFrames = YES;

// 自动配置输出缓冲区大小
videoOutput.automaticallyConfiguresOutputBufferDimensions = YES;

// 提供预览大小的缓冲区
videoOutput.deliversPreviewSizedOutputBuffers = NO;
2.4.2 检索支持的视频类型
| API | 说明 |
|---|---|
availableVideoCVPixelFormatTypes |
输出支持的视频像素格式。 |
availableVideoCodecTypes |
输出支持的视频编解码器。 |
availableVideoCodecTypesForAssetWriterWithOutputFileType: |
输出支持将视频写入输出文件的视频编解码器。 |
AVVideoCodecType |
一组常量,描述系统支持视频采集的编解码器。 |
// 查看可用的像素格式和编解码器类型
NSArray *pixelFormats = videoOutput.availableVideoCVPixelFormatTypes;
NSArray *codecTypes = videoOutput.availableVideoCodecTypes;
2.4.3 接收采集的视频数据
| API | 说明 |
|---|---|
setSampleBufferDelegate:queue: |
设置示例缓冲区委托和调用回调的队列。 |
sampleBufferDelegate |
采集对象的委托。 |
sampleBufferCallbackQueue |
系统调用委托回调的队列。 |
AVCaptureVideoDataOutputSampleBufferDelegate |
从视频数据输出接收样本缓冲区并监视其状态的方法。 |
// 设置输出的代理和队列
[videoOutput setSampleBufferDelegate:self queue:dispatch_get_main_queue()];


- (void)captureOutput:(AVCaptureOutput *)output didOutputSampleBuffer:(CMSampleBufferRef)sampleBuffer fromConnection:(AVCaptureConnection *)connection {
    // 处理 sampleBuffer
}
2.4.4 创建视频采集输出
| API | 说明 |
|---|---|
init |
创建新的视频文件输出。 |
new |
创建新的视频文件输出。 |
// 使用init或new方法创建实例
AVCaptureVideoDataOutput *videoOutput = [[AVCaptureVideoDataOutput alloc] init];
// 或
AVCaptureVideoDataOutput *videoOutput = [AVCaptureVideoDataOutput new];
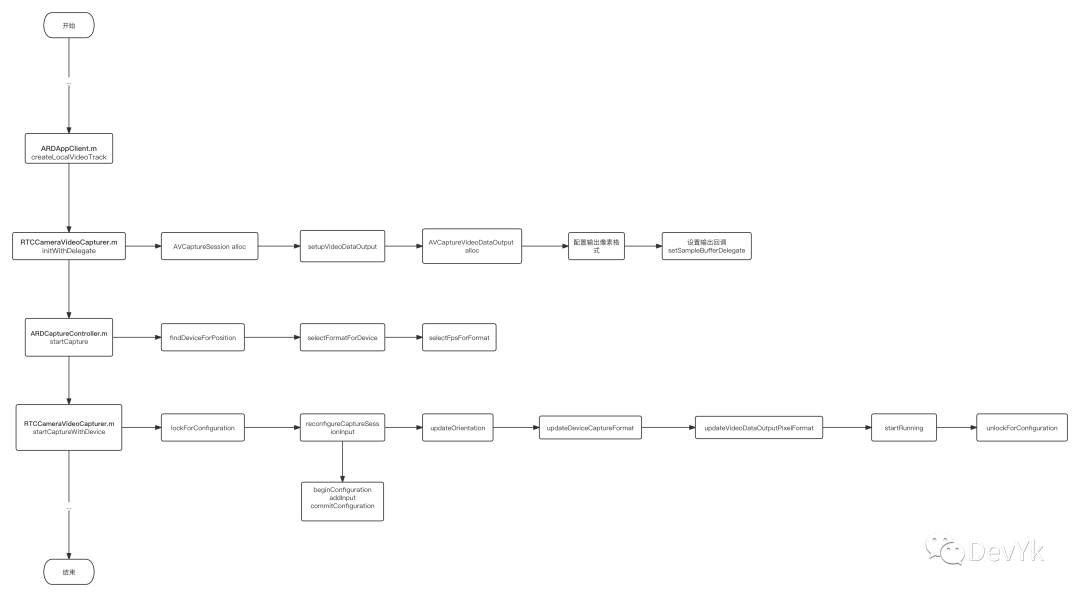
3. WebRTC 如何与苹果的 API 进行交互实现相机采集
根据上面的采集基础概念和上一篇文章的视频流程分析,我们来看下在 webrtc 苹果端(IOS,MAC) 是如何进行的相机采集:
一般的流程是这样的:
-
创建一个
AVCaptureSession对象, -
并且为该对象添加输入设备和视频数据输出对象。
-
为
AVCaptureSession设置视频分辨率、帧率、图像格式等信息 -
开始采集
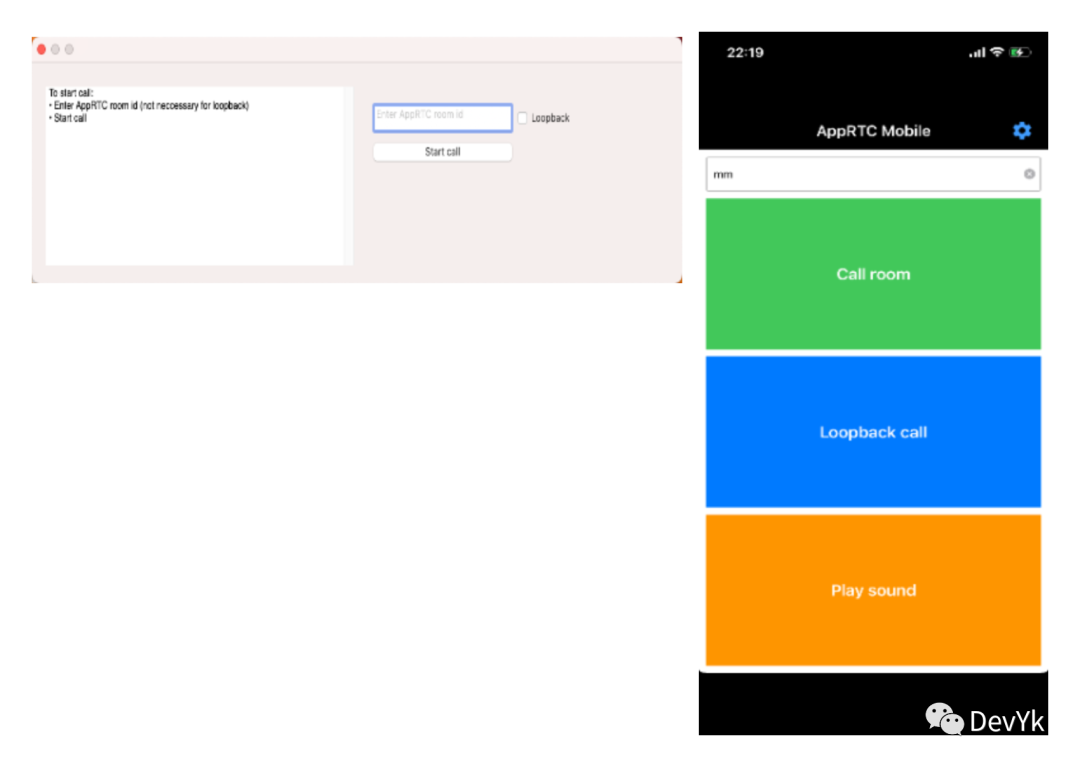
我们来验证下这个流程,首先看一下在webrtc中的流程:
其次当我们点击 IOS 或者 MAC OS 上对应的 Call room 、start call (如下图)之后就会执行到 ARDAppClient createLocalVideoTracks 函数
- (RTC_OBJC_TYPE(RTCVideoTrack) *)createLocalVideoTrack {
  ...

#if !TARGET_IPHONE_SIMULATOR
  if (self.isBroadcast) {
...
  } else {
    RTC_OBJC_TYPE(RTCCameraVideoCapturer) *capturer =
        [[RTC_OBJC_TYPE(RTCCameraVideoCapturer) alloc] initWithDelegate:source];
    [_delegate appClient:self didCreateLocalCapturer:capturer];
  }
#else
#if defined(__IPHONE_11_0) && (__IPHONE_OS_VERSION_MAX_ALLOWED >= __IPHONE_11_0)
...
#endif
#endif
  return [_factory videoTrackWithSource:source trackId:kARDVideoTrackId];
}
上面的代码首先是初始化 RTCCameraVideoCapturer 对象,其次是调用 ARDAppClientDelegate appClient 函数,我们依次看下各自的实现:
3.1 开始采集:
- (instancetype)initWithDelegate:(__weak id<RTC_OBJC_TYPE(RTCVideoCapturerDelegate)>)delegate {
  // 第一步
  return [self initWithDelegate:delegate captureSession:[[AVCaptureSession alloc] init]];
}

- (instancetype)initWithDelegate:(__weak id<RTC_OBJC_TYPE(RTCVideoCapturerDelegate)>)delegate
                  captureSession:(AVCaptureSession *)captureSession {
  if (self = [super initWithDelegate:delegate]) {
    //第二步
    if (![self setupCaptureSession:captureSession]) {
      return nil;
    }
...
  return self;
}

- (BOOL)setupCaptureSession:(AVCaptureSession *)captureSession {
  NSAssert(_captureSession == nil, @"Setup capture session called twice.");
  _captureSession = captureSession;
#if defined(WEBRTC_IOS)
  //第三步
  _captureSession.sessionPreset = AVCaptureSessionPresetInputPriority;
  _captureSession.usesApplicationAudioSession = NO;
#endif
  //第四步
  [self setupVideoDataOutput];
  //第五步
  if (![_captureSession canAddOutput:_videoDataOutput]) {
    RTCLogError(@"Video data output unsupported.");
    return NO;
  }
  [_captureSession addOutput:_videoDataOutput];

  return YES;
}
可以看到上面的第一步,内部实例化了一个 AVCaptureSession 对象,也就验证了我们开始所说的第一点,
我们继续看第二 > 三步,第三步内部是上面基础介绍到的设置会话的初始值,这里在 IOS 平台下设置了 AVCaptureSessionPresetInputPriority 是什么意思呢?它其实就是 AVCaptureSession 的一个预设值,它影响捕获会话的行为,特别是在同时使用多个捕获设备(例如摄像头和麦克风)时。这个预设值的作用是告诉捕获会话不要去强制控制音频和视频的输出设置,而是让已连接的捕获设备自己来控制输出的质量等级。
这个做法的好处是,它允许每个捕获设备根据其硬件能力和配置来自主决定输出的质量和性能,而不受默认预设值(例如 30fps)的限制。这样,您可以更灵活地控制不同设备的捕获质量,以满足特定的需求,而不必受到全局设置的影响。
简而言之,AVCaptureSessionPresetInputPriority 让捕获设备自己决定输出的质量,而不受固定的帧率等限制。这对于需要定制化捕获行为的应用程序来说非常有用,因为它提供了更多的灵活性和性能控制选项。
第四步是 setupVideoDataOutput 函数,我们看下内部实现:
- (void)setupVideoDataOutput {
  //4.1 步
  AVCaptureVideoDataOutput *videoDataOutput = [[AVCaptureVideoDataOutput alloc] init];
  //4.2 步
  NSSet<NSNumber *> *supportedPixelFormats =
      [RTC_OBJC_TYPE(RTCCVPixelBuffer) supportedPixelFormats];
  NSMutableOrderedSet *availablePixelFormats =
      [NSMutableOrderedSet orderedSetWithArray:videoDataOutput.availableVideoCVPixelFormatTypes];
  [availablePixelFormats intersectSet:supportedPixelFormats];
  NSNumber *pixelFormat = availablePixelFormats.firstObject;
  NSAssert(pixelFormat, @"Output device has no supported formats.");

  _preferredOutputPixelFormat = [pixelFormat unsignedIntValue];
  _outputPixelFormat = _preferredOutputPixelFormat;
  //4.3 步
  videoDataOutput.videoSettings = @{(NSString *)kCVPixelBufferPixelFormatTypeKey : pixelFormat};
  videoDataOutput.alwaysDiscardsLateVideoFrames = NO;
  //4.4 步
  [videoDataOutput setSampleBufferDelegate:self queue:self.frameQueue];
  _videoDataOutput = videoDataOutput;
}
上面的 4.1步:
-
就是我们基础概念介绍到的 AVCaptureVideoDataOutput它主要就是负责采集输出,用于记录视频并提供对视频帧的访问以进行处理。继承至AVCaptureOutput。
上面的 4.2 步:
-
通过 supportedPixelFormats函数获取 webrtc 内置的支持的像素格式
+ (NSSet<NSNumber*>*)supportedPixelFormats {
  return [NSSet setWithObjects:@(kCVPixelFormatType_420YpCbCr8BiPlanarFullRange),
                               @(kCVPixelFormatType_420YpCbCr8BiPlanarVideoRange),
                               @(kCVPixelFormatType_32BGRA),
                               @(kCVPixelFormatType_32ARGB),
                               nil];
}
-
从 videoDataOutput对象中获取了可用的视频像素格式。 -
通过交集操作,将支持的像素格式与可用的像素格式进行匹配,以便选择一个合适的像素格式。 -
如果没有可用的像素格式,将触发断言错误。
上面的 4.3 步:
-
设置 videoDataOutput的videoSettings属性,使用选定的像素格式来配置视频输出。 -
alwaysDiscardsLateVideoFrames属性设置为NO,这表示不会丢弃延迟的视频帧。
上面的 4.4 步:
-
将当前对象设置为 videoDataOutput的Sample Buffer代理,表示在捕获到新的视频帧数据时将调用当前对象的方法进行处理。 -
使用 self.frameQueue作为队列,这可能是一个用于处理视频帧数据的自定义队列。
总的来说,setupVideoDataOutput 这段代码主要用于配置捕获视频数据的输出格式和处理方式,确保选定的像素格式是可用的,并设置了适当的代理和队列来处理捕获到的视频帧。
我们继续看最上面的 第 5 步:
-
其实就是将第 4.4 步配置好的 videoDataOutput添加到 _captureSession 对象中去。这一步也就验证了最上面的第2步骤的视频数据输出对象的配置。
这上面就是 RTCCameraVideoCapturer initWithDelegate 的整个分析,下面我们接着分析 appClient 函数。
- (void)appClient:(ARDAppClient*)client
    didCreateLocalCapturer:(RTC_OBJC_TYPE(RTCCameraVideoCapturer) *)localCapturer {
  _captureController =
      [[ARDCaptureController alloc] initWithCapturer:localCapturer
                                            settings:[[ARDSettingsModel alloc] init]];

      [_captureController startCapture];
}
主要是实例化 ARDCaptureController ,并初始化参数,最后通过内部的 startCapture 函数开启采集,该函数主要逻辑如下:
- (void)startCapture:(void (^)(NSError *))completion {
  AVCaptureDevicePosition position =
      _usingFrontCamera ? AVCaptureDevicePositionFront : AVCaptureDevicePositionBack;
  AVCaptureDevice *device = [self findDeviceForPosition:position];
  AVCaptureDeviceFormat *format = [self selectFormatForDevice:device];

  if (format == nil) {
    RTCLogError(@"No valid formats for device %@", device);
    NSAssert(NO, @"");
    return;
  }

  NSInteger fps = [self selectFpsForFormat:format];

  [_capturer startCaptureWithDevice:device format:format fps:fps completionHandler:completion];
}
-
首先,它根据是否使用前置摄像头来确定捕获设备的位置(前置或后置)。 -
接着,它通过调用 findDeviceForPosition:方法查找对应位置的摄像头设备。 -
然后,它调用 selectFormatForDevice:方法来选择捕获设备的格式。 -
如果没有可用的格式,则记录错误信息,并触发断言,然后退出。 -
最后,它调用 selectFpsForFormat:方法来选择帧率,并调用startCaptureWithDevice:format:fps:completionHandler:方法来启动捕获。
上面的函数有几处比较重要比如:
-
如何选择像素格式? -
如何选择采集帧率?
这里不单独展开说明,后面第 4 小点会来统一解答文章开始的问题。
最后,我们接着看 startCaptureWithDevice 函数
- (void)startCaptureWithDevice:(AVCaptureDevice *)device
                        format:(AVCaptureDeviceFormat *)format
                           fps:(NSInteger)fps
             completionHandler:(nullable void (^)(NSError *_Nullable error))completionHandler {
  _willBeRunning = YES;
  [RTC_OBJC_TYPE(RTCDispatcher)
      dispatchAsyncOnType:RTCDispatcherTypeCaptureSession
                    block:^{
                      RTCLogInfo("startCaptureWithDevice %@ @ %ld fps", format, (long)fps);
...
                      self.currentDevice = device;
                      NSError *error = nil;
                      //第一步
                      if (![self.currentDevice lockForConfiguration:&error]) {
...
                        return;
                      }
                      //第二步
                      [self reconfigureCaptureSessionInput];
                      //第三步
                      [self updateOrientation];
                      //第四步
                      [self updateDeviceCaptureFormat:format fps:fps];
                      //第五步
                      [self updateVideoDataOutputPixelFormat:format];
                      //第六步
                      [self.captureSession startRunning];
                      //第七步
                      [self.currentDevice unlockForConfiguration];
                      self.isRunning = YES;
                      if (completionHandler) {
                        completionHandler(nil);
                      }
                    }];
}
这个函数startCaptureWithDevice:format:fps:completionHandler:主要用于启动视频捕获,下面是对其不同步骤的分析:
第一步: 锁定捕获设备配置
-
这是一项关键操作,它尝试锁定当前采集设备的配置,以便可以更改它。 -
如果锁定失败,它会生成一个错误,并直接返回,不执行后续的操作。
第二步: 重新配置捕获会话输入
- (void)reconfigureCaptureSessionInput {
  NSAssert([RTC_OBJC_TYPE(RTCDispatcher) isOnQueueForType:RTCDispatcherTypeCaptureSession],
           @"reconfigureCaptureSessionInput must be called on the capture queue.");
  NSError *error = nil;
  AVCaptureDeviceInput *input =
      [AVCaptureDeviceInput deviceInputWithDevice:_currentDevice error:&error];
  if (!input) {
    RTCLogError(@"Failed to create front camera input: %@", error.localizedDescription);
    return;
  }
  [_captureSession beginConfiguration];
  for (AVCaptureDeviceInput *oldInput in [_captureSession.inputs copy]) {
    [_captureSession removeInput:oldInput];
  }
  if ([_captureSession canAddInput:input]) {
    [_captureSession addInput:input];
  } else {
    RTCLogError(@"Cannot add camera as an input to the session.");
  }
  [_captureSession commitConfiguration];
}
这个函数 reconfigureCaptureSessionInput,主要用于重新配置捕获会话的输入,下面是这个函数的详细解释:
-
创建捕获设备输入: -
使用 _currentDevice创建一个AVCaptureDeviceInput对象input。这个input是一个表示摄像头设备输入的对象。
-
-
检查输入创建是否成功: -
如果创建 input失败,即_currentDevice不可用或其他错误,会记录错误信息到日志,并直接返回函数,不再执行后续操作。
-
-
开始配置捕获会话: -
使用 _captureSession的beginConfiguration方法,开始配置捕获会话。在这之后,可以对会话进行配置操作,而这些配置操作将在调用commitConfiguration之后一起生效。
-
-
移除旧的输入: -
使用 for-in循环遍历_captureSession.inputs中的所有输入(通常是之前的摄像头输入)。 -
通过 _captureSession的removeInput:方法将每个旧输入从会话中移除。这是为了清除之前可能存在的摄像头输入,以便替换为新的输入。
-
-
添加新的输入: -
检查 _captureSession是否可以添加新的摄像头输入input,如果可以,使用_captureSession的addInput:方法将新的输入添加到会话中。这样就将当前设备的摄像头输入配置到了捕获会话中。
-
-
提交会话配置: -
使用 _captureSession的commitConfiguration方法,提交捕获会话的配置,使之生效。
-
该函数验证了开始说的步骤第2点的配置输入设备到 采集会话中。
第三步: 更新当前设备的旋转方向
- (void)updateOrientation {
  NSAssert([RTC_OBJC_TYPE(RTCDispatcher) isOnQueueForType:RTCDispatcherTypeCaptureSession],
           @"updateOrientation must be called on the capture queue.");
#if TARGET_OS_IPHONE
  _orientation = [UIDevice currentDevice].orientation;
#endif
}
根据设备的方向,会在采集输出的视频数据中更新方向。
第四步: 更新设备采集格式和帧率
- (void)updateDeviceCaptureFormat:(AVCaptureDeviceFormat *)format fps:(NSInteger)fps {
  NSAssert([RTC_OBJC_TYPE(RTCDispatcher) isOnQueueForType:RTCDispatcherTypeCaptureSession],
           @"updateDeviceCaptureFormat must be called on the capture queue.");
  @try {
    _currentDevice.activeFormat = format;
    _currentDevice.activeVideoMinFrameDuration = CMTimeMake(1, fps);
  } @catch (NSException *exception) {
    RTCLogError(@"Failed to set active format!n User info:%@", exception.userInfo);
    return;
  }
}
第五步: 更新视频数据输出像素格式
- (void)updateVideoDataOutputPixelFormat:(AVCaptureDeviceFormat *)format {
  FourCharCode mediaSubType = CMFormatDescriptionGetMediaSubType(format.formatDescription);
  if (![[RTC_OBJC_TYPE(RTCCVPixelBuffer) supportedPixelFormats] containsObject:@(mediaSubType)]) {
    mediaSubType = _preferredOutputPixelFormat;
  }

  if (mediaSubType != _outputPixelFormat) {
    _outputPixelFormat = mediaSubType;
    _videoDataOutput.videoSettings =
        @{ (NSString *)kCVPixelBufferPixelFormatTypeKey : @(mediaSubType) };
  }
}
第六步: 启动捕获会话
-
通过调用 [self.captureSession startRunning]来启动捕获会话,这是实际开始捕获视频帧的地方。
第七步: 解锁捕获设备配置
-
解锁之前锁定的捕获设备的配置,以允许其他应用程序或操作使用设备。
这个函数主要负责视频捕获的启动过程,包括锁定和配置摄像头设备、更新会话设置、启动会话以及在完成时通知回调。这是一个多步骤的过程,通过异步分派在后台线程中执行,以确保不会阻塞主线程。
并且在这个函数中也验证了开始的 第三点和第4点流程,由此现在正是的开始采集了。
3.2 采集输出
在上面 3.1 小节中介绍了 setSampleBufferDelegate 函数,它的第一个参数就是采集回调
- (void)setSampleBufferDelegate:(nullable id<AVCaptureVideoDataOutputSampleBufferDelegate>)sampleBufferDelegate queue:(nullable dispatch_queue_t)sampleBufferCallbackQueue;

API_AVAILABLE(macos(10.7), ios(4.0), macCatalyst(14.0)) API_UNAVAILABLE(tvos) API_UNAVAILABLE(watchos)
@protocol AVCaptureVideoDataOutputSampleBufferDelegate <NSObject>

@optional

- (void)captureOutput:(AVCaptureOutput *)output didOutputSampleBuffer:(CMSampleBufferRef)sampleBuffer fromConnection:(AVCaptureConnection *)connection;

- (void)captureOutput:(AVCaptureOutput *)output didDropSampleBuffer:(CMSampleBufferRef)sampleBuffer fromConnection:(AVCaptureConnection *)connection API_AVAILABLE(ios(6.0), macCatalyst(14.0)) API_UNAVAILABLE(tvos);

@end
需要实现这两个函数,就能接收采集视频的回调了,那么这两个函数有什么区别呢?
-
captureOutput:didOutputSampleBuffer:fromConnection:这个方法主要用于处理捕获到的视频帧数据,它在 macOS 和 iOS 平台上可用,也支持 Mac Catalyst。 -
captureOutput:didDropSampleBuffer:fromConnection:这个方法在视频帧被丢弃(即丢失)时被调用,通常用于报告帧的丢失情况。它在 iOS 和 Mac Catalyst 上可用,但不支持 tvOS。
这里我们只关注视频帧输出,所以直接看第一个函数的实现:
#pragma mark AVCaptureVideoDataOutputSampleBufferDelegate

- (void)captureOutput:(AVCaptureOutput *)captureOutput
    didOutputSampleBuffer:(CMSampleBufferRef)sampleBuffer
           fromConnection:(AVCaptureConnection *)connection {
  //第一步
  NSParameterAssert(captureOutput == _videoDataOutput);

  if (CMSampleBufferGetNumSamples(sampleBuffer) != 1 || !CMSampleBufferIsValid(sampleBuffer) ||
      !CMSampleBufferDataIsReady(sampleBuffer)) {
    return;
  }

  CVPixelBufferRef pixelBuffer = CMSampleBufferGetImageBuffer(sampleBuffer);
  if (pixelBuffer == nil) {
    return;
  }

#if TARGET_OS_IPHONE
  BOOL usingFrontCamera = NO;
  //第二步
  AVCaptureDevicePosition cameraPosition =
      [AVCaptureSession devicePositionForSampleBuffer:sampleBuffer];
  if (cameraPosition != AVCaptureDevicePositionUnspecified) {
    usingFrontCamera = AVCaptureDevicePositionFront == cameraPosition;
  } else {
    AVCaptureDeviceInput *deviceInput =
        (AVCaptureDeviceInput *)((AVCaptureInputPort *)connection.inputPorts.firstObject).input;
    usingFrontCamera = AVCaptureDevicePositionFront == deviceInput.device.position;
  }
  //第三步
  switch (_orientation) {
    case UIDeviceOrientationPortrait:
      _rotation = RTCVideoRotation_90;
      break;
    case UIDeviceOrientationPortraitUpsideDown:
      _rotation = RTCVideoRotation_270;
      break;
    case UIDeviceOrientationLandscapeLeft:
      _rotation = usingFrontCamera ? RTCVideoRotation_180 : RTCVideoRotation_0;
      break;
    case UIDeviceOrientationLandscapeRight:
      _rotation = usingFrontCamera ? RTCVideoRotation_0 : RTCVideoRotation_180;
      break;
    case UIDeviceOrientationFaceUp:
    case UIDeviceOrientationFaceDown:
    case UIDeviceOrientationUnknown:
      // Ignore.
      break;
  }
#else
  // No rotation on Mac.
  _rotation = RTCVideoRotation_0;
#endif
//第四步
  RTC_OBJC_TYPE(RTCCVPixelBuffer) *rtcPixelBuffer =
      [[RTC_OBJC_TYPE(RTCCVPixelBuffer) alloc] initWithPixelBuffer:pixelBuffer];
  int64_t timeStampNs = CMTimeGetSeconds(CMSampleBufferGetPresentationTimeStamp(sampleBuffer)) *
      kNanosecondsPerSecond;
  RTC_OBJC_TYPE(RTCVideoFrame) *videoFrame =
      [[RTC_OBJC_TYPE(RTCVideoFrame) alloc] initWithBuffer:rtcPixelBuffer
                                                  rotation:_rotation
                                               timeStampNs:timeStampNs];
  [self.delegate capturer:self didCaptureVideoFrame:videoFrame];
}
第一步:参数验证和有效性检查
-
代码首先通过 NSParameterAssert验证captureOutput是否等于_videoDataOutput,确保回调是由正确的输出对象触发的。 -
接着,它对 sampleBuffer进行多项有效性检查:-
检查样本缓冲中的样本数是否为1,以确保只有一个样本。 -
检查样本缓冲是否有效,以确保它不为空或损坏。 -
检查样本缓冲数据是否准备就绪,以确保可以安全地访问数据。
-
第二步:确定摄像头使用情况(IOS)
-
代码根据摄像头的位置来确定是否使用前置摄像头。这里有两种方式来确定: -
首先,它尝试从 sampleBuffer中获取摄像头位置信息,如果可用,则根据摄像头位置确定是否使用前置摄像头。 -
如果无法从 sampleBuffer中获取位置信息,则通过检查连接的输入端口来判断是否使用前置摄像头。
-
第三步:确定视频旋转角度(IOS)
-
根据设备的方向( _orientation)以及摄像头使用情况(前置或后置),确定视频的旋转角度(_rotation)。不同的设备方向和摄像头使用情况会导致不同的旋转角度,以确保视频帧的正确方向显示。
第四步:创建并传递视频帧
-
代码创建了一个 RTCVideoFrame对象,其中包含了视频数据(从pixelBuffer创建),旋转信息(从第三步确定的_rotation),以及时间戳信息(从样本缓冲的时间戳获取)。 -
最后,将采集的视频帧传递给代理对象(用于编码或者预览)。
总结:这段采集代码主要完成了视频捕获后的处理和传递。它首先验证和检查参数的有效性,然后根据摄像头使用情况和设备方向确定视频的旋转角度,最后将采集到的视频帧以代理的形式传递给编码或预览。通过这四个步骤完成了视频采集后的处理流程。
4. 解答
通过上面 3 大点的介绍,其实陆陆续续的已经介绍答案了。这里我们再进行总结一下吧
4.1 如何自定义视频大小和图像格式
通过如下代码获取当前设备的采集大小和图像格式:
- (AVCaptureDeviceFormat *)selectFormatForDevice:(AVCaptureDevice *)device {
  NSArray<AVCaptureDeviceFormat *> *formats =
      [RTC_OBJC_TYPE(RTCCameraVideoCapturer) supportedFormatsForDevice:device];


    // 遍历并打印每个格式的信息
    for (AVCaptureDeviceFormat *format in formats) {
        CMFormatDescriptionRef formatDescription = format.formatDescription;

        // 获取格式的详细信息
        CMVideoDimensions dimensions = CMVideoFormatDescriptionGetDimensions(formatDescription);
        FourCharCode pixelFormat = CMFormatDescriptionGetMediaSubType(formatDescription);
        int frameRate = [format.videoSupportedFrameRateRanges.firstObject maxFrameRate]; // 获取最大帧率
        NSString *pixelFormatString = nil;
        // 打印格式信息
        switch (pixelFormat) {
            case kCVPixelFormatType_420YpCbCr8BiPlanarVideoRange:
                pixelFormatString = @"NV12"; // YUV 4:2:0, planar, 8-bit, video-range
                break;
            case kCVPixelFormatType_420YpCbCr8BiPlanarFullRange:
                pixelFormatString = @"NV21"; // YUV 4:2:0, planar, 8-bit, full-range
                break;
            case kCVPixelFormatType_422YpCbCr8:
                pixelFormatString = @"YUYV"; // YUV 4:2:2, packed, 8-bit
                break;
            case kCVPixelFormatType_32BGRA:
                pixelFormatString = @"BGRA"; // RGB 32-bit
                break;
            case kCVPixelFormatType_32ARGB:
                pixelFormatString = @"ARGB"; // RGB 32-bit
                break;
            default:
                pixelFormatString = @"Unknown";
                break;
        }

        NSLog(@"supportedFormatsForDevice: Width=%d, Height=%d, PixelFormat=%@", dimensions.width, dimensions.height, pixelFormatString);
    }
  /**自定义输出的视频大小,会选择最为合适的*/
  int targetWidth = 1920;
  int targetHeight = 720;
  AVCaptureDeviceFormat *selectedFormat = nil;
  int currentDiff = INT_MAX;

  for (AVCaptureDeviceFormat *format in formats) {
    CMVideoDimensions dimension = CMVideoFormatDescriptionGetDimensions(format.formatDescription);
    FourCharCode pixelFormat = CMFormatDescriptionGetMediaSubType(format.formatDescription);
    int diff = abs(targetWidth - dimension.width) + abs(targetHeight - dimension.height);
    if (diff < currentDiff) {
      selectedFormat = format;
      currentDiff = diff;
    } else if (diff == currentDiff && pixelFormat == [_capturer preferredOutputPixelFormat]) {
      selectedFormat = format;
    }
  }

  return selectedFormat;
}
打印如下:
MAC M1:
supportedFormatsForDevice: Width=1920, Height=1080, PixelFormat=NV12
supportedFormatsForDevice: Width=1280, Height=720, PixelFormat=NV12
supportedFormatsForDevice: Width=1080, Height=1920, PixelFormat=NV12
supportedFormatsForDevice: Width=1760, Height=1328, PixelFormat=NV12
supportedFormatsForDevice: Width=640, Height=480, PixelFormat=NV12
supportedFormatsForDevice: Width=1328, Height=1760, PixelFormat=NV12
supportedFormatsForDevice: Width=1552, Height=1552, PixelFormat=NV12
IPhone:
supportedFormatsForDevice: Width=192, Height=144, PixelFormat=NV12
supportedFormatsForDevice: Width=192, Height=144, PixelFormat=NV21
supportedFormatsForDevice: Width=352, Height=288, PixelFormat=NV12
supportedFormatsForDevice: Width=352, Height=288, PixelFormat=NV21
supportedFormatsForDevice: Width=480, Height=360, PixelFormat=NV12
supportedFormatsForDevice: Width=480, Height=360, PixelFormat=NV21
supportedFormatsForDevice: Width=640, Height=480, PixelFormat=NV12
supportedFormatsForDevice: Width=640, Height=480, PixelFormat=NV21
supportedFormatsForDevice: Width=640, Height=480, PixelFormat=NV12
supportedFormatsForDevice: Width=640, Height=480, PixelFormat=NV21
supportedFormatsForDevice: Width=960, Height=540, PixelFormat=NV12
supportedFormatsForDevice: Width=960, Height=540, PixelFormat=NV21
supportedFormatsForDevice: Width=1024, Height=768, PixelFormat=NV12
supportedFormatsForDevice: Width=1024, Height=768, PixelFormat=NV21
supportedFormatsForDevice: Width=1280, Height=720, PixelFormat=NV12
supportedFormatsForDevice: Width=1280, Height=720, PixelFormat=NV21
supportedFormatsForDevice: Width=1280, Height=720, PixelFormat=NV12
supportedFormatsForDevice: Width=1280, Height=720, PixelFormat=NV21
supportedFormatsForDevice: Width=1440, Height=1080, PixelFormat=NV12
supportedFormatsForDevice: Width=1440, Height=1080, PixelFormat=NV21
supportedFormatsForDevice: Width=1920, Height=1080, PixelFormat=NV12
supportedFormatsForDevice: Width=1920, Height=1080, PixelFormat=NV21
supportedFormatsForDevice: Width=1920, Height=1440, PixelFormat=NV12
supportedFormatsForDevice: Width=1920, Height=1440, PixelFormat=NV21
supportedFormatsForDevice: Width=3088, Height=2320, PixelFormat=NV12
supportedFormatsForDevice: Width=3088, Height=2320, PixelFormat=NV21
由此看出,在苹果设备上最通用的其实是 nv12 像素格式,其中 IOS 通过遍历出来得到了 [NV12,NV21] , MAC 得到了 [NV12] 格式。
4.2 如何设置帧率
- (NSInteger)selectFpsForFormat:(AVCaptureDeviceFormat *)format {
  Float64 maxSupportedFramerate = 0;
  for (AVFrameRateRange *fpsRange in format.videoSupportedFrameRateRanges) {
    maxSupportedFramerate = fmax(maxSupportedFramerate, fpsRange.maxFrameRate);
    NSLog(@"selectFpsForFormat %f", maxSupportedFramerate);
  }
  return fmin(maxSupportedFramerate, kFramerateLimit);
}

- (void)updateDeviceCaptureFormat:(AVCaptureDeviceFormat *)format fps:(NSInteger)fps {
  NSAssert([RTC_OBJC_TYPE(RTCDispatcher) isOnQueueForType:RTCDispatcherTypeCaptureSession],
           @"updateDeviceCaptureFormat must be called on the capture queue.");
  @try {
    _currentDevice.activeFormat = format;
    _currentDevice.activeVideoMinFrameDuration = CMTimeMake(1, fps);
  } @catch (NSException *exception) {
    RTCLogError(@"Failed to set active format!n User info:%@", exception.userInfo);
    return;
  }
}
在 IPhone 和 MAC 上均输出最大的采集帧率为 30fps,所以我们设置的时候需要根据 format.videoSupportedFrameRateRanges 范围去设置
4.3 前后摄像头之间如何切换
  //拿到前后摄像头的 position
  AVCaptureDevicePosition position =
      _usingFrontCamera ? AVCaptureDevicePositionFront : AVCaptureDevicePositionBack;
  //根据 position 去找到对应的摄像头设备
  AVCaptureDevice *device = [self findDeviceForPosition:position];

- (AVCaptureDevice *)findDeviceForPosition:(AVCaptureDevicePosition)position {
  NSArray<AVCaptureDevice *> *captureDevices =
      [RTC_OBJC_TYPE(RTCCameraVideoCapturer) captureDevices];
  for (AVCaptureDevice *device in captureDevices) {
    if (device.position == position) {
      return device;
    }
  }
  return captureDevices[0];
}
4.4 IOS 和 MACOS 代码的通用性
-
通过第三大点的介绍,除了一些特定的配置外(通过平台宏配置),基本上一套采集代码在 IOS 和 MACOS 是可以直接使用的.
5.总结
通过上面的 4 个大点,从采集基础到 webrtc 中的实际使用分析,每一个点都基本分析到了,现在你可以自己实现一套相机采集的功能了。
参考
-
Setting Up a Capture Session -
https://objccn.io/issue-23-1/
作者:DevYK
原文:https://mp.weixin.qq.com/s/TzK-f9Z0Nus0xejIfI1mHA
版权声明:本文内容转自互联网,本文观点仅代表作者本人。本站仅提供信息存储空间服务,所有权归原作者所有。如发现本站有涉嫌抄袭侵权/违法违规的内容, 请发送邮件至1393616908@qq.com 举报,一经查实,本站将立刻删除。