
在数字时代,实时网络应用改变了我们与技术和人与人之间的互动方式。从即时聊天系统到即时内容更新,用户现在都希望能在指尖进行无缝、即时的交流。本教程将使用 Laravel 和 Pusher 这两个强大的工具,创建实时聊天应用。
安装并运行迁移
首先,安装 Laravel。
composer create-project laravel/laravel为方便使用,让我们使用 SQLite 数据库。在 .env 中,将 nysql 改为 sqlite。在 .env 中删除 DB_DATABASE=laravel
DB_CONNECTION=sqlite编写迁移:
php artisan make:migration create_chat_messages_table --create=chat_messages将其添加到迁移表中:
public function up(): void
    {
        Schema::create('chat_messages', function (Blueprint $table) {
            $table->id();
            $table->string('user');
            $table->text('message_text');
            $table->timestamps();
        });
 }
运行:
php artisan migrate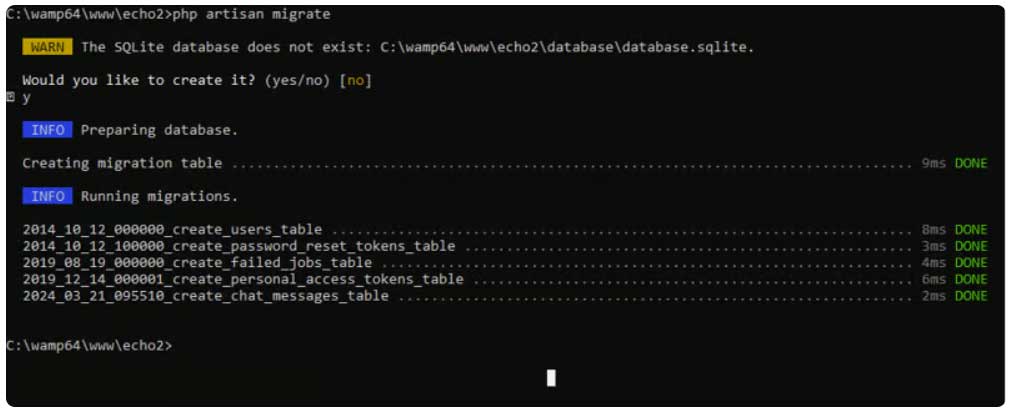

Pusher
首先登录 pusher 并创建一个应用程序。
https://dashboard.pusher.com/apps

创建应用程序后,获取这些字段并保存在 .env 中。
BROADCAST_DRIVER=pusher
...

PUSHER_APP_ID=""
PUSHER_APP_KEY=""
PUSHER_APP_SECRET=""
PUSHER_APP_CLUSTER=
安装 pusher 在命令行中添加以下内容:
composer require pusher/pusher-php-serverVue.js
现在使用 VusJS 构建 UI。
npm install
npm install vue@latest vue-loader@latest
npm i @vitejs/plugin-vue
编辑文件 vite.config.js
import { defineConfig } from 'vite';
import laravel from 'laravel-vite-plugin';
import vue from '@vitejs/plugin-vue'

export default defineConfig({
    plugins: [
        vue(),
        laravel({
            input: ['resources/css/app.css', 'resources/js/app.js'],
            refresh: true,
        }),
    ],
});
现在进入 resources\js\app.js 并添加以下几行。
import { createApp } from 'vue';
import Chat from './components/Chat.vue';
import App from './App.vue'
const app = createApp(App);
app.component('Chat', Chat);

app.mount("#app");
从用户界面开始
创建文件 resources\js\components\Chat.vue
添加:
<template>
    <div class="chat-box">
        <div class="chat-box-header">Chat</div>
        <div class="chat-box-messages" id="chat-messages">
            <div class="message other-user">Hi, how are you?</div>
            <div class="message current-user">I'm good, thanks! And you?</div>
        </div>
        <div class="chat-box-input">
            <input type="text" class="input_border" placeholder="Type a message..." />
            <button type="button">Send</button>
        </div>
    </div>
</template>


<style scoped>

.chat-box-input {
    padding: 10px;
    background-color: #fff;
    border-top: 1px solid #eee;
    display: flex; /* Aligns input and button side by side */
}

.chat-box-input input {
    flex-grow: 1; /* Allows input to take up available space */
    margin-right: 8px; /* Adds spacing between input and button */
    padding: 8px 10px;
    border: 1px solid #ccc;
    border-radius: 4px;
    box-sizing: border-box;
}

.chat-box-input button {
    padding: 10px 15px;
    background-color: #007bff;
    color: #ffffff;
    border: none;
    border-radius: 4px;
    cursor: pointer; /* Changes cursor to pointer on hover */
    white-space: nowrap; /* Prevents wrapping of text in the button */
}

.chat-box-input button:hover {
    background-color: #0056b3; /* Darker shade on hover for visual feedback */
}

.chat-box {
    display: flex;
    flex-direction: column;
    max-width: 320px;
    min-width: 300px;
    height: 500px;
    border: 1px solid #ccc;
    border-radius: 8px;
    overflow: hidden;
    box-shadow: 0 2px 10px rgba(0,0,0,0.1);
    font-family: Arial, sans-serif;
    background-color: #fff;
}

.chat-box-header {
    background-color: #007bff;
    color: #ffffff;
    padding: 10px;
    text-align: center;
    font-size: 16px;
}

.chat-box-messages {
    flex: 1;
    padding: 10px;
    overflow-y: auto;
    background-color: #f9f9f9;
    display: flex;
    flex-direction: column;
}

.message {
    margin-bottom: 12px;
    padding: 8px 10px;
    border-radius: 20px;
    display: inline-block;
    max-width: 70%;
}

.current-user {
    background-color: #007bff;
    color: #ffffff;
    margin-left: auto;
    text-align: right;
    align-self: flex-end;
}

.other-user {
    background-color: #e9ecef;
    color: #333;
}

.chat-box-input {
    padding: 10px;
    background-color: #fff;
    border-top: 1px solid #eee;
}

.chat-box-input input {
    width: 100%;
    padding: 8px 10px;
    border: 1px solid #ccc;
    border-radius: 4px;
    box-sizing: border-box;
}

.input_border{
    border: 1px solid #ccc;
}
</style>
现在转到 resources\views\welcome.blade.php 文件,删除所有内容并添加以下内容:
<!DOCTYPE html>
<html lang="{{ str_replace('_', '-', app()->getLocale()) }}">
    <head>
        <meta charset="utf-8">
        <meta name="viewport" content="width=device-width, initial-scale=1">
        <meta name="csrf-token" content="{{ csrf_token() }}">

        <title>Laravel</title>
        @vite('resources/js/app.js')
    </head>
    <body class="antialiased">
        <div id="app"></div>
    </body>
</html>
添加此文件 resources\js\App.vue
填充这些内容:
<template>
    <chat></chat>
</template>
在一个控制台(在您的项目目录中)运行此命令
php artisan serve在另一个控制台(在您的项目目录中)运行此命令
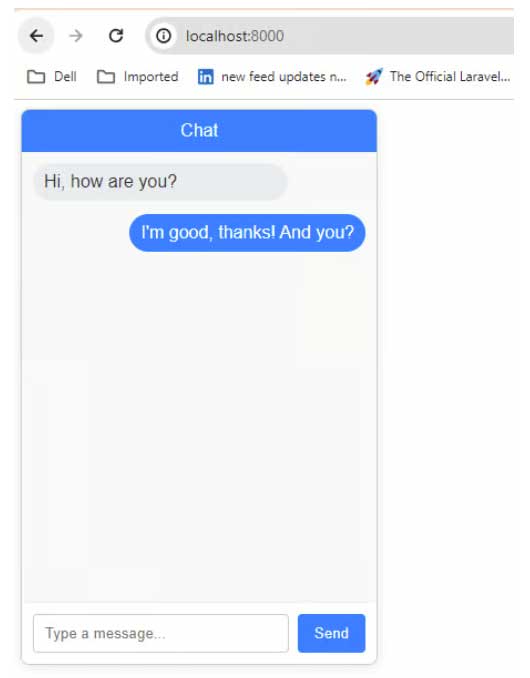
npm run dev然后在 localhost:8000 中看到这个 UI
接下来创建一个模型和事件。
php artisan make:model ChatMessage
php artisan make:event MessageCreated
ChatMessage 模型:
class ChatMessage extends Model
{
    use HasFactory;

    protected $fillable = ['user', 'message'];
}
然后是“MessageCreated”事件。
<?php

namespace App\Events;

use Illuminate\Broadcasting\Channel;
use Illuminate\Broadcasting\InteractsWithSockets;
use Illuminate\Broadcasting\PresenceChannel;
use Illuminate\Broadcasting\PrivateChannel;
use Illuminate\Contracts\Broadcasting\ShouldBroadcast;
use Illuminate\Foundation\Events\Dispatchable;
use Illuminate\Queue\SerializesModels;

class MessageCreated implements ShouldBroadcast
{

    use Dispatchable, InteractsWithSockets, SerializesModels;

    public $chat;

    /**
     * Create a new event instance.
     */
    public function __construct($chat)
    {
        $this->chat = $chat;
    }

    /**
     * Get the channels the event should broadcast on.
     *
     * @return array<int, \Illuminate\Broadcasting\Channel>
     */
    public function broadcastOn(): array
    {
        return [
            new Channel('chats'),
        ];
    }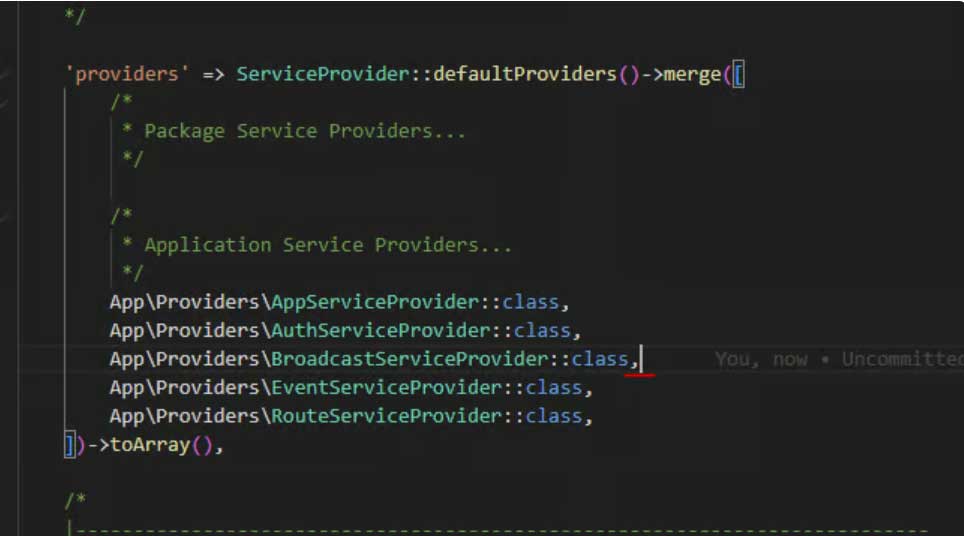
}检查这里我们已经在私人频道上添加了ShouldBroadcast广播。在公共频道上广播意味着当使用 echo 时任何人都会看到。并且还需要启用提供商。
配置\应用程序.php
下来是 routes.
Route::post('/chat', function () {
    $chat = ChatMessage::create([
        'user' => request('user'),
        'message_text' => request('message_text')
    ]);

    event((new MessageCreated($chat))->dontBroadcastToCurrentUser());
});
这样做的目的是将 ChatMessage 保存在表内并发送给推送器。让我们连接到用户界面并进行检查。
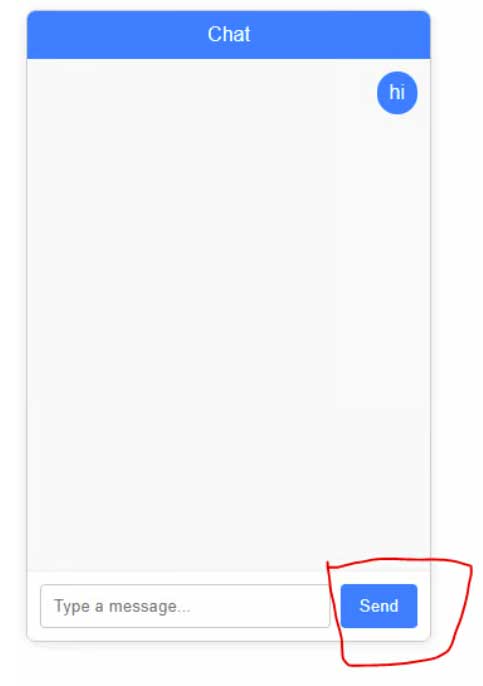
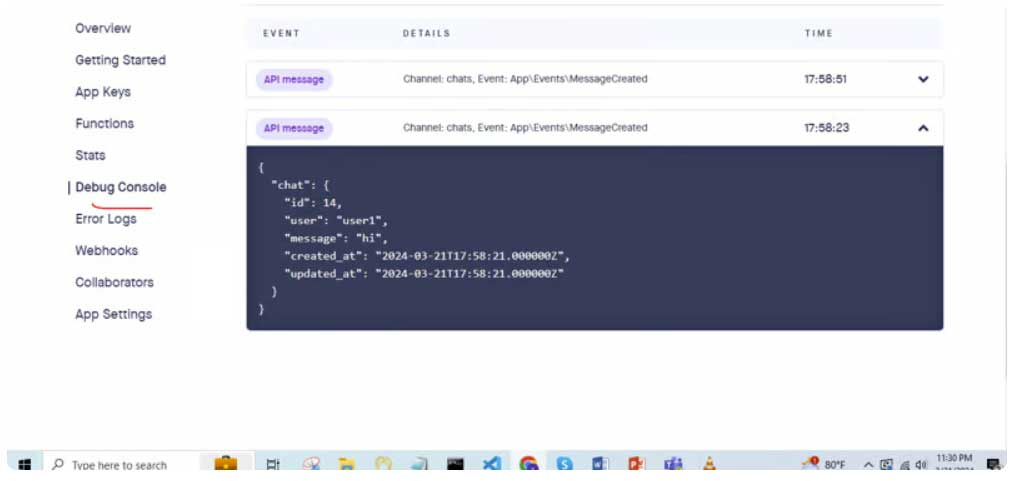
现在,如果你在用户界面上点击按钮:
你将在推送仪表板中看到这一点。
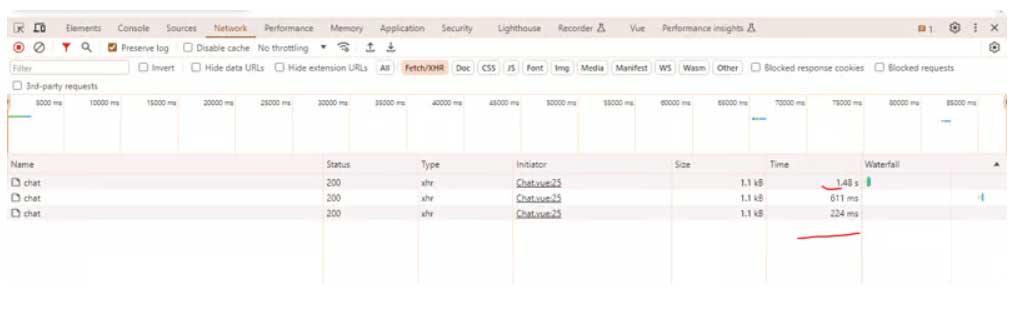
你可能会发现,按下按钮后,屏幕上的信息需要很长时间才能显示出来。这是因为后台发送推送程序需要很长时间。我们可以将此调用异步化,我们可以这样做。
第 1 步:配置队列驱动程序
首先,更新 .env 文件以使用数据库队列驱动程序:
QUEUE_CONNECTION=database第 2 步:创建队列表
Laravel 需要数据库中的一个表来存储排队的作业。可以通过运行 Laravel 附带的队列表迁移来创建此表。在终端中,执行:
php artisan queue:table第 2 步:应用迁移来创建表:
php artisan migrate第 4 步:确保事件监听器实现 ShouldQueue
use Illuminate\Broadcasting\PrivateChannel;
use Illuminate\Contracts\Broadcasting\ShouldBroadcast;
use Illuminate\Contracts\Queue\ShouldQueue;
use Illuminate\Foundation\Events\Dispatchable;
use Illuminate\Queue\SerializesModels;

class MessageCreated implements ShouldBroadcast, ShouldQueue
{
第 5 步:运行 Queue Worker
php artisan queue:work此命令启动一个队列工作程序,侦听数据库队列上的新作业并处理它们。保持此工作线程运行以确保你的排队作业得到处理。
现在可以看到 API 调用速度显著提高
我对聊天界面添加了一些更改。你可以在此 git 库中访问完整示例。
在 cli 中运行这个:
npm install --save laravel-echo pusher-js添加到resources\js\bootstrap.js
import Echo from 'laravel-echo';
import Pusher from 'pusher-js';
window.Pusher = Pusher;


window.Echo = new Echo({
  broadcaster: 'pusher',
  key: 'pubkey',
  cluster: 'mt1',
  forceTLS: true
});
原文:https://dev.to/vimuth7/create-a-chat-with-laravel-and-pusher-4igp
本文来自作者投稿,版权归原作者所有。如需转载,请注明出处:https://www.nxrte.com/jishu/im/45661.html