
本文将演示如何通过 WebRTC 显示 H.265 帧,如上一篇文章《不使用 DataChannel 的 WebRTC H.265》中所述。
媒体源扩展 (MSE)
媒体源 API 的正式名称是媒体源扩展 (MSE),它提供了无插件 Web 流媒体功能。使用 MSE,可以通过 JavaScript 创建媒体流,并使用 <audio>和 <video>元素播放媒体流。
MSE 支持包含 H.265 帧的片段式 mpeg-4(fMP4)。fMP4 的结构由 ftyp 和 moov 组成,后跟多个 moof 和 mdat 对。
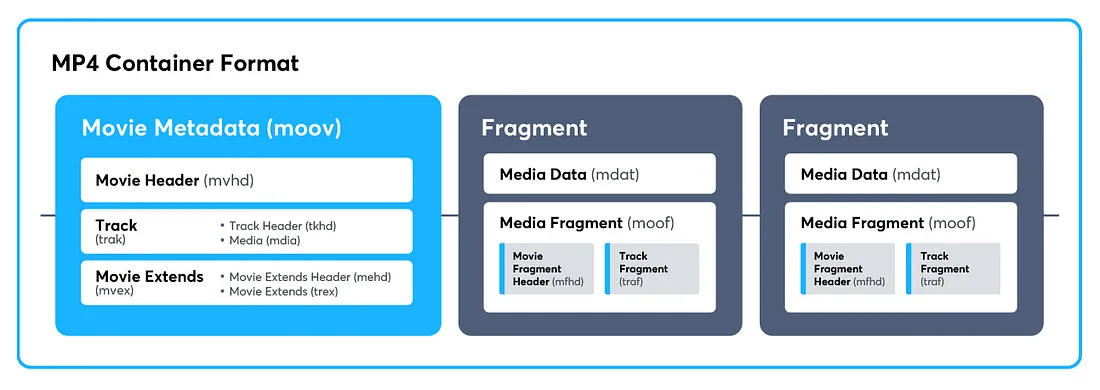

在 MSE 上播放 H.265 视频流就像播放一个无穷无尽的 fMP4 文件。每个数据块都包含 moof 和 mdat,第一个数据块的前缀是 ftyp 和 moov。
播放流媒体视频前有两个检查点。
实现 MSE
我编写了一个 WebSocket 服务器,用于向网站发送 fMP4 数据。要生成 fMP4 视频样本,建议下载 Bento4。
Bento4 MP4、DASH、HLS、CMAF SDK 和工具。快速、现代、开源的 C++ 工具包,满足您对 MP4 和 DASH/HLS/CMAF 媒体格式的所有需求。
# convert demo.mp4 to a fMP4 file fdemo.mp4
$ /bento4/bin/mp4fragment demo.mp4 fdemo.mp4
# show fMP4 info
$ ./bento4/bin/mp4info fdemo.mp4
# dump fMP4 boxes
$ ./bento4/bin/mp4dump fdemo.mp4
[ftyp] size=8+24
...
[moov] size=8+732
...
[moof] size=8+216
...
[mdat] size=8+67484
[moof] size=8+216
...
[mdat] size=8+67584
[moof] size=8+216
...
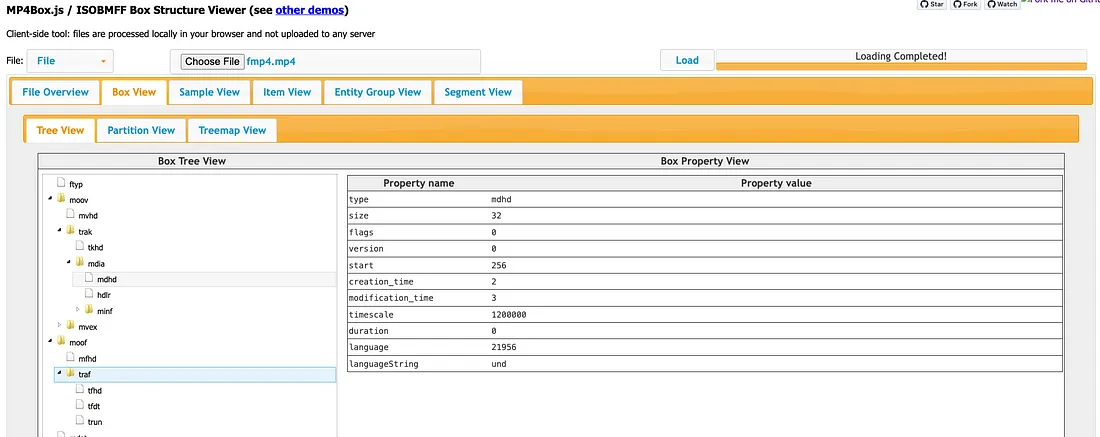
[mdat] size=8+69004如果你想拥有一个在线互动查看器,可以浏览 MP4Box.js 网站。
前台代码使用本地 JavaScript 编写,不使用 ReactJS 或 VueJS 框架。有一个下载功能可用于检查从 WebSocket 接收到的内容。该网站可用于检查常见 MIME 类型的支持情况。
<!DOCTYPE html>
<html lang="en">
  <head>
    <meta charset="UTF-8" />
    <title>Websocket Frontend</title>
  </head>
  <body>
    <div id="output"></div>
    <video
      id="video"
      width="640"
      height="480"
      autoplay
      style="border: 1px solid black"
    ></video>
    <br />
    <button id="play" onclick="play()">Play</button>
    <button id="stop" onclick="stop()">Stop</button>
    <button id="download" onclick="download()">Download</button>
    <script>
      let recordedChunks = [];
      let ws = null;

      function play() {
        const ms = new MediaSource();
        const player = document.getElementById("video");

        player.src = URL.createObjectURL(ms);

        player.addEventListener("error", () => {
          console.log("player error");
        });

        ms.addEventListener("sourceopen", () => {
          const sb = ms.addSourceBuffer(
            'video/mp4; codecs="hev1.1.6.L150"'
            );
          ws = new WebSocket("ws://localhost:8000");

          sb.mode = "sequence";

          sb.addEventListener("updateend", () => {
            console.log(
              sb.buffered,
              sb.buffered.start(0),
              '==>',
              sb.buffered.end(0),
              sb.mode,
            )
          });
          sb.addEventListener("error", () => {
            console.log("error");
          });

          ws.addEventListener("open", () => {
            console.log("open");
            // clear data
            recordedChunks = [];
          });

          ws.addEventListener("message", (event) => {
            event.data.arrayBuffer().then((buffer) => {
              sb.appendBuffer(buffer);
            });
          });
        });
        ms.addEventListener("error", () => {
          console.log("error");
        });
      }
      function stop() {
        ws.close();
      }
      function download() {
        const blob = new Blob(recordedChunks, {
          type: "video/mp4",
        });
        const url = URL.createObjectURL(blob);
        const a = document.createElement("a");
        document.body.appendChild(a);
        a.style = "display: none";
        a.href = url;
        a.download = "test.mp4";
        a.click();
        window.URL.revokeObjectURL(url);
      }
    </script>
  </body>
</html>
WebSocket 服务器是用 Deno 编写的,读取 fMP4 文件并将其发送到前端。
const demo = Deno.readFileSync("fdemo.mp4");


Deno.serve((req) => {
  if (req.headers.get("upgrade") != "websocket") {
    return new Response(null, { status: 501 });
  }
  const { socket, response } = Deno.upgradeWebSocket(req);
  socket.addEventListener("open", () => {
    console.log("a client connected!");
    setTimout(() => {
      socket.send(demo);
    }, 1000);
  });
  socket.addEventListener("message", (event) => {
    console.log("message", event);
  });
  socket.addEventListener("close", () => {
    sockets.delete(socket);
    console.log("a client disconnected!");
  });
  return response;
});
目前一切运行良好。
编写纯 JavaScript 打包器
由于无法调用 Bento4 生成 fMP4 文件(不使用 wasm),我想为 H.265 编写一个纯 JavaScript fMP4 打包器。我参考了 hls.js 代码库中的 src/remux/mp4-generator.ts,它预定义了许多框,但只支持 H.264 (avc1)。
添加 hev1 和 hvcc
要从原始帧支持 H.265,我需要添加 hev1 和 hvcc 框。stsd 下的 hev1 和 hvcc 取代了 avc1 和 avcc。
[moov] size=8+732
  [mvhd] size=12+96
  [trak] size=8+560
    [tkhd] size=12+80, flags=7
    [mdia] size=8+460
      [mdhd] size=12+20
      [hdlr] size=12+41
      [minf] size=8+367
        [vmhd] size=12+8, flags=1
        [dinf] size=8+28
          [dref] size=12+16
            [url ] size=12+0, flags=1
        [stbl] size=8+303
          [stsd] size=12+223
            [hev1] size=8+211 <-------------------
              [hvcC] size=8+105 <-----------------
              [btrt] size=8+12
          [stts] size=12+4
          [stsc] size=12+4
          [stsz] size=12+8
          [stco] size=12+4
  [mvex] size=8+48
    [mehd] size=12+4
    [trex] size=12+20
hev1 和 hvcc 的组装如下,track.vps/sps/pps 是 H.265 关键帧中的 NALU。
值得注意的是,track.vps/sps/pps 不包括启动代码!mdat 中的有效载荷也不包含启动代码。
static hev1(track: Track) {
  let vps: number[] = []
  let sps: number[] = []
  let pps: number[] = []
  let len

  // assemble the VPS
  vps.push(0x20)
  vps.push(0x00)
  vps.push(0x01) // vps count
  len = track.vps.byteLength
  vps.push((len >>> 8) & 0xff)
  vps.push(len & 0xff)
  vps = vps.concat(Array.prototype.slice.call(track.vps))

  // assemble the SPS
  sps.push(0x21)
  sps.push(0x00)
  sps.push(0x01) // sps count
  len = track.sps.byteLength
  sps.push((len >>> 8) & 0xff)
  sps.push(len & 0xff)
  sps = sps.concat(Array.prototype.slice.call(track.sps))

  // assemble the PPS
  pps.push(0x22)
  pps.push(0x00)
  pps.push(0x01) // pps count
  len = track.pps.byteLength
  pps.push((len >>> 8) & 0xff)
  pps.push(len & 0xff)
  pps = pps.concat(Array.prototype.slice.call(track.pps))

  const hvcc = MP4.box(
    MP4.types.hvcC,
    new Uint8Array(
      [
        // those magic bytes are copied from fdemo.mp4
        0x01, 0x01, 0x60, 0x00, 0x00, 0x00, 0x00, 0x00, 0x00, 0x00, 0x00,
        0x00, 0x96, 0xf0, 0x00, 0xfc, 0xfd, 0xf8, 0xf8, 0x00, 0x00, 0x0f,
        0x03,
      ]
        .concat(vps)
        .concat(sps)
        .concat(pps),
    ),
  )

  return MP4.box(
    MP4.types.hev1,
    new Uint8Array([
    ...
    ]), // pre_defined = -1
    hvcc,
    MP4.box(
      MP4.types.btrt,
      new Uint8Array([
      ...
      ]),
    ), // avgBitrate
  )
}

static mdat(track: Track) {
    const vps = track.vps
    const sps = track.sps
    const pps = track.pps
    const frame = track.frame

    return MP4.box(
      MP4.types.mdat,
      new Uint8Array(
        [
          (vps.byteLength >>> 24) & 0xff,
          (vps.byteLength >>> 16) & 0xff,
          (vps.byteLength >>> 8) & 0xff,
          vps.byteLength & 0xff,
        ]
          .concat(Array.prototype.slice.call(vps))
          .concat([
            (sps.byteLength >>> 24) & 0xff,
            (sps.byteLength >>> 16) & 0xff,
            (sps.byteLength >>> 8) & 0xff,
            sps.byteLength & 0xff,
          ])
          .concat(Array.prototype.slice.call(sps))
          .concat([
            (pps.byteLength >>> 24) & 0xff,
            (pps.byteLength >>> 16) & 0xff,
            (pps.byteLength >>> 8) & 0xff,
            pps.byteLength & 0xff,
          ])
          .concat(Array.prototype.slice.call(pps))
          .concat([
            (frame.byteLength >>> 24) & 0xff,
            (frame.byteLength >>> 16) & 0xff,
            (frame.byteLength >>> 8) & 0xff,
            frame.byteLength & 0xff,
          ])
          .concat(Array.prototype.slice.call(frame)),
      ),
    )
}注意:track这里与 hls.js 中的不一样。
BaseMediaDecodeTime 和 DefaultSampleDuration
我遇到了一个问题,即播放器在第一帧上冻结,并将第一个块发送到 MSE(其中包括关键帧)后需要 20 秒或更长时间才能更新。经过进一步调查,我发现问题与帧的默认采样持续时间有关。
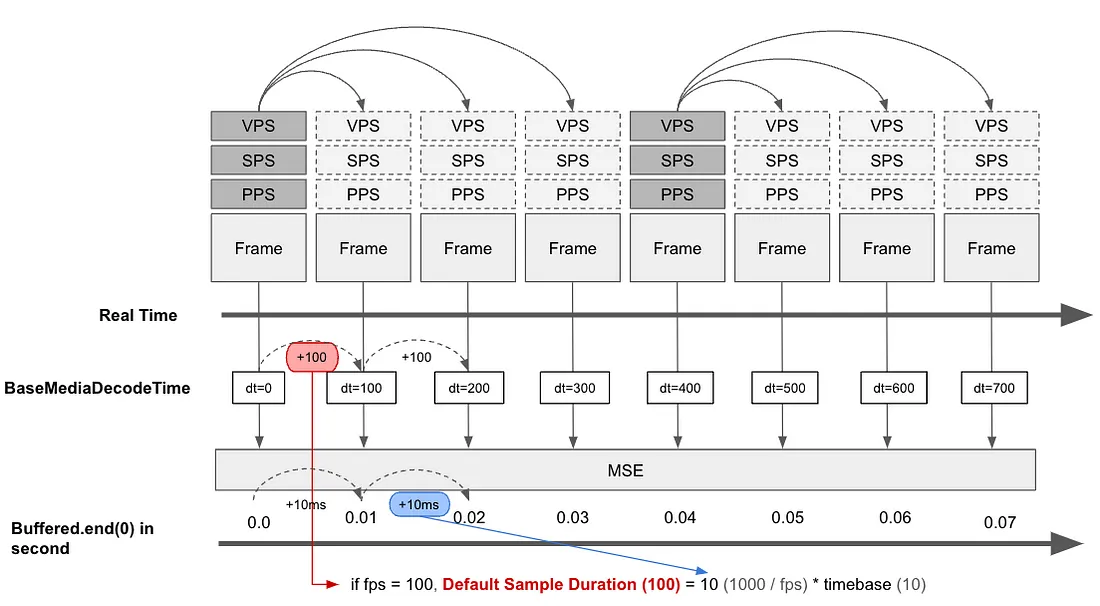
根据我的测试,要流畅播放实时视图,BaseMediaDecodeTime 应增加 DefaultSampleDuration。根据我的测试,timebase 是一个任意值,但不小于 10。
由于 BaseDecodeTime 在长时间播放后可能会溢出,因此可以使用较小的帧间隔。例如,如果 fps 为 25,帧间隔为 40ms,我可以使用最小 10ms。因此,DefaultSampleDuration 从 40 * 10 变为 10 * 10。当然,使用较小的帧间隔会影响 Buffered.end(0) 的增加。
const timebase = 10;

static traf(track: Track) {
    const baseMediaDecodeTime = track.dt
    const defaultSampleDuration = timeBase * Math.floor(1000/track.fps)
    const id = track.id
    const size =
      track.vps.byteLength +
      track.sps.byteLength +
      track.pps.byteLength +
      track.frame.byteLength +
      16

    return MP4.box(
      MP4.types.traf,
      MP4.box(
        MP4.types.tfhd,
        new Uint8Array([
          0x00, // version 0
          0x02,
          0x00,
          0x38, // flags
          id >> 24,
          (id >> 16) & 0xff,
          (id >> 8) & 0xff,
          id & 0xff, // track_ID
          (defaultSampleDuration >>> 24) & 0xff,
          (defaultSampleDuration >>> 16) & 0xff,
          (defaultSampleDuration >>> 8) & 0xff,
          defaultSampleDuration & 0xff,
          (size >>> 24) & 0xff,
          (size >>> 16) & 0xff,
          (size >>> 8) & 0xff,
          size & 0xff,
          0x01,
          0x01,
          0x00,
          0x00,
        ]),
      ),
      MP4.box(
        MP4.types.tfdt,
        new Uint8Array([
          0x00, // version 0
          0x00,
          0x00,
          0x00, // flags
          baseMediaDecodeTime >> 24,
          (baseMediaDecodeTime >> 16) & 0xff,
          (baseMediaDecodeTime >> 8) & 0xff,
          baseMediaDecodeTime & 0xff, // baseMediaDecodeTime is an integer equal to the sum of the decode durations of all earlier samples in the media
        ]),
      ),
      MP4.trun(
        28 + // tfhd
          16 + // tfdt
          8 + // traf header
          16 + // mfhd
          8 + // moof header
          8,
      ), // mdat header
    )
  }
最后,我将 mdhd 更改为 version 0。
 const timebase = 10;
  const timescale = 1000;

  static mdhd() {
    const ts = timeBase * timescale

    return MP4.box(
      MP4.types.mdhd,
      new Uint8Array([
        0x00, // version 0
        0x00,
        0x00,
        0x00, // flags
        0x00,
        0x00,
        0x00,
        0x02, // creation_time
        0x00,
        0x00,
        0x00,
        0x03, // modification_time
        (ts >> 24) & 0xff,
        (ts >> 16) & 0xff,
        (ts >> 8) & 0xff,
        ts & 0xff, // timescale
        0x00,
        0x00,
        0x00,
        0x00, // duration
        0x55,
        0xc4, // 'und' language (undetermined)
        0x00,
        0x00,
      ]),
    )
  }
WebRTC 可插入流
现在,我有了一个纯 JavaScript H.265 fMP4 打包器。但我们如何处理来自 WebRTC 的数据呢?答案就是使用 WebRTC 可插入流。
参考:https://developer.mozilla.org/en-US/docs/Web/API/WebRTC_API/Using_Encoded_Transforms
我可以在变换函数中获取编码视频帧 (RTCEncodedVideoFrame)。RTCEncodedVideoFrame.data 包含来自 WebRTC 的数据。
解析前 8 个字节,检查是否是 H.265 关键帧,但数据包是 H.264 P 帧。如果是关键帧,则使用 TextDecoder.decode() 读取 NALU 位置字符串大小并获取字符串。最后,NALU 位置映射可将 VSP/SPS/PPS 分开。
确保缓存 VPS、SPS 和 PPS,以便与 P 帧一起打包。
再次强调
值得注意的是,
track.vps/sps/pps不包括起始代码!mdat 中的有效载荷也不包括起始代码。
使用队列
如果未触发更新结束事件,则无法将帧添加到 SourceBuffer。使用队列来缓冲帧,并在 updateend 事件回调中每次向 SourceBuffer 传递一个帧。
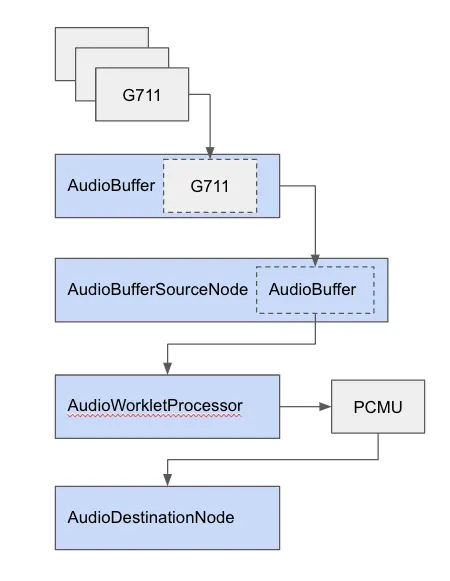
额外功能:G711 纯 JavaScript 解码
为了播放 G711 音频数据,我使用了 Web Audio API 中的 AudioContext 和 audioWorklet。
例子:
https://developer.mozilla.org/en-US/docs/Web/API/BaseAudioContext/createBufferSource
如果您使用 Webpack 开发网站,请使用 CopyWebpackPlugin 将 audioWorklet 文件复制到 dist。
 new CopyWebpackPlugin({
      patterns: [
        {
          from: fromRoot('src/audioWorklet'),
          to: 'audioWorklet',
        },
      ],
    }),
在 JavaScript 函数中:
this.audioCtx.audioWorklet
      .addModule('./audioWorklet/g711.js')
      .then(() => {
        if (!this.audioCtx) {
          return
        }

        this.g711Node = new AudioWorkletNode(
          this.audioCtx,
          'worklet-name',
        )

          this.g711Node.connect(this.audioCtx.destination)
      })
      .catch(() => {})
在audioWorklet函数中,g711.js:
const G711 = {
  // There is a map to map 2 bytes G711 to 16 bytes PCMU
  // https://coral.googlesource.com/linux-imx/+/refs/heads/codeaurora-linux-4.19.y/drivers/isdn/i4l/isdn_audio.c?autodive=0%2F%2F%2F%2F%2F%2F%2F%2F%2F%2F%2F%2F%2F%2F%2F%2F%2F%2F
  uLawDecode: (float32Data) => {}
}

class G711ToPcmWorklet extends AudioWorkletProcessor {
  process(inputs, outputs) {
    if (!inputs[0][0]) {
      return true
    }
    // input will be Float32Array format, pcm is Int16Array
    const pcm = G711.uLawDecode(inputs[0][0])
    const output = outputs[0]

    output.forEach(channel => {
      for (let i = 0; i < channel.length; i++) {
        // convert Int16Array to Float32Array
        channel[i] = pcm[i] / (pcm[i] >= 0 ? 32767 : 32768)
      }
    })

    return true
  }
}

registerProcessor('worklet-name', G711ToPcmWorklet)
检查采样率
确保 AudioBuffer 和 AudioContext 中的采样率相同。
this.sampleRate = 16000

this.audioCtx = new AudioContext({
  sampleRate: this.sampleRate,
})

this.buffer = this.audioCtx.createBuffer(
  this.channelCnt,
  float32Data.length,
  this.sampleRate,
)
检查 AudioBufferSource 的开始时间
如果您在播放音频时听到重复的乒乓声,可能是因为所有音频块在下一个 AudioSourceBuffer 开始时间之前已经播放完毕。造成此问题的一个可能原因是音频块的持续时间由浮点数表示,该浮点数可能不稳定。例如,持续时间几乎总是 0.64,但它可能突然变成 0.6399999999 或 0.640000001。这可能会导致开始时间出现偏差并导致重复的乒乓声。
  if (this.startTime < this.audioCtx.currentTime) {
      this.startTime = this.audioCtx.currentTime
    }

    this.bufferSource = this.audioCtx.createBufferSource()
    this.bufferSource.buffer = this.buffer
    this.bufferSource.onended = () => {
      this.playFramesInQueue()
    }
    this.bufferSource.connect(this.g711Node)
    this.bufferSource.start(this.startTime)

    // Add duration after each G711 chunks
    this.startTime += this.buffer.duration
    // remove bias in startItme. 0.6400001 -> 0.64, 0.639999 -> 0.64
    this.startTime = Math.round(this.startTime * 1000) / 1000
使用队列
当AudioBufferSource.onended被触发时,向 AudioBufferSource 发送下一个音频块。
实用的命令
# aac to raw pcm
$ ffmpeg -i movie.mp4 -f s16le -acodec pcm_s16le output.raw
# aac to wav
$ ffmpeg -i movie.mp4 -codec:a pcm_mulaw output.wav
# g711 to wav
$ ffmpeg -f mulaw -ar 16000 -i audio.raw audio.wav
作者:Angcar
本文来自作者投稿,版权归原作者所有。如需转载,请注明出处:https://www.nxrte.com/jishu/webrtc/36442.html