
对象检测是计算机视觉中的一项基本任务,涉及识别和定位图像或视频中的对象。多年来,已经开发了多种对象检测算法,每种算法都有自己的优点和局限性。YOLOv4(You Only Look Once)就是其中一种广受欢迎的算法,以其高精度和实时性能而闻名。
在这篇博文中,我们将探索 YOLOv4 算法并指导你使用 OpenCV 完成其实现。我们将介绍其架构,解释代码,并演示如何对图像和视频执行对象检测。
YOLOv4简介
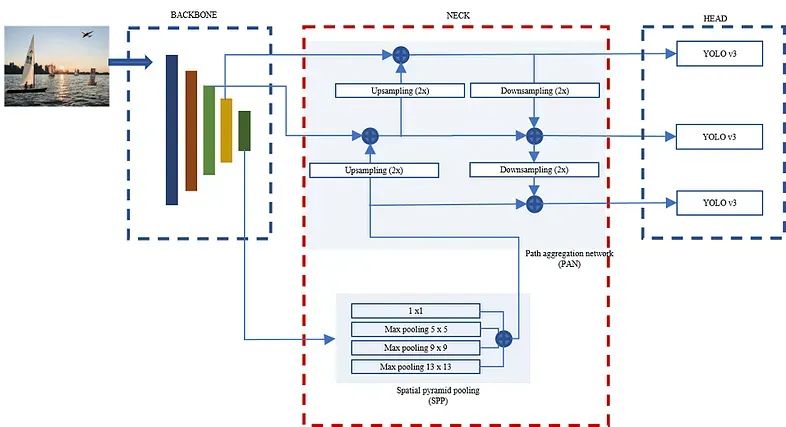
YOLOv4 是 YOLO 算法的第四次迭代,它通过引入单阶段、端到端方法彻底改变了目标检测。与传统的两级检测器不同,YOLOv4 单次处理整个图像,使其效率很高。它通过结合先进技术(包括强大的骨干网络、特征金字塔网络和多个检测头)来实现最先进的准确性。

理解代码
提供的代码使用 opencv 实现 YOLOv4。让我们一步步分解:
导入必要的包:我们首先导入所需的包,包括 OpenCV、NumPy、time 和 argparse。这些软件包提供了图像处理、数值运算和命令行参数解析所需的工具。
YOLOv4 类:
Yolov4 类封装了 YOLOv4 的功能。它初始化权重和配置文件路径,定义类列表,并使用cv2.dnn.readNetFromDarknet. 它还设置了推理所需的参数。
import cv2
import numpy as np
import time
import argparse

class Yolov4:
    def __init__(self):
        self.weights = opt.weights  # loading weights
        self.cfg = opt.cfg  # loading cfg file
        self.classes = ['person', 'bicycle', 'car', 'motorcycle', 'airplane', 'bus', 'train', 'truck', 'boat',
                        'traffic light', 'fire hydrant', 'stop sign', 'parking meter', 'bench',
                        'bird', 'cat', 'dog', 'horse', 'sheep', 'cow', 'elephant', 'bear', 'zebra', 'giraffe',
                        'backpack', 'umbrella', 'handbag', 'tie', 'suitcase', 'frisbee', 'skis',
                        'snowboard', 'sports ball', 'kite', 'baseball bat', 'baseball glove', 'skateboard', 'surfboard',
                        'tennis racket', 'bottle', 'wine glass', 'cup', 'fork', 'knife',
                        'spoon', 'bowl', 'banana', 'apple', 'sandwich', 'orange', 'broccoli', 'carrot', 'hot dog',
                        'pizza', 'donut', 'cake', 'chair', 'couch', 'potted plant', 'bed', 'dining table',
                        'toilet', 'TV', 'laptop', 'mouse', 'remote', 'keyboard',
                        'cell phone', 'microwave', 'oven', 'toaster', 'sink', 'refrigerator', 'book', 'clock', 'vase',
                        'scissors', 'teddy bear', 'hair drier', 'toothbrush']
        self.Neural_Network = cv2.dnn.readNetFromDarknet(self.cfg, self.weights)
        self.outputs = self.Neural_Network.getUnconnectedOutLayersNames()
        self.COLORS = np.random.randint(0, 255, size=(len(self.classes), 3), dtype="uint8")
        self.image_size = opt.img_size
bounding_box:
bounding_box方法采用 YOLOv4 模型的输出并提取边界框坐标、置信度分数和类标签。它应用置信度阈值并执行非极大值抑制以滤除弱检测和重叠框。
    def bounding_box(self, detections):
        try:
            confidence_score = []
            ids = []
            cordinates = []
            Threshold = 0.5
            for i in detections:
                for j in i:
                    probs_values = j[5:]
                    class_ = np.argmax(probs_values)
                    confidence_ = probs_values[class_]

                    if confidence_ > Threshold:
                        w, h = int(j[2] * self.image_size), int(j[3] * self.image_size)
                        x, y = int(j[0] * self.image_size - w / 2), int(j[1] * self.image_size - h / 2)
                        cordinates.append([x, y, w, h])
                        ids.append(class_)
                        confidence_score.append(float(confidence_))
            final_box = cv2.dnn.NMSBoxes(cordinates, confidence_score, Threshold, .6)
            return final_box, cordinates, confidence_score, ids

        except Exception as e:
            print(f'Error in : {e}')s
Predictions:
Predictions 方法采用过滤后的边界框信息,并将框、类标签和置信度分数叠加在原始图像上。它还计算推理时间并将其显示在图像上。
def predictions(self, prediction_box, bounding_box, confidence, class_labels, width_ratio, height_ratio, end_time,
                    image):
        try:
            for j in prediction_box.flatten():
                x, y, w, h = bounding_box[j]
                x = int(x * width_ratio)
                y = int(y * height_ratio)
                w = int(w * width_ratio)
                h = int(h * height_ratio)
                label = str(self.classes[class_labels[j]])
                conf_ = str(round(confidence[j], 2))
                color = [int(c) for c in self.COLORS[class_labels[j]]]
                cv2.rectangle(image, (x, y), (x + w, y + h), color, 2)
                cv2.putText(image, label + ' ' + conf_, (x, y - 2), cv2.FONT_HERSHEY_COMPLEX, .5, color, 2)
                time = f"Inference time: {end_time:.3f}"
                cv2.putText(image, time, (10, 13), cv2.FONT_HERSHEY_COMPLEX, .5, (156, 0, 166), 1)
            return image

        except Exception as e:
            print(f'Error in : {e}')
Inference:
Inference 方法对输入图像执行实际的推理。它预处理图像,将其设置为 YOLOv4 模型的输入,并检索输出预测。然后,它调用bounding_box和predictions函数来处理和可视化结果。
    def Inference(self, image, original_width, original_height):
        try:
            blob = cv2.dnn.blobFromImage(image, 1 / 255, (320, 320), True, crop=False)
            self.Neural_Network.setInput(blob)
            start_time = time.time()
            output_data = self.Neural_Network.forward(self.outputs)
            end_time = time.time() - start_time
            final_box, cordinates, confidence_score, ids = self.bounding_box(output_data)
            outcome = self.predictions(final_box, cordinates, confidence_score, ids, original_width / 320,
                                       original_height / 320, end_time, image)
            return outcome
        except Exception as e:
            print(f'Error in : {e}')
main方法
在代码的主要部分,我们使用 argparse 解析命令行参数。如果提供了图像路径或视频路径,则使用 Yolov4 类进行相应的推理。显示结果并可选择将其保存到视频文件中。
if __name__ == "__main__":
    parse=argparse.ArgumentParser()
    parse.add_argument('--weights', type=str, default='yolov4.weghts', help='weights path')
    parse.add_argument('--cfg', type=str, default='yolov4.cfg', help='cfg path')
    parse.add_argument('--image', type=str, default='', help='image path')
    parse.add_argument('--video', type=str, default='', help='video path')
    parse.add_argument('--img_size', type=int, default='', help='size of w*h')
    opt = parse.parse_args()
    obj = Yolov4()  # constructor called and executed


    if opt.image:
        try:
            image = cv2.imread(opt.image, 1)
            original_width , original_height = image.shape[1] , image.shape[0]
            obj.Inference(image=image,original_width=original_width,original_height=original_height)
            cv2.imshow('Inference ',image)
            cv2.waitKey()
            cv2.destroyAllWindows()
        except Exception as e:
            print(f'Error in : {e}')

    if opt.video:
        try:
            cap = cv2.VideoCapture(opt.video)
            fps = cv2.CAP_PROP_FPS
            width = cap.get(3)
            height = cap.get(4)
            fourcc = cv2.VideoWriter_fourcc(*'XVID')
            output = cv2.VideoWriter("demo.avi", fourcc, fps, (int(width), int(height)))
            while cap.isOpened():
                res, frame = cap.read()
                if res == True:
                    outcome = obj.Inference(image=frame, original_width=width, original_height=height)
                    cv2.imshow("demo", outcome)
                    output.write(outcome)
                    if cv2.waitKey(1) & 0xFF == ord('q'):
                        break
                else:
                    break
            cap.release()
            cv2.destroyAllWindows()
        except Exception as e:
            print(f'Error in : {e}')
运行代码
要尝试 YOLOv4 实现,请按照以下步骤操作:
- 确保安装了所需的依赖项,包括 OpenCV。
- 在此处下载 YOLOv4 权重和配置文件:https://www.google.com/url?sa=t&rct=j&q=&esrc=s&cd=&ved=2ahUKEwieo_mRqoyAAxUMSmwGHfqfCyYQFnoECBcQAQ&url=https%3A%2F%2Fgithub.com%2FAlexeyAB%2Fdarknet%2Freleases%2Fdownload%2Fdarknet_yolo_v3_optimal%2Fyolov4.weights&usg=AOvVaw30if4joxtTaS8DAh12vYQ4&opi=89978449并将配置文件(https://github.com/kamal3344/v4-Inference/blob/main/yolov4.cfg)放在与代码相同的目录中。
- 打开终端或命令提示符并导航到包含代码的目录。
- 要对图像执行对象检测,请运行命令
python yolov4.py --image path/to/image.jpg。替换path/to/image.jpg为图像文件的实际路径。 - 要对视频执行对象检测,请运行命令
python yolov4.py --video path/to/video.mp4。替换path/to/video.mp4为视频文件的实际路径。 - for images = python Inference_args.py — weights yolov4.weights — cfg=yolov4.cfg — image=bus.jpg — img_size=320
- for videos = python Inference_args.py — weights yolov4.weights — cfg=yolov4.cfg — video=traffic_signs.mp4 — img_size=320
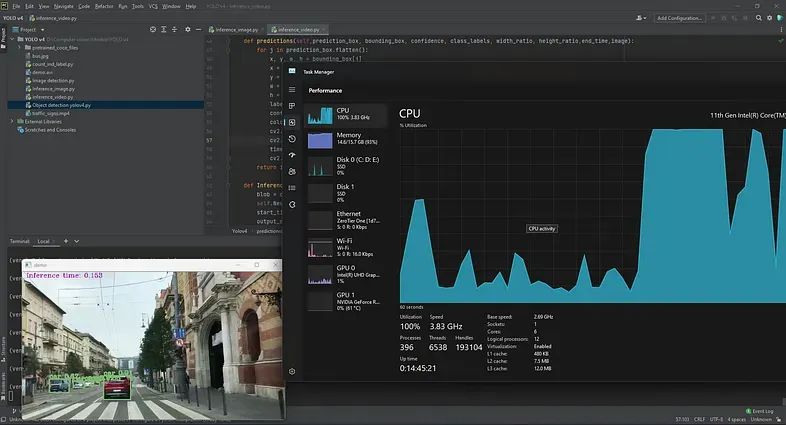
资源利用率
如果你当前在CPU上使用OpenCV运行YOLOv4推理,你可能会遇到CPU占用率较高的情况,CPU利用率达到90%以上。为了提高性能并获得更好的每秒帧速率 (FPS),建议使用 GPU 加速。
结论
在这篇博文中,我们探索了 YOLOv4 算法并学习了如何使用 opencv 实现它。我们讨论了架构,解释了代码,并演示了如何对图像和视频执行对象检测。YOLOv4 是一种强大的算法,在保持实时性能的同时实现了令人印象深刻的准确性,使其成为各种计算机视觉应用中的宝贵工具。
请随意尝试代码并将 YOLOv4 应用到你自己的项目中。
代码文件:https://github.com/kamal3344/v4-Inference
作者:磐怼怼
来源:深度学习与计算机视觉
原文:https://mp.weixin.qq.com/s/87aeQpJ_3yW2BYUJpE4I7w
版权声明:本文内容转自互联网,本文观点仅代表作者本人。本站仅提供信息存储空间服务,所有权归原作者所有。如发现本站有涉嫌抄袭侵权/违法违规的内容, 请发送邮件至1393616908@qq.com 举报,一经查实,本站将立刻删除。