
YOLO(You Only Look Once)是一种流行的用于对象检测的开源神经网络模型。在这篇文章中,我们将解释如何使用 YOLO 提取一堆人(或至少一个人)的图像。
首先,我们需要安装 YOLO 库和依赖项。为此,我们将使用 pip 包管理器并安装以下库:
pip install numpy
pip install opencv-python
pip install tensorflow
pip install keras
接下来我们从官网下载预训练好的YOLO权重和配置文件。这些文件可以在https://pjreddie.com/darknet/yolo/找到。
一旦我们有了权重和配置文件,我们就可以使用它们对我们的图像执行对象检测。
以下是如何使用 YOLO 检测图像中人物的示例:
import cv2
import numpy as np

# Load YOLO model
net = cv2.dnn.readNet("./yolov3.weights", "./darknet/cfg/yolov3.cfg")

# Define input image
image = cv2.imread("image.jpg")

# Get image dimensions
(height, width) = image.shape[:2]

# Define the neural network input
blob = cv2.dnn.blobFromImage(image, 1 / 255.0, (416, 416), swapRB=True, crop=False)
net.setInput(blob)

# Perform forward propagation
output_layer_name = net.getUnconnectedOutLayersNames()
output_layers = net.forward(output_layer_name)

# Initialize list of detected people
people = []

# Loop over the output layers
for output in output_layers:
    # Loop over the detections
    for detection in output:
        # Extract the class ID and confidence of the current detection
        scores = detection[5:]
        class_id = np.argmax(scores)
        confidence = scores[class_id]

        # Only keep detections with a high confidence
        if class_id == 0 and confidence > 0.5:
            # Object detected
            center_x = int(detection[0] * width)
            center_y = int(detection[1] * height)
            w = int(detection[2] * width)
            h = int(detection[3] * height)

            # Rectangle coordinates
            x = int(center_x - w / 2)
            y = int(center_y - h / 2)

            # Add the detection to the list of people
            people.append((x, y, w, h))

# Draw bounding boxes around the people
for (x, y, w, h) in people:
    cv2.rectangle(image, (x, y), (x + w, y + h), (0, 255, 0), 2)

# Show the image
cv2.imshow("Image", image)
cv2.waitKey(0)在这个例子中,我们首先使用cv2.dnn.readNet方法加载 YOLO 模型。然后,我们定义输入图像并获取其尺寸。
接下来,我们通过从图像创建一个斑点并对其像素值进行归一化来定义神经网络输入。
最后,我们执行前向传播并在输出层上循环,以提取检测并提取人周围的边界框坐标(我们的兴趣在于人检测)。
然后我们可以使用cv2.rectangle方法在原始图像上的人周围绘制边界框。
运行此代码后,你应该能够看到检测到的任何人周围都带有边界框。
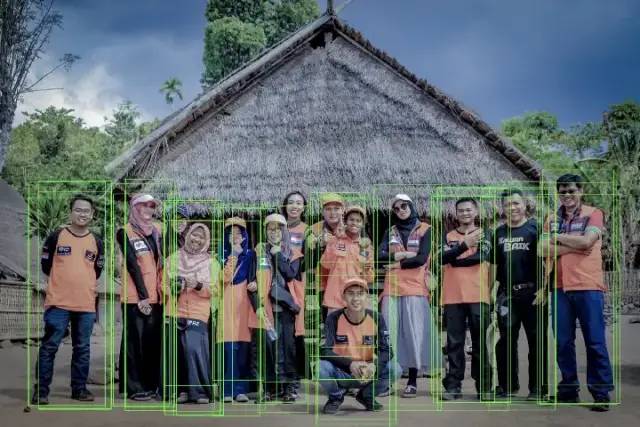

YOLO 对象检测 | 来源(https://unsplash.com/photos/kY8m5uDIW7Y)
如果你想去除重复的矩形,你可以使用 NMS,例如:
cv2.dnn.NMSBoxes(boxes, confidences, score_threshold=0.5, nms_threshold=0.4)此外,可以为每个检测到的矩形添加一个标题:
cv2.putText(image, label, (x, y + 30), font, 2, color, 3)输出是:
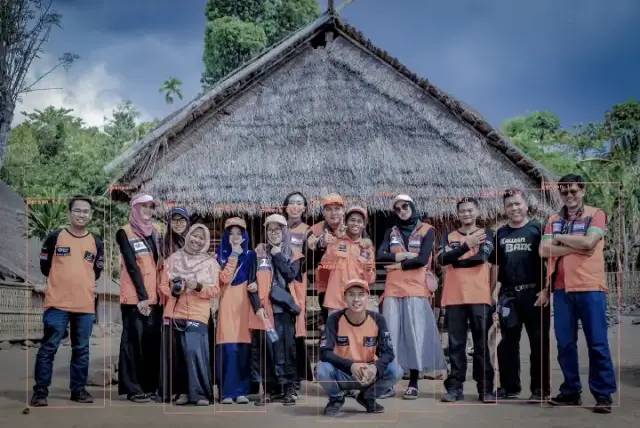
YOLO 对象检测(带标签的对象)| 来源(https://unsplash.com/photos/kY8m5uDIW7Y)
现在你可以轻松地计算图像中的人数。
作者:磐怼怼 | 来源:公众号——深度学习与计算机视觉
版权声明:本文内容转自互联网,本文观点仅代表作者本人。本站仅提供信息存储空间服务,所有权归原作者所有。如发现本站有涉嫌抄袭侵权/违法违规的内容, 请发送邮件至1393616908@qq.com 举报,一经查实,本站将立刻删除。