
深度学习使机器能够从大量数据中学习和改进,从而彻底改变了人工智能领域。Mediapipe 是一个用于构建多模式 ML 管道的跨平台开源框架,它引入了一个新的任务 API,可以比以往更轻松地将深度学习模型整合到你的项目中。
本文将探索三个使用 Mediapipe Tasks API 的激动人心的项目,这些项目专注于一个单独的领域:音频、图像和文本。通过这些示例,你将学习如何应用深度学习来解决现实世界的问题并构建后端应用程序。
在开始构建端到端项目之前,让我们先看看 Mediapipe。
什么是 Mediapipe 任务 API?
Mediapipe 是一个开源且灵活的框架,用于构建多模式 ML 管道,允许开发人员为音频、图像和其他传感器数据创建复杂的处理图。它提供了一组称为“图形”的预构建组件,可以轻松组合以创建端到端的 ML 管道。
随着最近发布的 Mediapipe Tasks API,开发人员现在可以访问针对各种任务(包括音频、图像和文本处理)的预训练深度学习模型。这些预训练模型使用最先进的技术在大型数据集上进行训练。它们以“tflite”格式提供,针对广泛的边缘设备(如 IoT 和 Android/IOS)部署进行了优化。
Tasks API 为使用这些模型提供了一个简单且兼容的接口,使开发人员可以轻松地将深度学习集成到他们的项目中,而无需深入了解底层模型。
Mediapipe的安装
要在本地系统中安装 mediapipe,你可以使用 pip install 和特定版本的 mediapipe。
pip install mediapipe==0.9.1
还可以使用 Google Colab 运行以下项目。在 Google 命令中运行以下命令:
!pip install -q flatbuffers==2.0.0
!pip install -q mediapipe==0.9.1
让我们继续构建我们的第一个项目。
项目 1:构建你自己的对象检测
对象检测是一种计算机视觉技术,用于识别和定位图像或视频中的对象。这是监控、自动驾驶汽车和机器人等各种应用中的一项关键任务。
简单来说,对象检测就像在图片或视频中寻找隐藏的宝藏。想象一下玩一个游戏来定位隐藏在图像中的所有对象。对象检测就像一台玩游戏的计算机,但它不是为了好玩而寻找物体,而是帮助我们解决现实世界的问题。
现在在这个项目中,你将:
- 了解 Mediapipe Tasks API 如何通过提供预训练模型和机器学习算法来简化对象检测过程。
- 了解 tflite 格式的重要性以及它如何帮助开发人员在移动设备上部署 c。
使用 OpenCV 和 Mediapipe 实现对象检测
首先,我们需要导入所需的库。
import cv2
import matplotlib.pyplot as plt

import mediapipe as mp
from mediapipe.tasks import python
from mediapipe.tasks.python import vision
下载预训练模型:Efficientdet Lite 模型。你可以使用检测对象所需的任何输入图像。
model = "efficientdet_lite2_uint8.tflite"img = plt.imread(f"{input_image}")plt.imshow(img)

#use Mediapipe Tasks API
base_options = python.BaseOptions(model_asset_path=model)
options = vision.ObjectDetectorOptions(base_options=base_options,score_threshold=0.5)
detector = vision.ObjectDetector.create_from_options(options)

#using Mediapipe Image Attribute initialize the input image path.
image = mp.Image.create_from_file(input_image)
detect_image = detector.detect(image)
image = image.numpy_view()
Mediapipe Tasks API 基于三个端点工作:
- BaseOptions:此行使用 TFLite 格式的对象检测模型路径初始化 BaseOptions 类,在本例中为“efficientdet_lite2.tflite”。
- ObjectDetectorOptions:此行使用 BaseOptions 对象作为参数初始化 ObjectDetectorOptions 类。此外,它将目标检测的最小分数阈值设置为 0.5,这表示只有当概率分数大于 0.5 时才会标记边界框。
- ObjectDetector:此行使用 ObjectDetectorOptions 对象作为参数创建 ObjectDetector 类的实例。create_from_options 方法使用指定的选项初始化 ObjectDetector。
由于我们使用Mediapipe读取输入图像路径,因此需要将其转换为numpy以在检测到的对象上添加边界框、标签和mAP分数。
for detection in detect_image.detections:
# Insert bounding_box
bbox = detection.bounding_box
# the bounding box contains four parameters:
#x, y, width and height
start_point = bbox.origin_x, bbox.origin_y
end_point = bbox.origin_x + bbox.width, bbox.origin_y + bbox.height
cv2.rectangle(image, start_point, end_point, (0,255,0), 25)
# mAP score and the Detected image label
target = detection.categories[0]
category_name = target.category_name
score = round(target.score, 2)
label = f"{category_name}:{score}"
loc = (bbox.origin_x+15,bbox.origin_y+25)
cv2.putText(image, label, loc, cv2.FONT_HERSHEY_DUPLEX,14,(255,0,0),20)
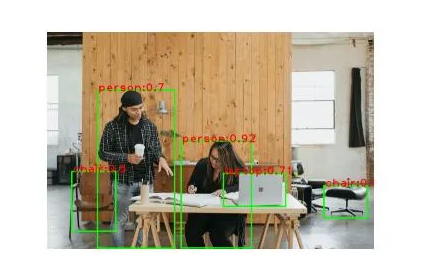
plt.imshow(image)提供的代码通过在每个检测到的对象周围绘制一个边界框来检测图像中的对象,并在图像上显示对象标签及其 mAP 分数。
为此,OpenCV 库有助于在图像上绘制边界框和文本。
综合起来:使用 Mediapipe Tasks API 进行对象检测
import cv2
import matplotlib.pyplot as plt

import mediapipe as mp
from mediapipe.tasks import python
from mediapipe.tasks.python import vision

input_image = "surface-81OnSSXJo-I-unsplash.jpg"
model = "efficientdet_lite2_uint8.tflite"

#use Mediapipe Tasks API
base_options = python.BaseOptions(model_asset_path=model)
options = vision.ObjectDetectorOptions(base_options=base_options,score_threshold=0.5)
detector = vision.ObjectDetector.create_from_options(options)

#using Mediapipe Image Attribute initialize the input image path.
image = mp.Image.create_from_file(input_image)
detect_image = detector.detect(image)

image = image.numpy_view()
for detection in detect_image.detections:
    # Insert bounding_box
    bbox = detection.bounding_box
    # the bounding box contains four parameters:
    #x, y, width and height
    start_point = bbox.origin_x, bbox.origin_y
    end_point = bbox.origin_x + bbox.width, bbox.origin_y + bbox.height
    cv2.rectangle(image, start_point, end_point, (0,255,0), 25)

    # mAP score and the Detected image label
    target = detection.categories[0]
    category_name = target.category_name
    score = round(target.score, 2)
    label = f"{category_name}:{score}"
    loc = (bbox.origin_x+15,bbox.origin_y+25)
    cv2.putText(image, label, loc, cv2.FONT_HERSHEY_DUPLEX,14,(255,0,0),20)

plt.imshow(image)
plt.axis("off")
项目 2:检测语音或静音的音频分类
音频分类涉及根据音频信号的内容将音频信号分类到预定义的类别中。这是一项重要的任务,因为它在音乐、语音识别和声音监控方面有很多应用。
Mediapipe 任务 API 为音频分类应用程序提供了一系列 ML 算法。这些算法针对处理顺序数据进行了优化,并且能够学习音频信号中的复杂模式。流行的算法包括 RNN 和 CNN,它们能够处理音频信号的频谱图和其他时频表示。
使用 Mediapipe 实现音频分类
首先,导入所需的库。在我们的示例中,我们将使用 .wav 音频文件,因此从 scipy.io 导入 wavfile 来处理输入音频文件。
from mediapipe.tasks import python
from mediapipe.tasks.python.components import containers
from mediapipe.tasks.python import audio
from scipy.io import wavfile
import urllib
import numpy as np
Yamnet 是使用 Mediapipe 对音频信号进行分类的迁移学习技术。我们不必担心将时域信号转换为频域信号。Yamnet 的预训练模型会处理这个问题。
下载模型:https://storage.googleapis.com/mediapipe-assets/yamnet_audio_classifier_with_metadata.tflite
model = "yamnet_audio_classifier_with_metadata.tflite"

#download sample audio file
audio_file_name = 'speech_16000_hz_mono.wav'
url = f'https://storage.googleapis.com/mediapipe-assets/{audio_file_name}'
urllib.request.urlretrieve(url, audio_file_name)
可以使用以下代码显示示例音频:
from IPython.display import Audio, display

file_name = 'speech_16000_hz_mono.wav'
display(Audio(file_name, autoplay=False))
音频只有 4 秒,既是语音又是无声背景音。此处音频分类的目标是预测音频是否包含语音或静音。该过程类似于前面的代码示例。
对于 AudioClassifierOptions,我们传递 max_results 而不是阈值分数。
max_results=4 指定要记录在音频文件中的时间戳。
max_results 指定分类器应返回的最大分类结果数。在本例中,该值设置为 4,这意味着分类器将返回最多 4 个不同的预测,并按其置信度排序。
#mediapipe tasks API endpoints
base_options = python.BaseOptions(model_asset_path=model)
options = audio.AudioClassifierOptions(base_options=base_options, max_results=4)
classifier = audio.AudioClassifier.create_from_options(options)
要读取输入音频文件并处理 AudioData,我们使用 scipy 和 Mediapipe 容器组件。
sample_rate, wav_data = wavfile.read(audio_file_name)
audio_clip = containers.AudioData.create_from_array(wav_data.astype(float) / np.iinfo(np.int16).max, sample_rate)
result = classifier.classify(audio_clip)
现在我们将循环遍历时间戳的结果列表和相应的分类结果,并打印出每个时间戳的最高分类标签和分数。
for idx, timestamp in enumerate([0,750,1500,3000,4500]):
    target = result[idx]
    label = target.classifications[0].categories[0]
    print(f'Timestamp {timestamp}: {label.category_name} ({label.score})')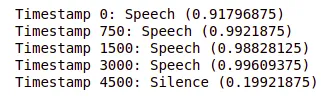
综合起来:使用 Mediapipe Tasks API 进行音频分类
from mediapipe.tasks import python
from mediapipe.tasks.python.components import processors
from mediapipe.tasks.python.components import containers
from mediapipe.tasks.python import audio
from scipy.io import wavfile
import urllib
import numpy as np

model = "yamnet_audio_classifier_with_metadata.tflite"

#download sample audio file from Mediapipe Assets storageapis
audio_file_name = 'speech_16000_hz_mono.wav'
url = f'https://storage.googleapis.com/mediapipe-assets/{audio_file_name}'
urllib.request.urlretrieve(url, audio_file_name)

base_options = python.BaseOptions(model_asset_path=model)
options = audio.AudioClassifierOptions(base_options=base_options, max_results=4)
classifier = audio.AudioClassifier.create_from_options(options)

sample_rate, wav_data = wavfile.read(audio_file_name)
audio_clip = containers.AudioData.create_from_array(wav_data.astype(float) / np.iinfo(np.int16).max, sample_rate)
result = classifier.classify(audio_clip)

for idx, timestamp in enumerate([0,750,1500,3000,4500]):
    target = result[idx]
    label = target.classifications[0].categories[0]
    print(f'Timestamp {timestamp}: {label.category_name} ({label.score})')
项目三:文本情感分析
情感分析是自然语言处理的一个子领域,旨在从文本中提取信息,例如个人表达的观点、情感和态度。情感分析的目标是自动对一段文本的极性进行分类,是积极的、消极的还是中性的。
在漫画中,情感分析提取角色对话或特定场景的情感基调。借助情绪分析,我们可以自动将对话的情绪归类为负面情绪,这可以帮助我们了解角色的感受以及情绪如何影响故事情节。
在此示例中,我们将从 DC/Marvel 漫画中获取两个对话,并使用 Mediapipe 预训练的 BERT 模型应用情感分析。
使用 Mediapipe 实施情感分析
这个程序非常简单。由于这是第三个项目,你现在已经了解如何在 Python 程序中使用 API 端点。这是一个 NLP 项目,我们的输入现在是文本。
from mediapipe.tasks import python
from mediapipe.tasks.python import text

sample_text1 = "We’ll do our part, dear sister, and let our maker do his!…It’ll work out"
sample_text2 = "Some people are in such utter darkness that they will burn you just to see a light"
让我们定义任务 API 的三个 API 端点。下载预训练的transformer模型:https://storage.googleapis.com/mediapipe-tasks/text_classifier/bert_text_classifier.tflite
model = "bert_text_classifier.tflite"
base_options = python.BaseOptions(model_asset_path=model)
options = text.TextClassifierOptions(base_options=base_options)
classifier = text.TextClassifier.create_from_options(options)
我希望在这一点上,上述代码是不言自明的。我们使用相同的 3 个 API 端点对文本的标签或情感进行分类。
for input_text in [sample_text1,sample_text2]:
    sentiment = classifier.classify(input_text)
    label = sentiment.classifications[0].categories[0]
    print(f"{input_text} is:n {label.category_name}. Score:{label.score}n")
综合起来:使用 Mediapipe Tasks API 进行文本情感分析
from mediapipe.tasks import python
from mediapipe.tasks.python import text

#example text to classify
sample_text1 = "We’ll do our part, dear sister, and let our maker do his!…It’ll work out"
sample_text2 = "Some people are in such utter darkness that they will burn you just to see a light"

#define mediapipe API endpoints
model = "bert_text_classifier.tflite"
base_options = python.BaseOptions(model_asset_path=model)
options = text.TextClassifierOptions(base_options=base_options)
classifier = text.TextClassifier.create_from_options(options)

#get the sentiment
for input_text in [sample_text1,sample_text2]:
    sentiment = classifier.classify(input_text)
    label = sentiment.classifications[0].categories[0]
    print(f"{input_text} is:n {label.category_name}. Score:{label.score}n")
是的,我们做到了! 👍
结论
总之,Mediapipe Tasks API 已被证明是在实际项目中实施深度学习模型的强大工具。关键要点是:
- Mediapipe Tasks API 是一种多功能且易于使用的工具,用于在实际项目中实施深度学习模型。其预训练模型准确且稳健,并为数据处理和模型评估提供了广泛的 API 和工具。
- 通过使用 Tasks API 构建三个项目,我们展示了深度学习在解决各个领域问题中的适用性。从图像中的对象检测到音频分类和情感分析,深度学习已被用于各种任务的自动化。
- 预训练模型是深度学习项目的重要组成部分,因为它们提供了训练的起点,并且与从头开始训练模型相比可以节省时间和资源。
- Mediapipe 与其他工具和 API 的集成非常简单。
作者:磐怼怼 | 来源:公众号——深度学习与计算机视觉
版权声明:本文内容转自互联网,本文观点仅代表作者本人。本站仅提供信息存储空间服务,所有权归原作者所有。如发现本站有涉嫌抄袭侵权/违法违规的内容, 请发送邮件至1393616908@qq.com 举报,一经查实,本站将立刻删除。